Lab - Image Configuration
Overview
Learn about basic Image Management
Image Configuration
Nutanix’s Image Service is where you can store your build ISOs, as well as Disk Images you create (similar to VMware Templates).
We will upload CentOS ISO to use for deploying VMs.
In Prism Central > Explore, click Images.
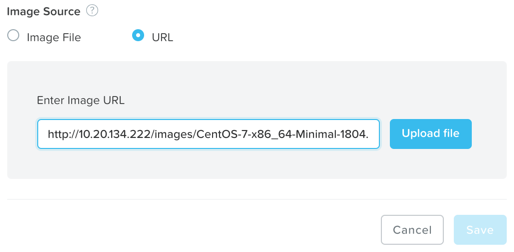
Next click Add Image, and click URL.
Fill out the following fields and click Upload File:
Enter Image URL - http://10.20.134.222/images/CentOS-7-x86_64-Minimal-1804.iso
Next, fill out the following fields and click Save:
Image Name - CentOS7-initials
Image Type - ISO
Image Description - (Optional) Add a description

Note
Image management in Prism Central allows you to upload images that can be used to deploy workloads in any of the clusters registered to that Prism Central instance.
Now we will upload Windows 2012 ISO to use for deploying VMs, if the cluster doesn’t already have this image available.
Click Add Image, and click URL.
Fill out the following fields and click Upload File:
Enter Image URL - http://10.20.134.222/images/server_2012_r2_vl_x64_dvd_3319595.iso
Next, fill out the following fields and click Save:
Image Name - Windows2012-initials
Image Type - ISO
Image Description - (Optional) Add a description
Note
Image management in Prism Central allows you to upload images that can be used to deploy workloads in any of the clusters registered to that Prism Central instance. An image can also be uploaded directly from a cluster’s Prism Element. This tool can also convert VM disk images to formats that AHV can understand. The image service supports raw, vhd, vhdx, vmdk, vdi, iso, and qcow2 disk formats.