Calm: Infrastructure as a Service
The estimated time to complete this lab is ?? minutes.
Overview
Nutanix Calm allows you to seamlessly select, provision, and manage your business applications across your infrastructure for both the private and public clouds. Nutanix Calm provides App lifecycle, monitoring and remediation to manage your heterogeneous infrastructure, for example, VMs or bare-metal servers. Nutanix Calm supports multiple platforms so that you can use a single self-service and automation interface to manage all your infrastructure.
Infrastructure-as-a-Service (IaaS) is defined as the ability to quickly provide compute resources, on-demand through a self service portal. While many customers utilize Nutanix Calm to orchestrate complex, multi-tiered applications, a significant portion of customers also utilize Calm to provide basic IaaS for their end users.
In this lab you’ll create a “Single VM Blueprint” based on either a Linux or Microsoft OS, launch the blueprint, and manage the resulting application.
Creating a Single VM Blueprint
A blueprint is the framework for every application or piece of infrastructure that you model by using Nutanix Calm. While complex, multi-tiered applications utilize the “Multi VM/Pod Blueprint”, the streamlined interface of the “Single VM Blueprint” is conducive for IaaS use cases. You can model each type of infrastructure your company utilizes (for instance Windows, CentOS, and/or Ubuntu) in a Single VM blueprint, and end users can repeatedly launch the blueprint to create infrastructure on demand. The resulting infrastructure (which is still referred to as an “application”), can then be managed throughout its entire lifecycle within Calm, including managing Nutanix Guest Tools (NGT), modifying resources, snapshotting, and cloning.
In this lab, you have the option of either creating a CentOS 7 Linux server, or Windows 2016 server. It is recommended to start with the OS that you’re most familiar with. If desired, repeat the lab with the other OS after you’ve completed it with your first OS.
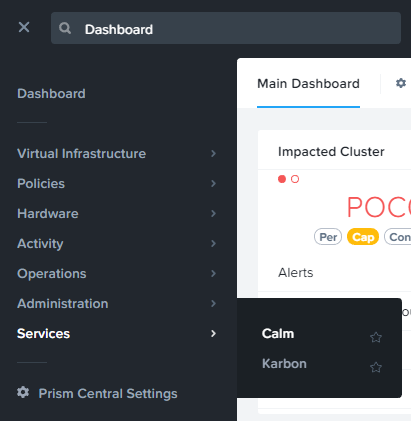
In Prism Central, select > Services > Calm.
Select
 Blueprints in the left hand toolbar to view and manage Calm blueprints.
Note
Mousing over an icon will display its title.
Click + Create Blueprint > Single VM Blueprint.
Fill out the following fields:
Name - Initials-CentOS-IaaS or Initials-Windows-IaaS, depending on your OS choice
Description - Something descriptive of your choice
Project - Initials-Calm
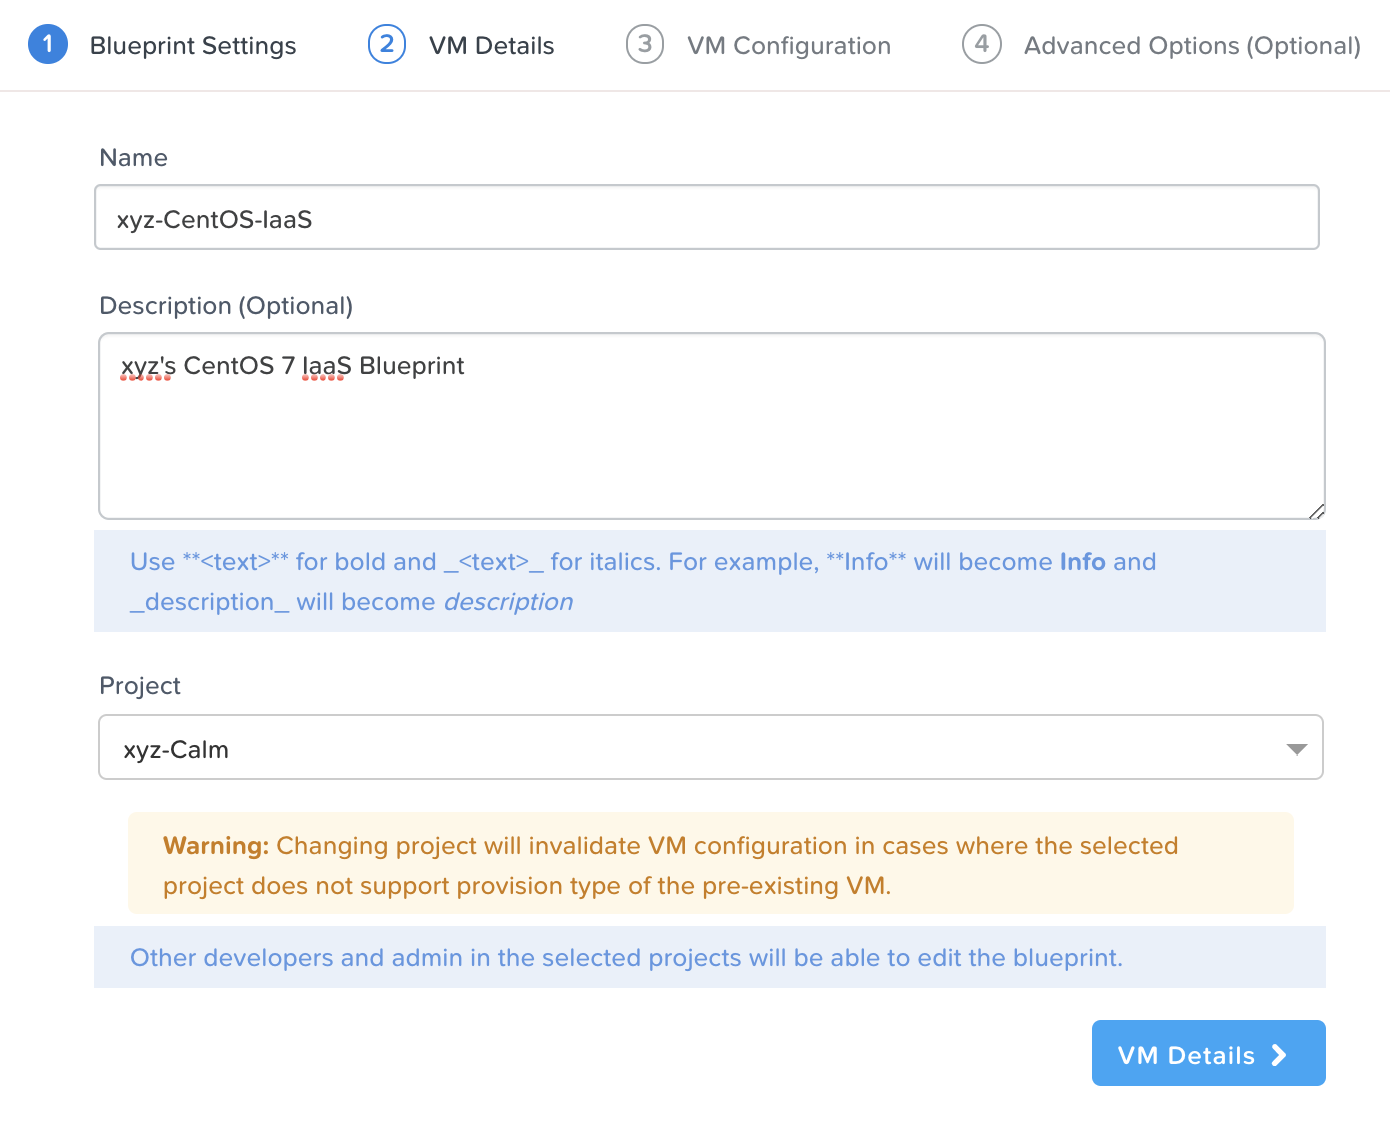
CentOS 7 Blueprint Settings
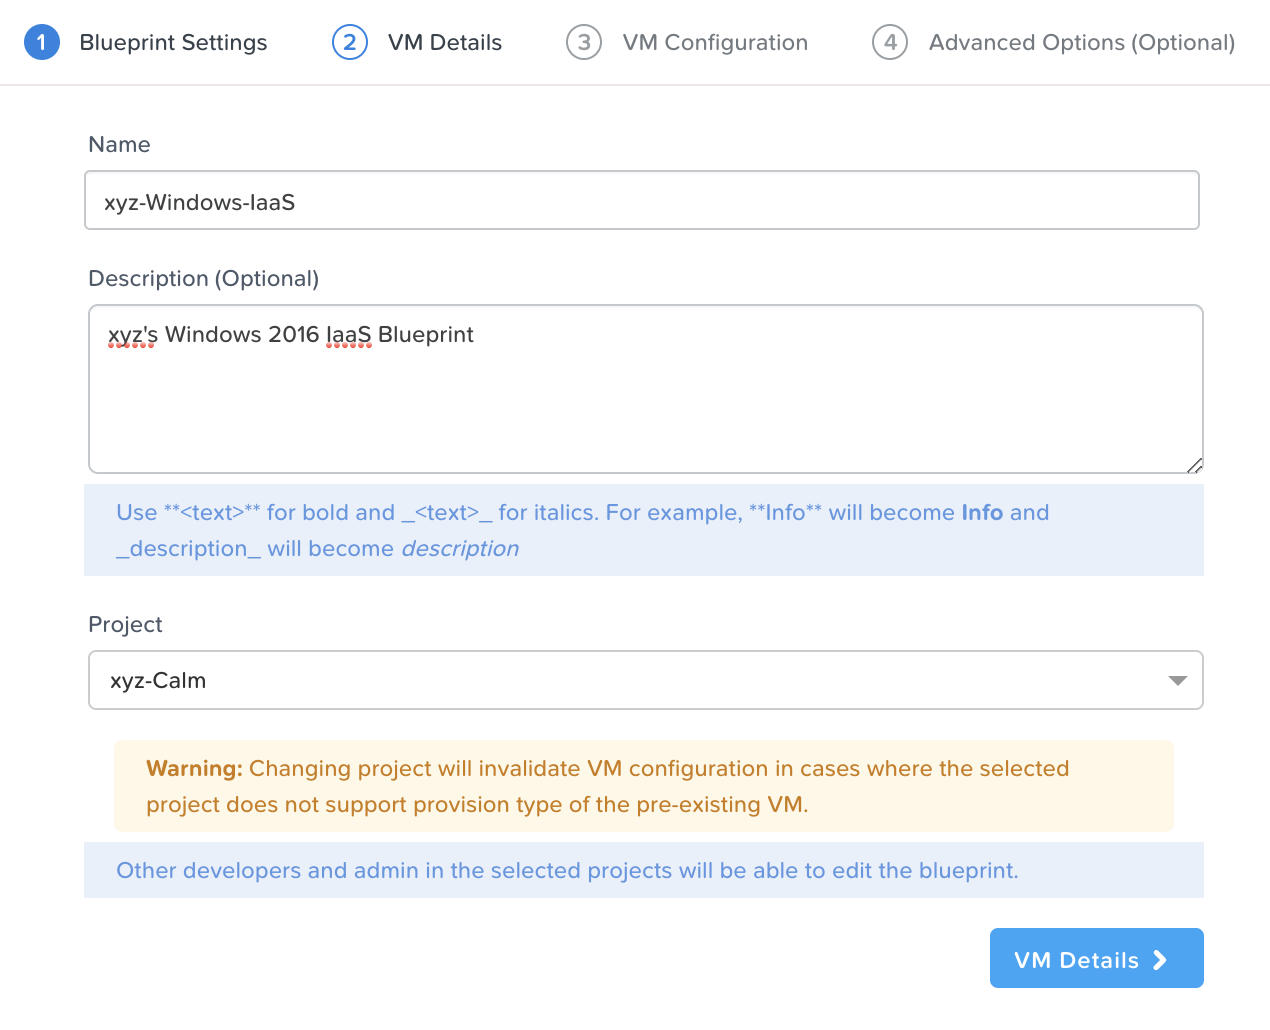
Windows 2016 Blueprint Settings
Click VM Details to proceed to the next step.
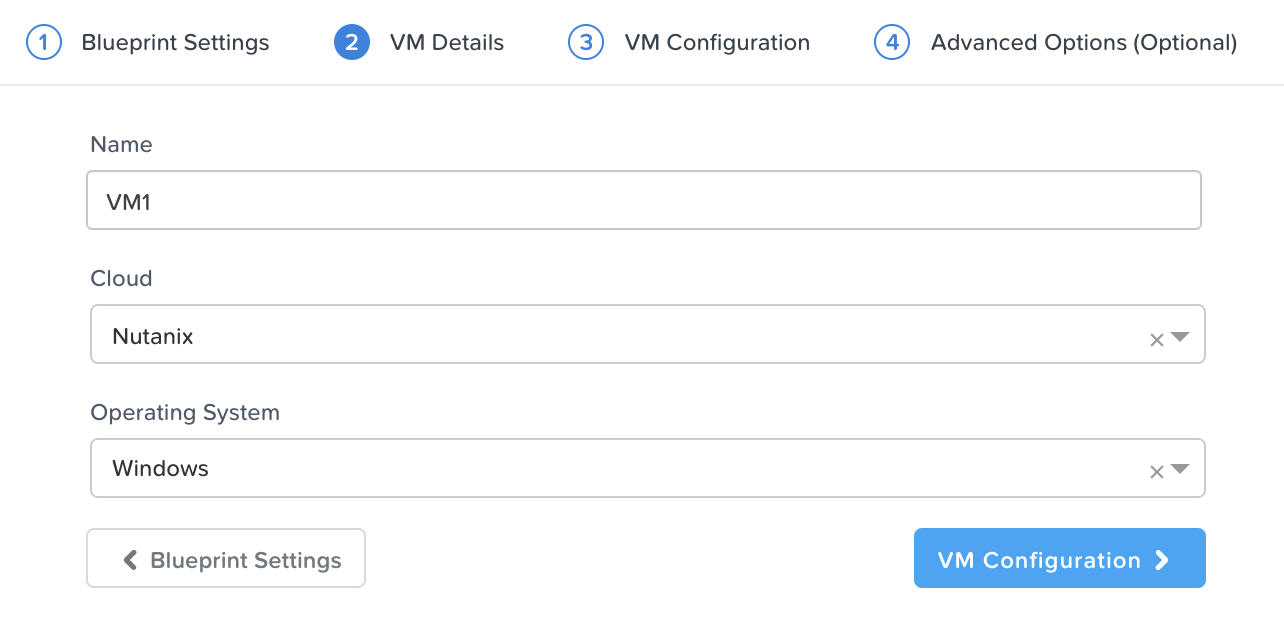
Note the following fields on the VM Details page:
Name - The internal-to-Calm name of the VM. Can be left as default.
Cloud - The cloud we’re deploying the infrastructure on. Should be left as Nutanix.
Operating System - The type of OS we’re deploying. It should be left as Linux if you’re using CentOS 7, or changed to Windows if using Windows 2016.
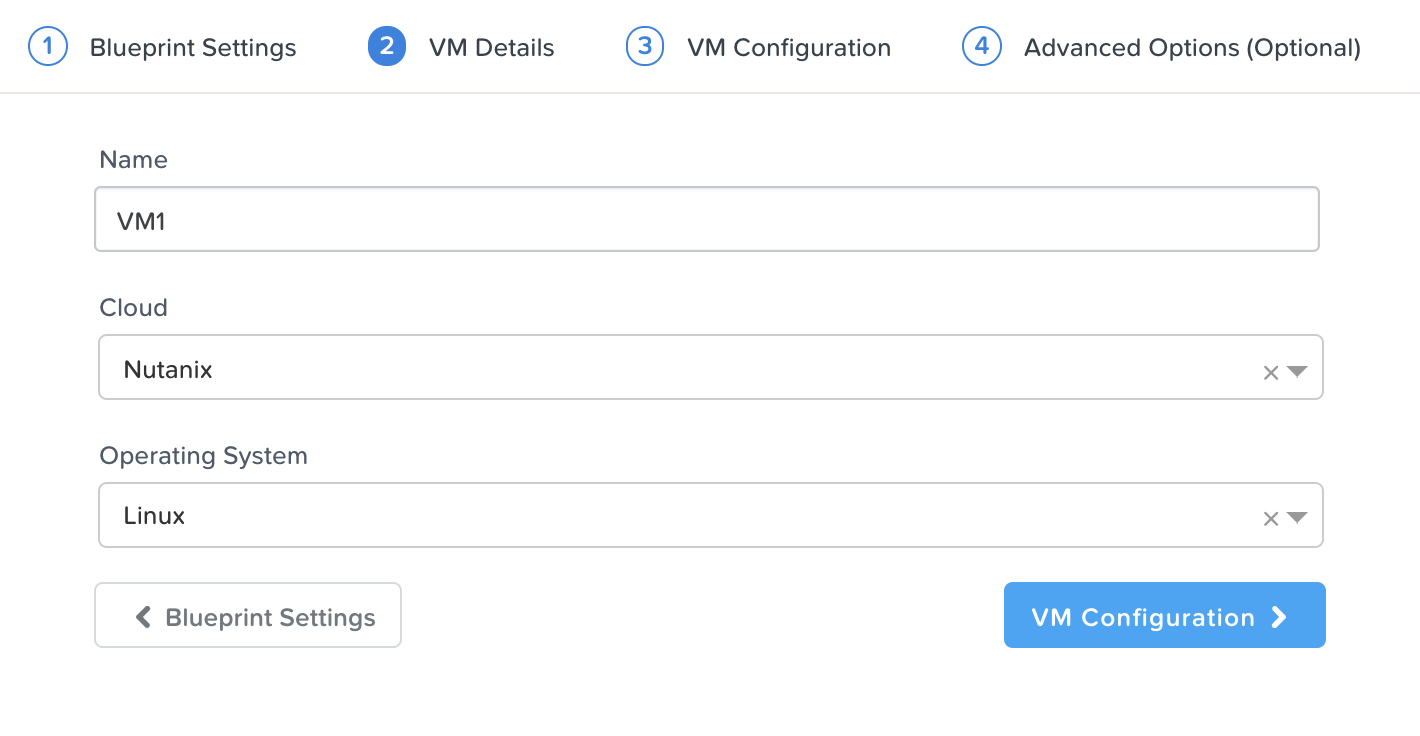
CentOS 7 VM Details
Windows 2016 VM Details
Click VM Configuration to proceed to the next step.
On this page, we’ll be specifying a variety of settings for our infrastructure.
General Configuration
VM Name - this is the name of the virtual machine according to the hypervisor/cloud. It can be left as default.
vCPUs - the number of vCPUs to assign to the VM. For CentOS, enter 2. For Windows, enter 4. For both, mark the field as runtime by clicking the running man icon so it turns blue. This allows the end user to modify this field at launch.
Cores per vCPU - the number of cores per vCPU to assign to the VM. For both OSes, enter 1.
Memory (GiB) - the amount of RAM to assign to the VM. For CentOS, enter 4. For Windows, enter 6. Mark this field as runtime.
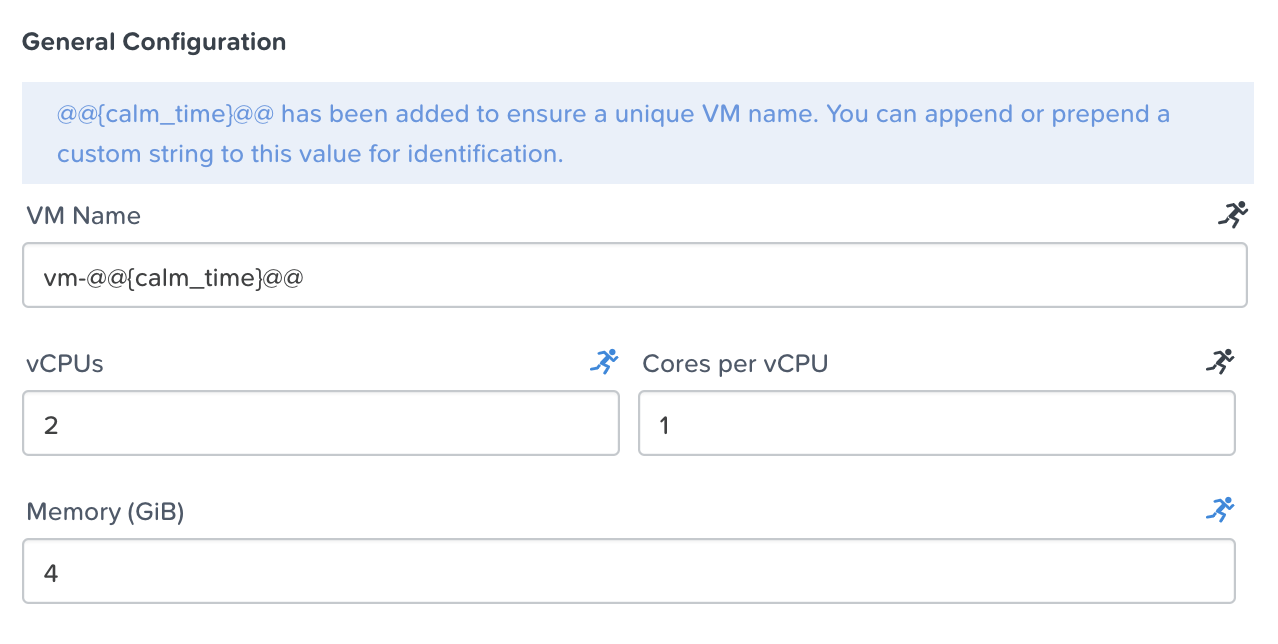
CentOS 7 VM Configuration - General Configuration
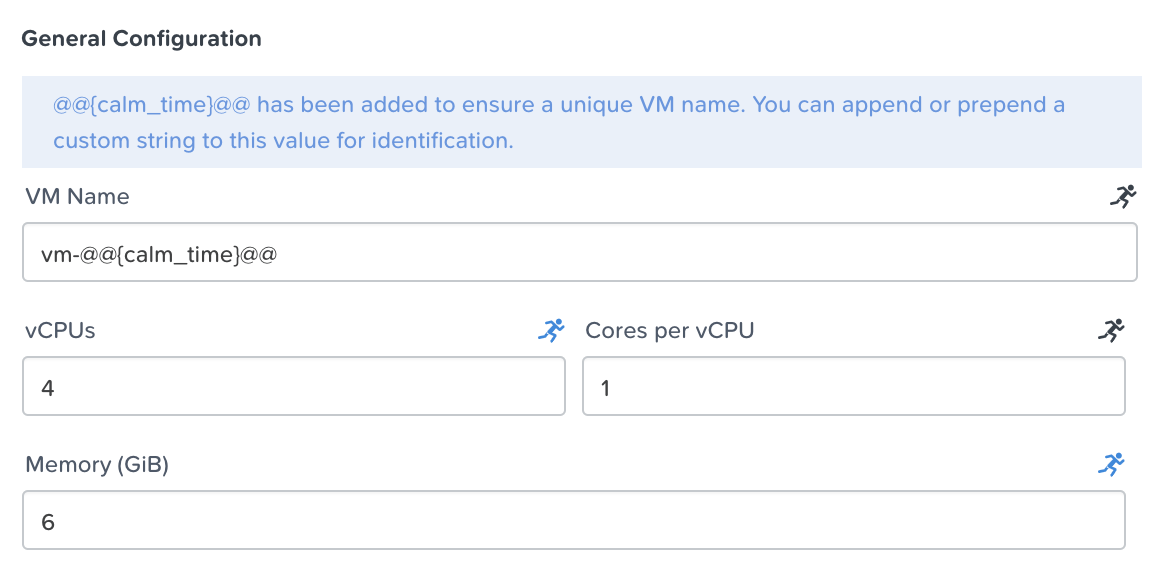
Windows 2016 VM Configuration - General Configuration
Guest Customization - Guest customization allows for the modification of certain settings at boot. Linux OSes use “Cloud Init”, while Windows OSes use “Sysprep”. Select the Guest Customization, and then paste in one of the two following scripts, depending on your OS. If you’re deploying Windows, leave the Install Type (Prepared) and Join a Domain (un-checked) as defaults.
CentOS 7
#cloud-config
users:
  - name: centos
    sudo: ['ALL=(ALL) NOPASSWD:ALL']
chpasswd:
  list: |
    centos:@@{vm_password}@@
  expire: False
ssh_pwauth:   true
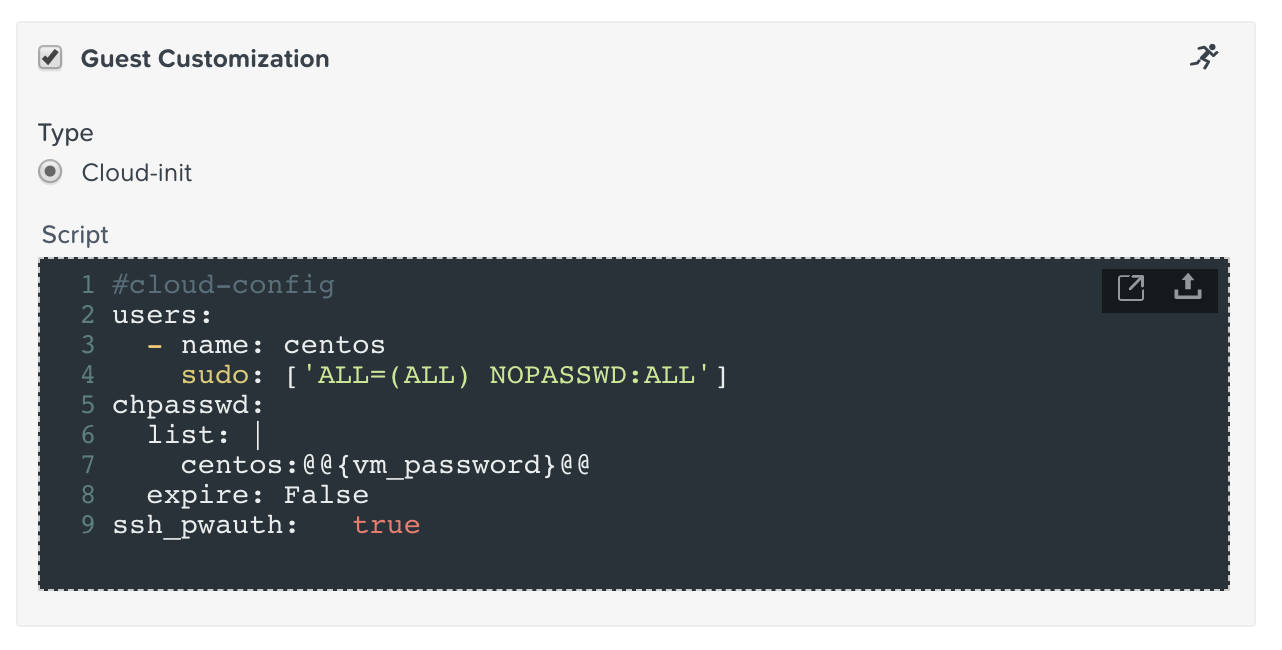
CentOS 7 Cloud Init
Windows 2016
<?xml version="1.0" encoding="UTF-8"?>
<unattend xmlns="urn:schemas-microsoft-com:unattend">
   <settings pass="oobeSystem">
      <component name="Microsoft-Windows-Shell-Setup" xmlns:wcm="http://schemas.microsoft.com/WMIConfig/2002/State" xmlns:xsi="http://www.w3.org/2001/XMLSchema-instance" processorArchitecture="amd64" publicKeyToken="31bf3856ad364e35" language="neutral" versionScope="nonSxS">
         <OOBE>
            <HideEULAPage>true</HideEULAPage>
            <HideOEMRegistrationScreen>true</HideOEMRegistrationScreen>
            <HideOnlineAccountScreens>true</HideOnlineAccountScreens>
            <HideWirelessSetupInOOBE>true</HideWirelessSetupInOOBE>
            <NetworkLocation>Work</NetworkLocation>
            <SkipMachineOOBE>true</SkipMachineOOBE>
         </OOBE>
         <UserAccounts>
            <AdministratorPassword>
               <Value>@@{vm_password}@@</Value>
               <PlainText>true</PlainText>
            </AdministratorPassword>
         </UserAccounts>
         <FirstLogonCommands>
            <SynchronousCommand wcm:action="add">
               <CommandLine>cmd.exe /c netsh firewall add portopening TCP 5985 "Port 5985"</CommandLine>
               <Description>Win RM port open</Description>
               <Order>1</Order>
               <RequiresUserInput>true</RequiresUserInput>
            </SynchronousCommand>
            <SynchronousCommand wcm:action="add">
               <CommandLine>powershell -Command "Enable-PSRemoting -SkipNetworkProfileCheck -Force"</CommandLine>
               <Description>Enable PS-Remoting</Description>
               <Order>2</Order>
               <RequiresUserInput>true</RequiresUserInput>
            </SynchronousCommand>
            <SynchronousCommand wcm:action="add">
               <CommandLine>powershell -Command "Set-ExecutionPolicy -ExecutionPolicy RemoteSigned"</CommandLine>
               <Description>Enable Remote-Signing</Description>
               <Order>3</Order>
               <RequiresUserInput>false</RequiresUserInput>
            </SynchronousCommand>
         </FirstLogonCommands>
      </component>
      <component name="Microsoft-Windows-International-Core" xmlns:wcm="http://schemas.microsoft.com/WMIConfig/2002/State" xmlns:xsi="http://www.w3.org/2001/XMLSchema-instance" processorArchitecture="amd64" publicKeyToken="31bf3856ad364e35" language="neutral" versionScope="nonSxS">
         <InputLocale>en-US</InputLocale>
         <SystemLocale>en-US</SystemLocale>
         <UILanguageFallback>en-us</UILanguageFallback>
         <UILanguage>en-US</UILanguage>
         <UserLocale>en-US</UserLocale>
      </component>
   </settings>
   <settings pass="specialize">
      <component name="Microsoft-Windows-Shell-Setup" xmlns:wcm="http://schemas.microsoft.com/WMIConfig/2002/State" xmlns:xsi="http://www.w3.org/2001/XMLSchema-instance" processorArchitecture="amd64" publicKeyToken="31bf3856ad364e35" language="neutral" versionScope="nonSxS">
         <ComputerName>@@{calm_application_name}@@</ComputerName>
         <RegisteredOrganization>Nutanix</RegisteredOrganization>
         <RegisteredOwner>Acropolis</RegisteredOwner>
         <TimeZone>UTC</TimeZone>
      </component>
      <component name="Microsoft-Windows-TerminalServices-LocalSessionManager" xmlns="" publicKeyToken="31bf3856ad364e35" language="neutral" versionScope="nonSxS" processorArchitecture="amd64">
         <fDenyTSConnections>false</fDenyTSConnections>
      </component>
      <component name="Microsoft-Windows-TerminalServices-RDP-WinStationExtensions" xmlns="" publicKeyToken="31bf3856ad364e35" language="neutral" versionScope="nonSxS" processorArchitecture="amd64">
         <UserAuthentication>0</UserAuthentication>
      </component>
      <component name="Networking-MPSSVC-Svc" xmlns:wcm="http://schemas.microsoft.com/WMIConfig/2002/State" xmlns:xsi="http://www.w3.org/2001/XMLSchema-instance" processorArchitecture="amd64" publicKeyToken="31bf3856ad364e35" language="neutral" versionScope="nonSxS">
         <FirewallGroups>
            <FirewallGroup wcm:action="add" wcm:keyValue="RemoteDesktop">
               <Active>true</Active>
               <Profile>all</Profile>
               <Group>@FirewallAPI.dll,-28752</Group>
            </FirewallGroup>
         </FirewallGroups>
      </component>
   </settings>
</unattend>
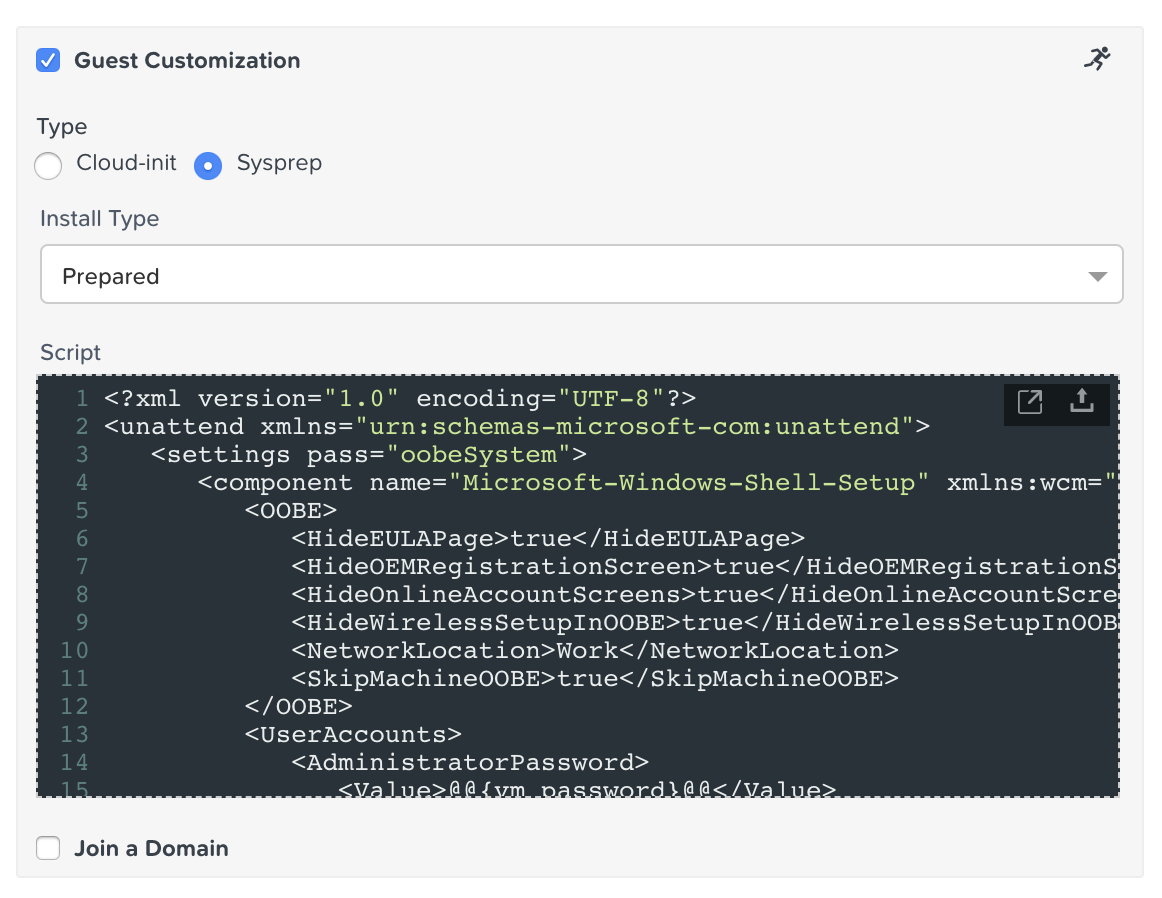
Windows 2016 Sysprep
Note
Take note of the “@@{vm_password}@@” text. In Calm the “@@{” and “}@@” characters represent a macro. At runtime, Calm will automatically “patch” or substitute in the proper value(s) when it encounters a macro. A macro could represent a system defined value, a VM property, or (as it does in this case) a runtime variable. Later in this lab we’ll create a runtime variable with the name “vm_password”.
Disks - A disk is the storage of the VM or infrastructure that we’re deploying. It could be based on a pre-existing image (as it will in our case), or it could be based on a blank disk to enable the VM to consume additional storage. For instance, a Microsoft SQL server may need its base OS disk, a separate SQL Server binary disk, separate database data file disks, separate TempDB disks, and a separate logging disk. In our case we’re going to have a single disk, based on a pre-existing image.
Type - The type of disk, this can be left as default (DISK).
Bus Type - The bus type of the disk, this can be left as default (SCSI).
Operation - How the disk will be sourced. “Allocate on Storage Container” is used for blank disks. We’re going to keep the default, Clone from Image Service, as we’re using a pre-defined image.
Image - The image the VM will be based off of. Select either CentOS7.qcow2 or Windows2016.qcow2, depending on your OS choice.
Bootable - Whether or not this particular disk is bootable. A minimum of one disk must be bootable. In our case, leave it enabled.
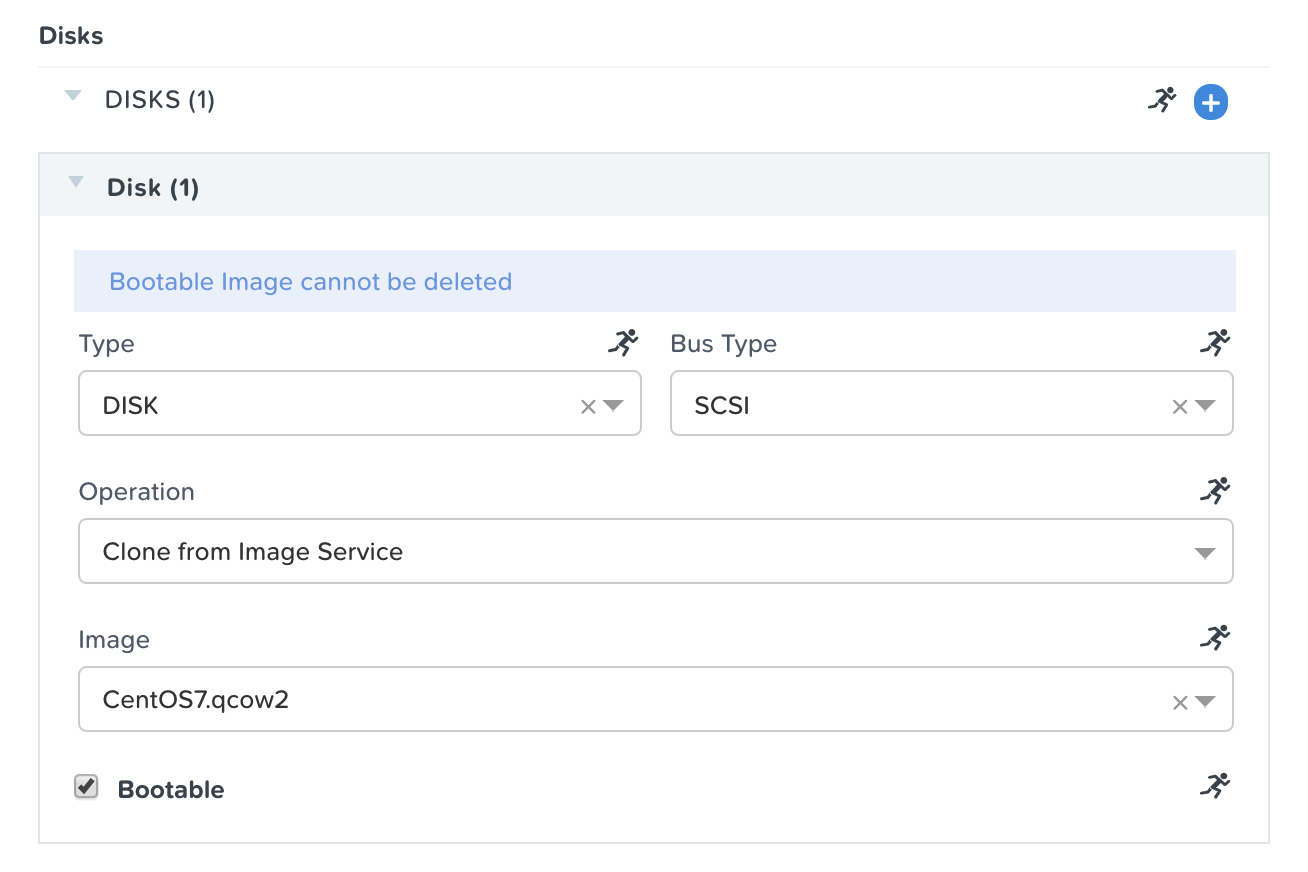
CentOS 7 VM Configuration - Disks
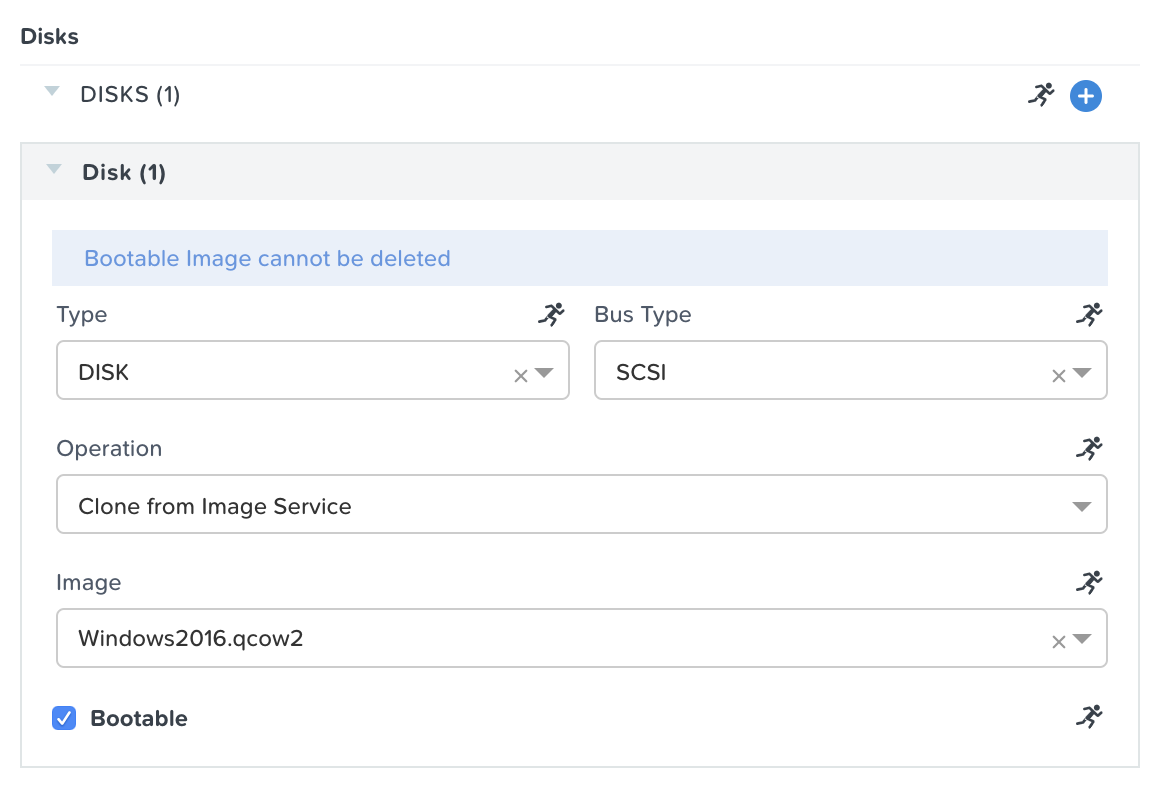
Windows 2016 VM Configuration - Disks
Boot Configuration - The boot method of the VM. We’ll leave the default of Legacy BIOS.
vGPUs - Whether or not the VM needs a virtual graphical processing unit. We’ll leave the default of none.
Categories - Categories span several different products and solutions within the Nutanix portfolio. They enable you to set security policies, protection policies, alert policies, and playbooks. Simply choose the categories corresponding to the workload, and all of these policies will automatically be applied. In this lab however, we’re going to leave this field blank.
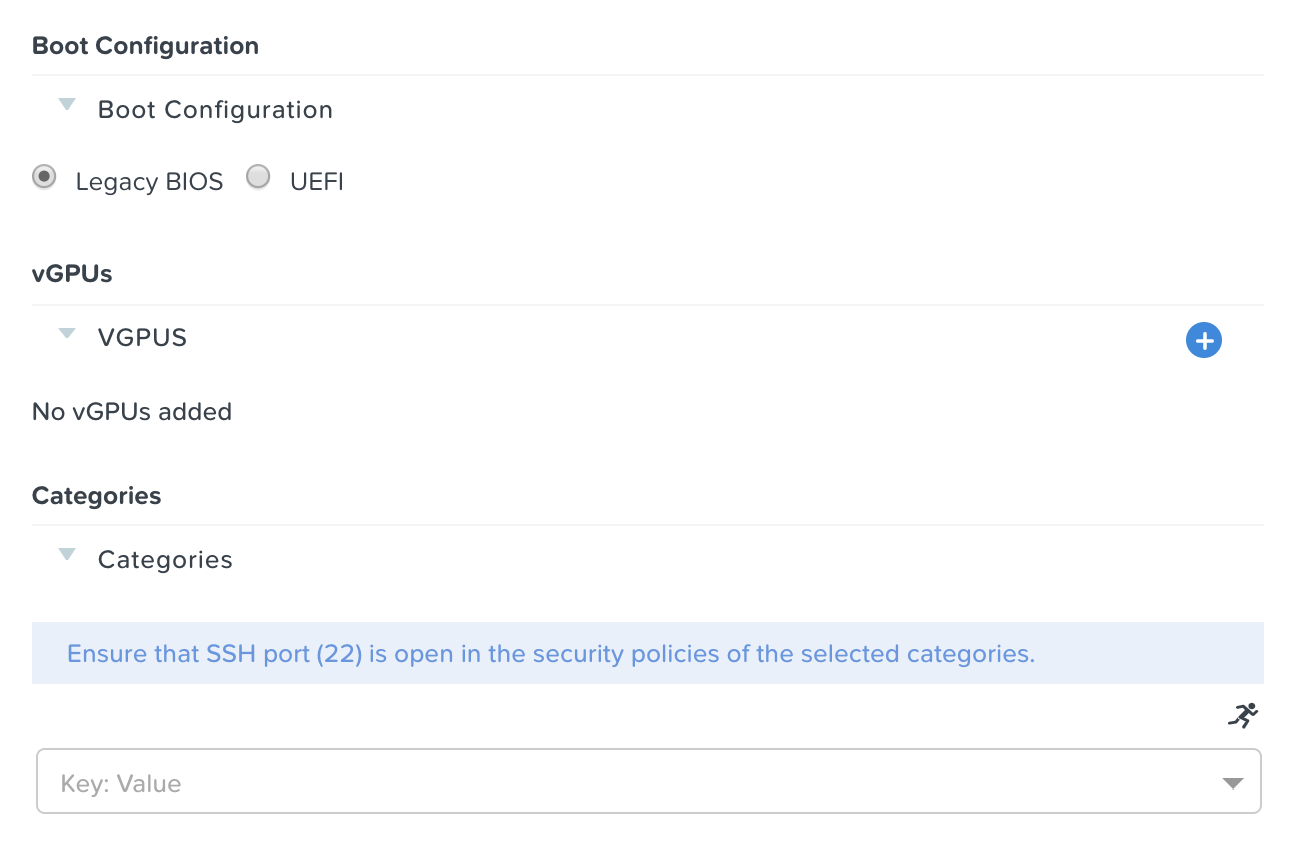
VM Configuration - Boot Configuration, vGPUs, and Categories
NICs - Network adapters allow communication to and from your virtual machine. We’ll be adding a single NIC by clicking the blue plus, then selecting Primary in the dropdown, and selecting the Dynamic radio button.
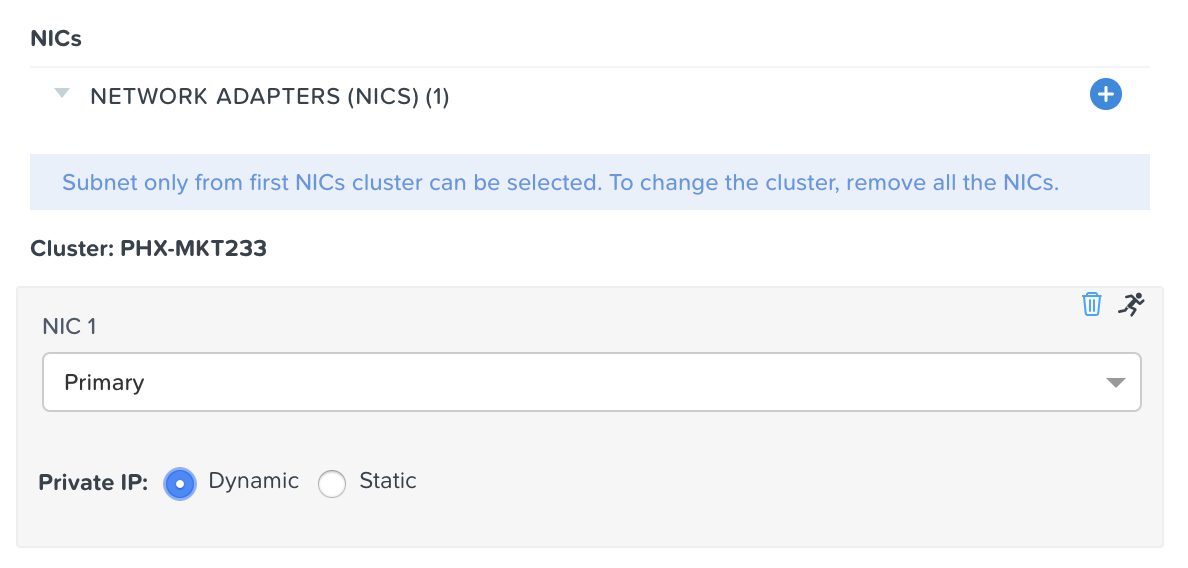
VM Configuration - NICs
Serial Ports - Whether or not the VM needs a virtual serial port. We’ll leave the default of none.
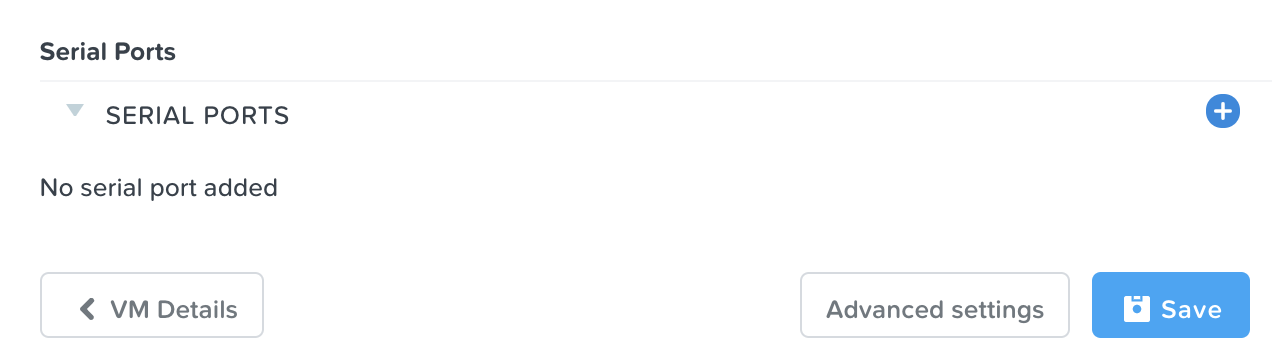
VM Configuration - Serial Ports
At the bottom of the page, click the blue Save button. It is expected to have a single error about an incorrect macro due to our Guest Customization containing “vm_password”. If you have additional errors, please be sure to resolve them before continuing to the next section.
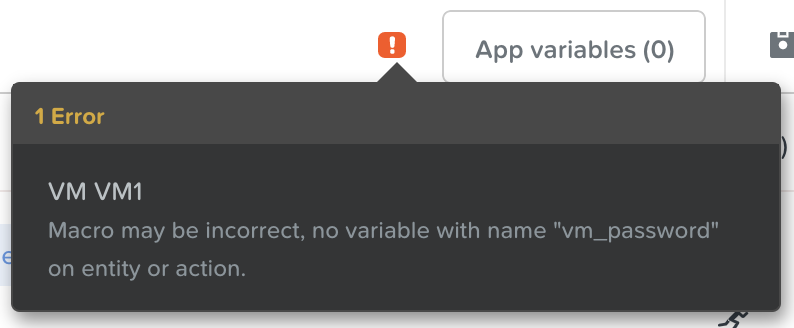
Blueprint Save - Error
Defining Variables
Variables allow extensibility of Blueprints, meaning a single Blueprint can be used for multiple purposes and environments depending on the configuration of its variables. Variables can either be static values saved as part of the Blueprint or they can be specified at Runtime (when the Blueprint is launched), as they will in this case.
In a Single VM blueprint, variables can be accessed by clicking the App variables button near the top. By default, variables are stored as a String, however additional Data Types (Integer, Multi-line String, Date, Time, and Date Time) are all possible. Any of these data types can be optionally set as Secret, which will mask its value and is ideal for variables such as passwords. There are also more advanced Input Types (versus the default Simple), however these are outside the scope of this lab.
Variables can be used in scripts executed against objects using the @@{variable_name}@@ construct (called a macro). Calm will expand and replace the variable with the appropriate value before sending to the VM.
Click the App variables button along the top pane to bring up the variables menu.
In the pop-up that appears, you should see a note stating you currently do not have any variables. Go ahead and click the blue + Add Variable button to add our variable, and fill out the following fields.
Along the left column, click the running man icon to mark this variable as runtime.
In the main pane, set the variable Name as vm_password. This name must exactly match (including case) the value within our macro from our Guest Customization script, otherwise we’ll continue to get an error when we save.
Leave the Data Type as the default, String. Feel free to investigate the other options, however discussion about them are outside the scope of this lab.
For the Value, leave blank, as we want the end users to specify their own VM password.
Enable the Secret checkbox, as we do not want this password to be visible.
Click the Show Additional Options link at the bottom.
Leave the Label field blank.
In the Description field, paste in either Create a password for the user “centos” or Create a password for the user “Administrator”, depending on your OS choice.
Enable the Mark this variable mandatory checkbox. This will ensure that the end user enters a password, which is required since we did not provide default value.
Leave the other two checkboxes unselected.
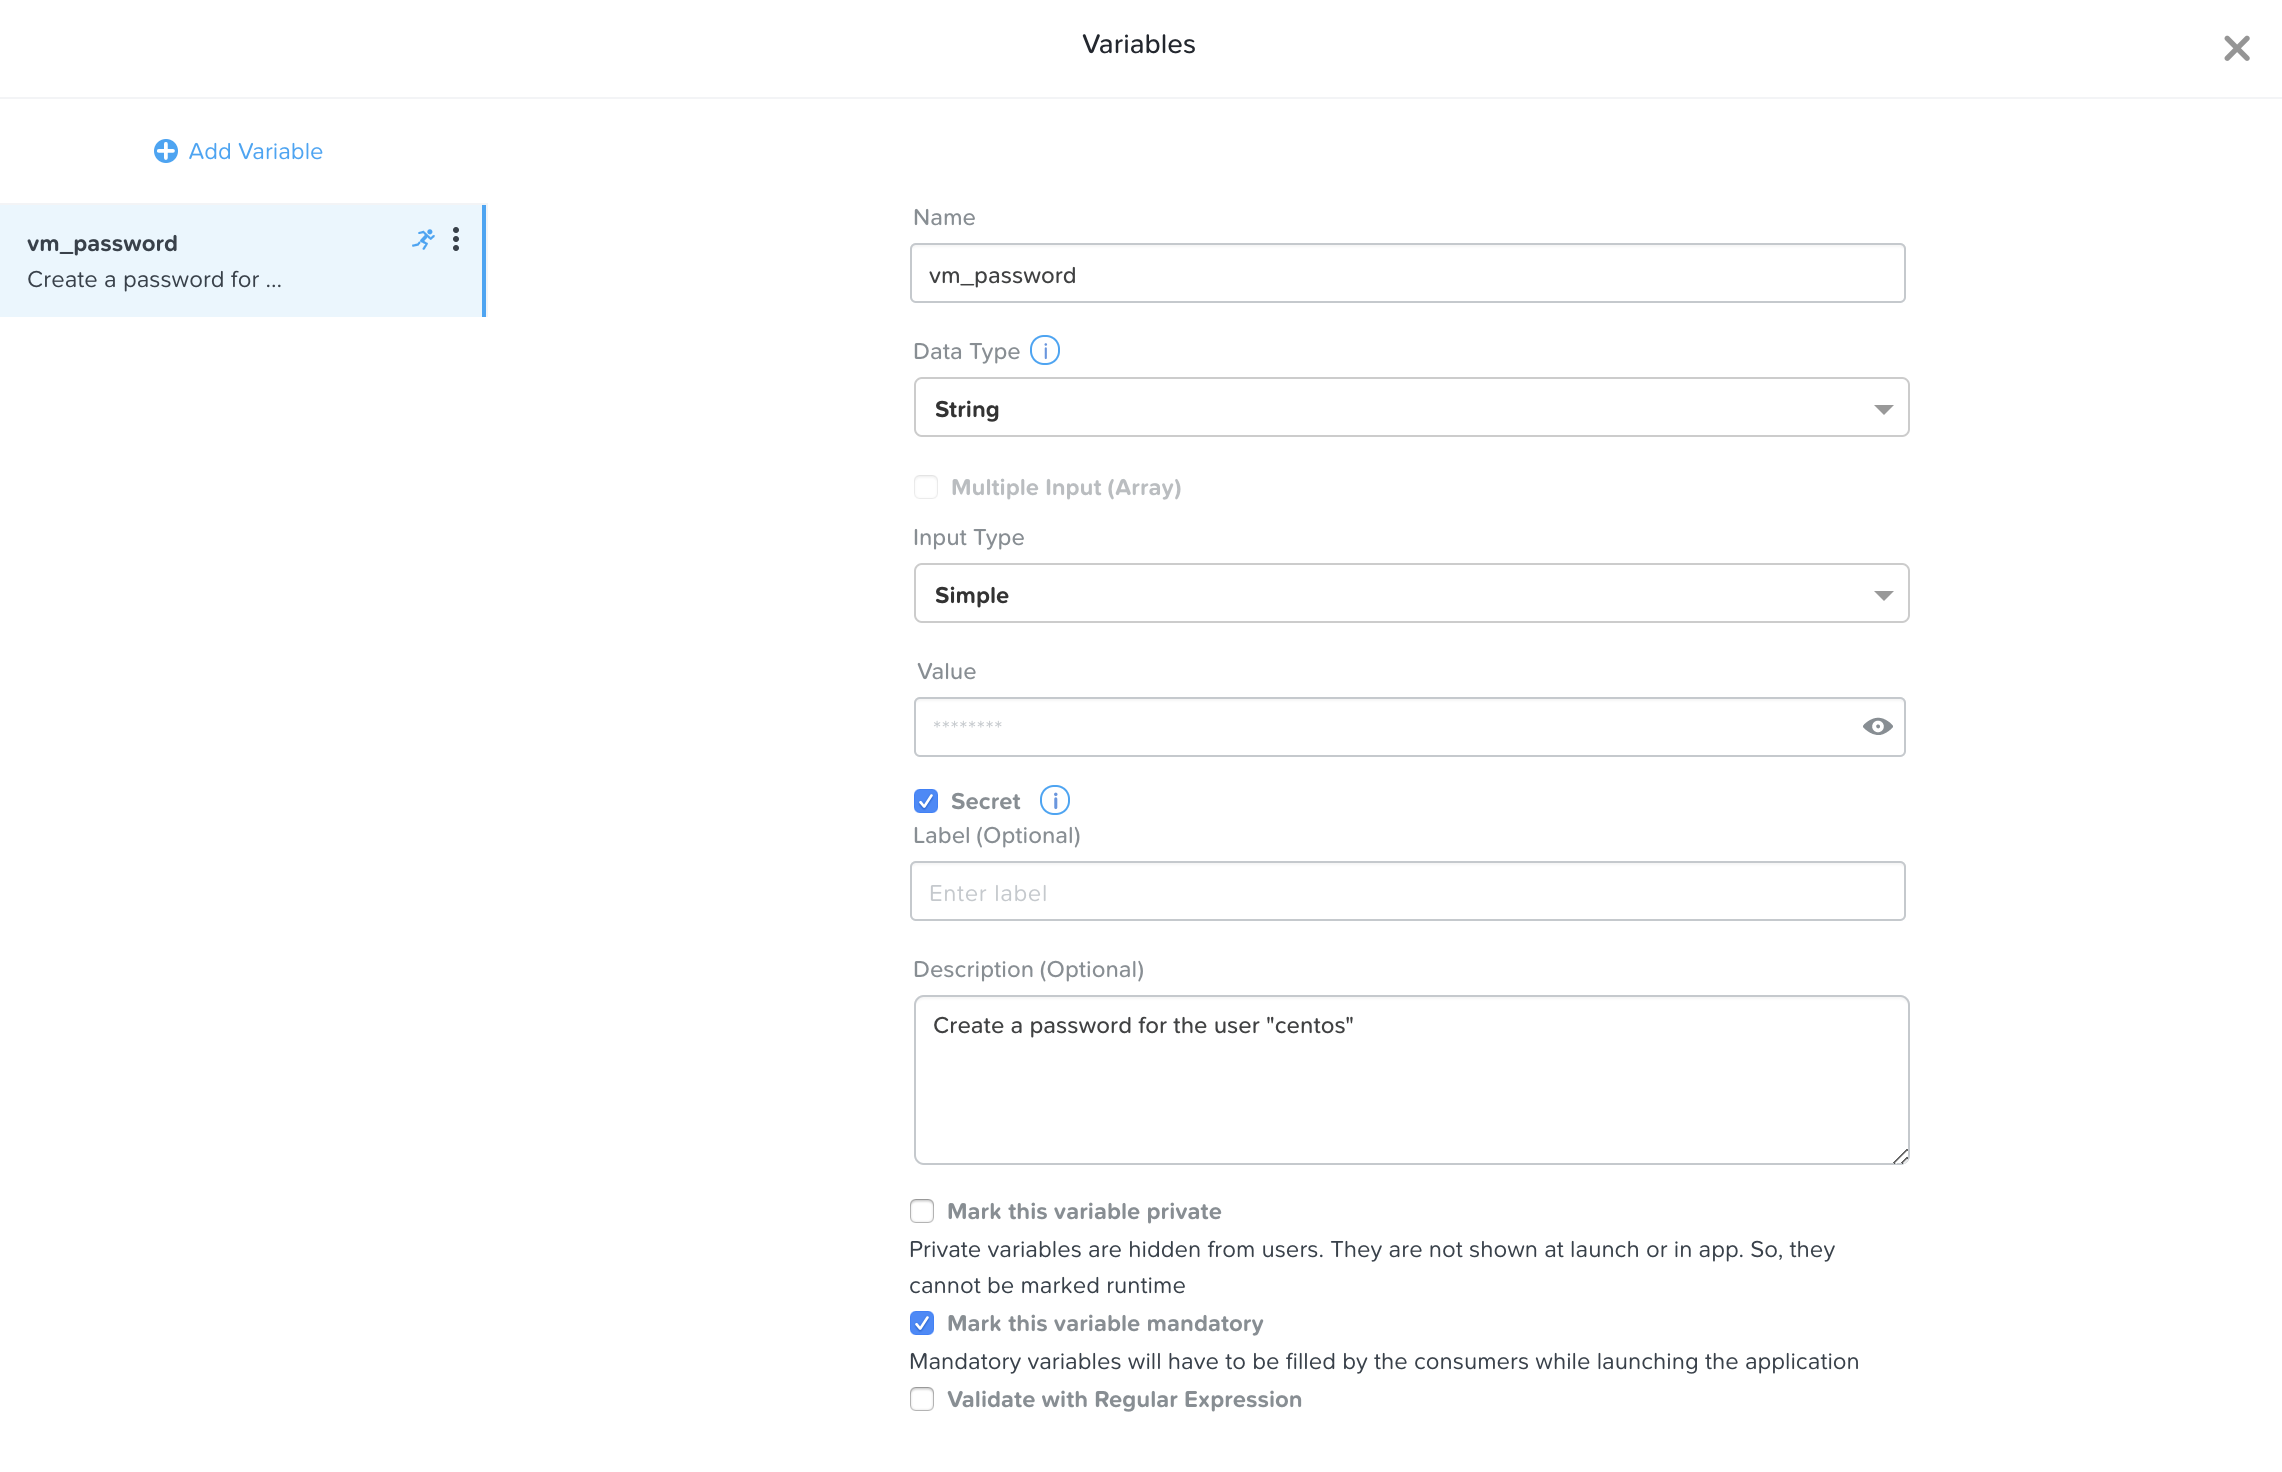
Variable - vm_password
Scroll to the bottom, and click the blue Done button.
Click Save. It is expected to receive a Warning stating that the value of our secret variable is empty. This is needed as there is not way to determine the value of a secret once you save the blueprint, so this warning alerts a user in the event they accidentally left it blank. Warnings do not prevent users from launching or publishing the blueprint. If you receive any other warning, or a red error, please resolve the issue before continuing on.
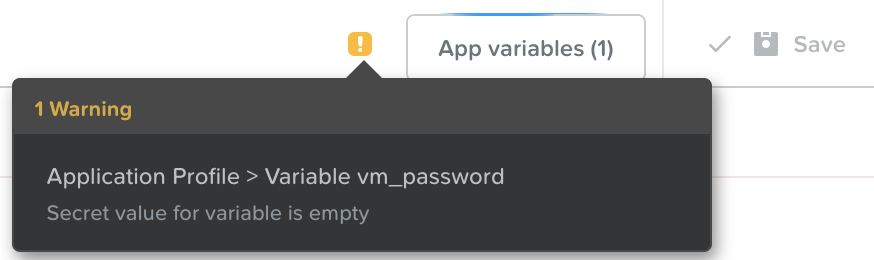
Blueprint Save - Warning
Launching the Blueprint
Now that our blueprint is complete, take note of the buttons to the right of the save button:
Publish - this allows us to request to publish the blueprint into the Marketplace. Blueprints have a 1:1 mapping to a Project, meaning only other users who are members of our own Project will have the ability to launch this blueprint. Publishing blueprints to the Marketplace allows an administrator to assign any number of Projects to the Marketplace blueprint, which enables self service for any number of end users desired.
Download - this option downloads the blueprint in a JSON format, which can be checked into source control, or uploaded into another Calm instance.
Launch - this launches our blueprint and deploys our application and/or infrastructur.
Go ahead and click the Launch button. On the launch page that appears, Name your application with your initials, OS type, and a unique number. Click Create, where you’ll be redirectly the application page.

Blueprint Launch
Managing your Application
Wait several minutes for your application to change from a Provisioning state to a Running state. If it instead changes to an Error state, navigate to the Audit tab, and expand the Create action to start troubleshooting your issue.
Once your application is in a Running state, navigate around the five tabs in the UI:

Application Tabs
The Overview tab gives you information about any variables specified, the cost incurred (showback can be configured in the Calm Settings), an application summary, and a VM summary.
The Manage tab allows you to run actions against the application / infrastructure. This includes basic lifecycle (start, restart, stop, delete), NGT management (install, manage, uninstall), and App Update, which allows for editing of basic VM resources.
The Metrics tab gives in depth information about CPU, Memory, Storage, and Network utilization.
The Recovery Points tab lists the history of VM Snapshots, and allows the user to restore the VM to any of these points.
The Audit tab shows every action run against the application, the time and user that ran a given action, and in depth information on the results of that action, including script output.
Next, view the common VM tasks available in the upper right corner of the UI:

Application Buttons
The Clone button allows a user to duplicate the existing application into a new app that is manageable separately from the current application. For a brand new application, this is equivalent to launching the blueprint again. However, a user may have spent significant time customizing the existing application to suit their specific needs, and would like these changes to be present on the new app.
The Snapshot button creates a new recovery point of the VM, which allows a user to restore the VM.
The Launch Console button opens a console window to the VM.
The Update button allows for the end user to modify basic VM settings (this is equivalent to the Manage > App Update action).
The Delete button deletes the underlying VM and the Calm Application (this is equivalent to the Manage > App Delete action).
Now that we’re familiar with the application page layout, let’s modify our application by adding additional memory, but let’s do it in a way that we can recover from in case something goes wrong.
Click the Snapshot button in the upper right, and in the pop-up that appears, change the name to before-update-@@{calm_time}@@, leave the rest as default, and click the blue Save button.
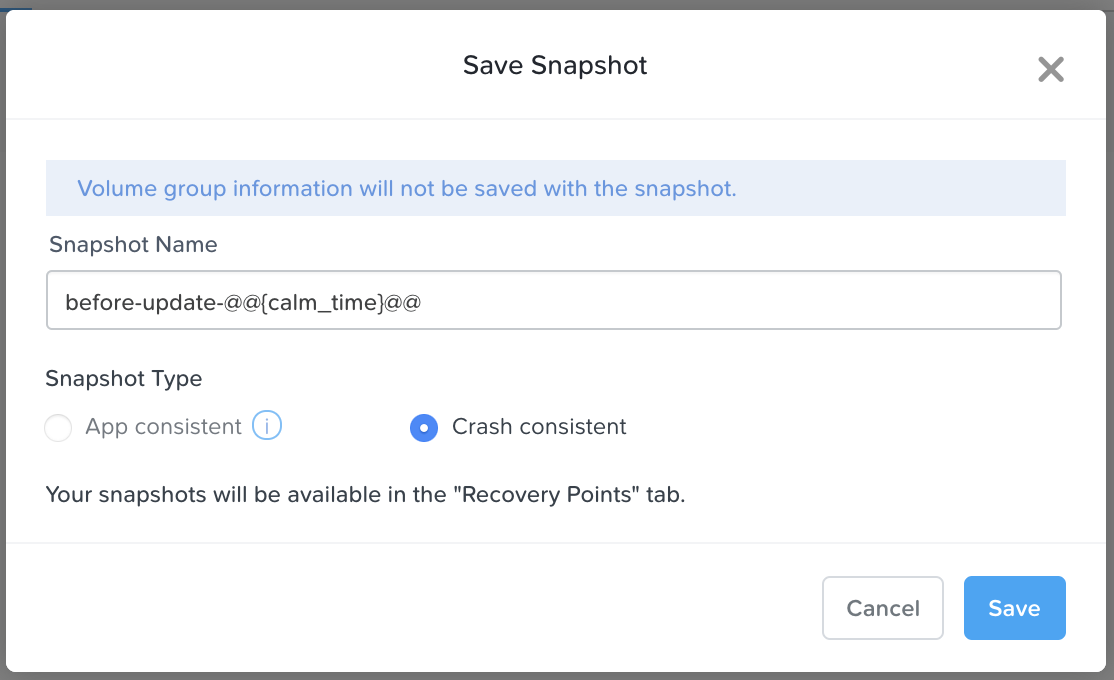
Application Snapshot
Take note you’re re-directed to the Audit tab. Expand the Snapshot Create action to view the tasks of the snapshot. Once complete, navigate to the Recovery Points tab, a validate that our new snapshot is listed.
Next, click the Launch Console button in the upper right, and log in to your VM. If you chose CentOS as your OS, the username will be centos, and for Windows it will be Administrator. The password is what you specified during the blueprint launch.
To view the current memory on CentOS, run the command free -h. If you’re using Windows, open a Command Prompt, and run systeminfo | findstr Memory. Take note of the current memory allocated to your VM.
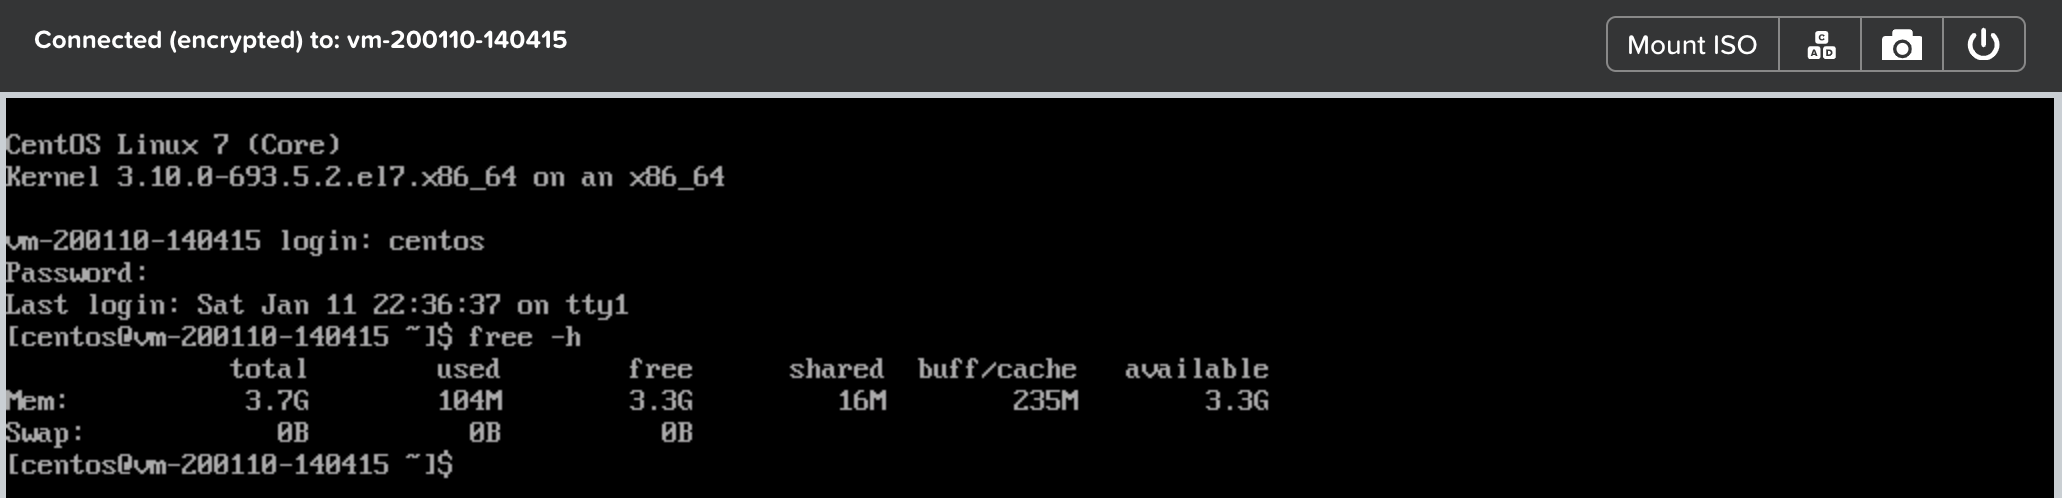
CentOS Memory - Before Update
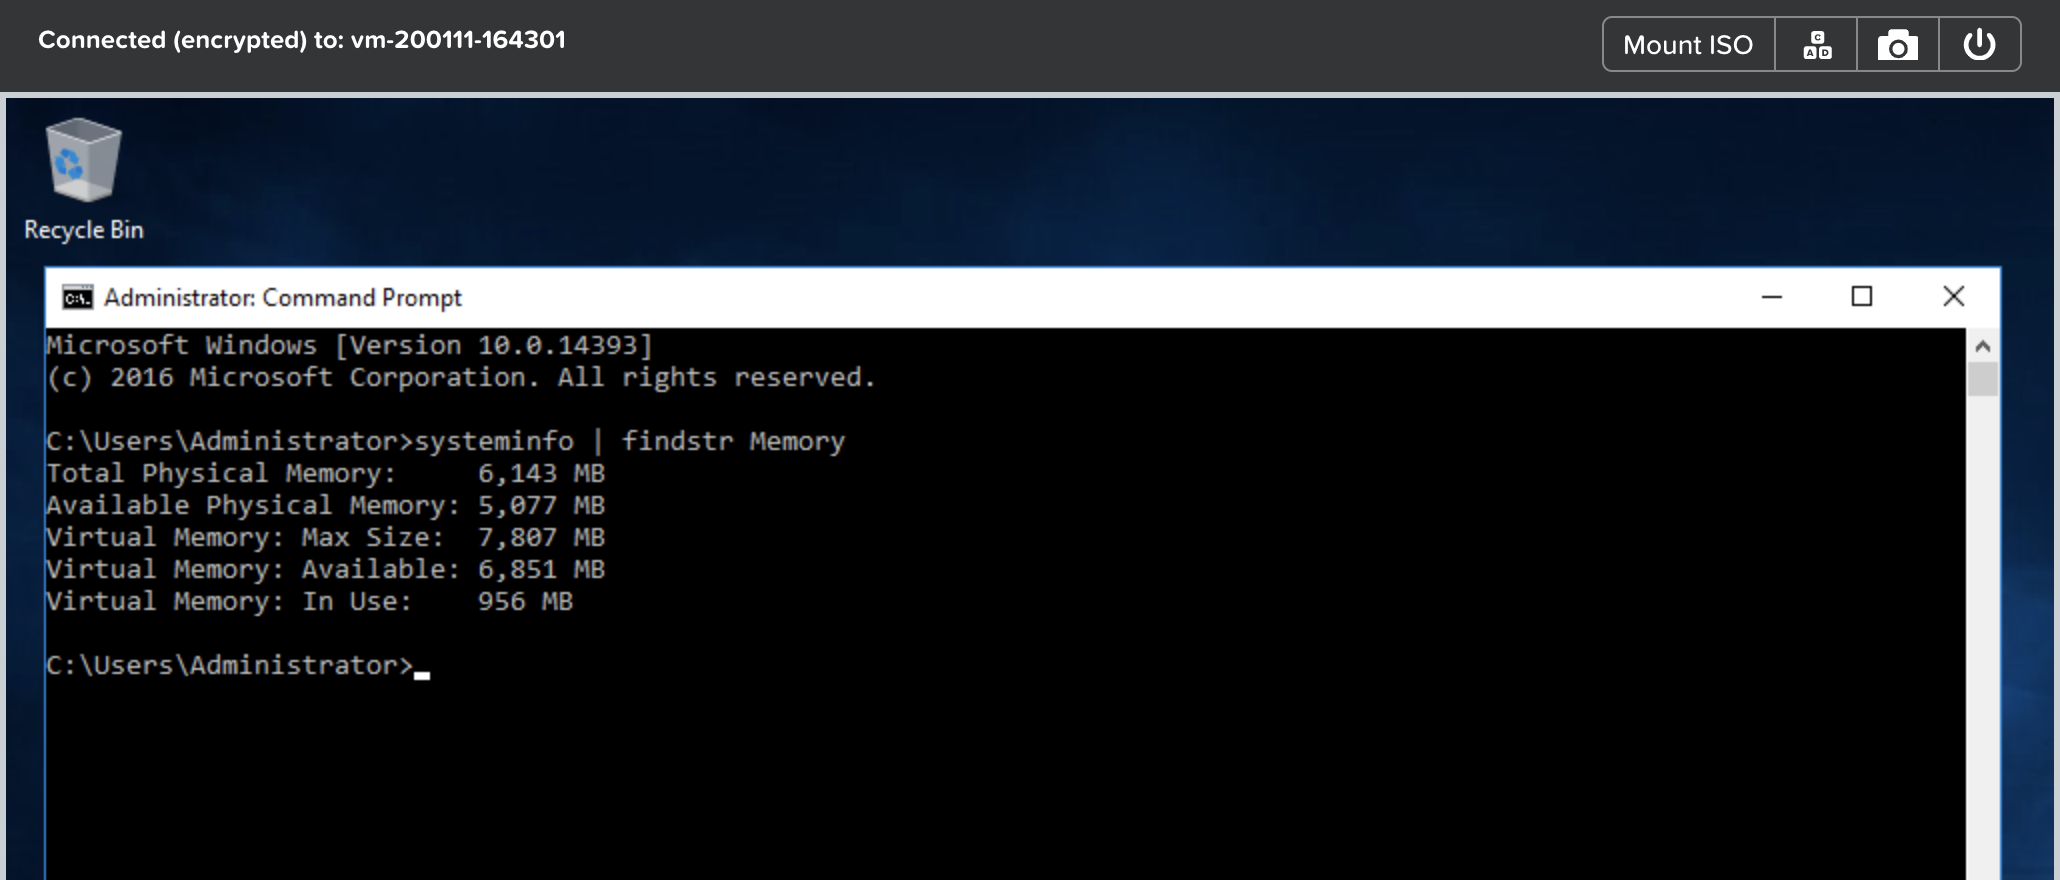
Windows Memory - Before Update
Navigate back to the application page of Calm, and click the Update button in the upper right. On the page that appears, increase the Memory (GiB) field by 2 GiB (for CentOS it should now be 6 GiB, for Windows, 8 GiB). Click the blue Update button in the lower left.
Validate that the memory field has been increased by 2 GiB, and click Confirm.
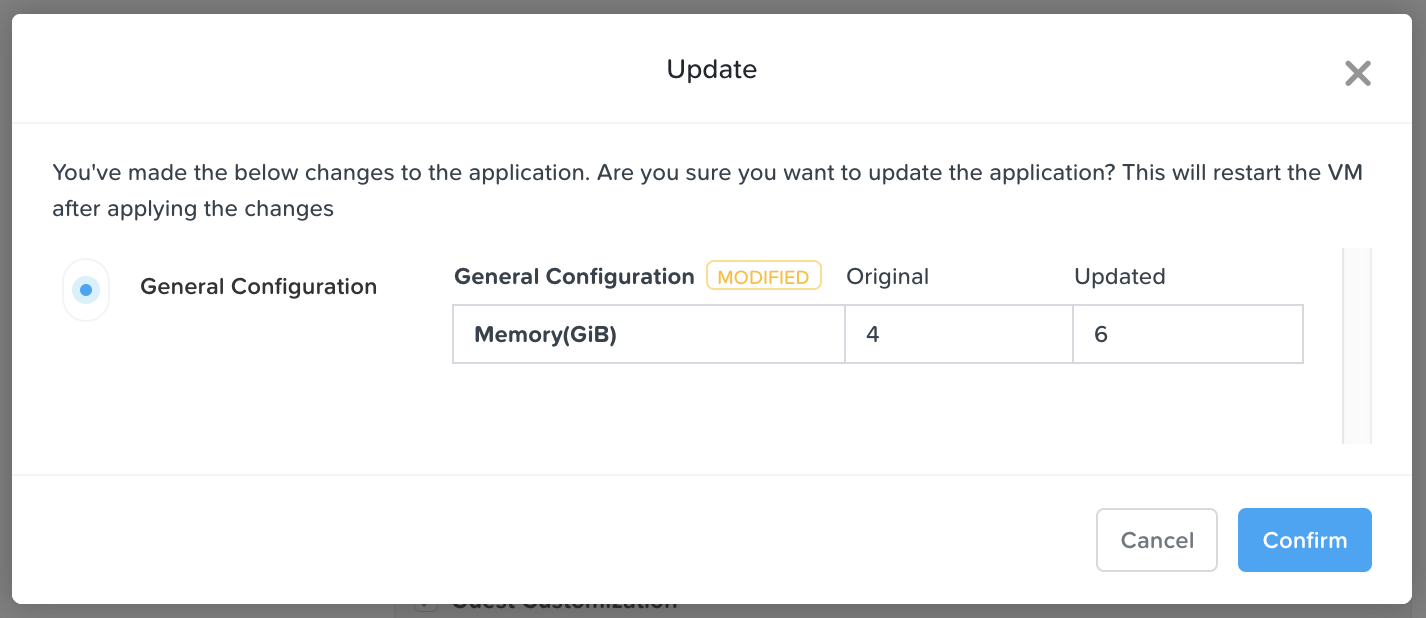
CentOS Memory - Confirm Change

Windows Memory - Confirm Change
In the Audit tab of Calm, wait for the App Update action to complete.
Back in the VM Console, run the same command from earlier to view the updated memory, and note that it has increased by 2 GiB.
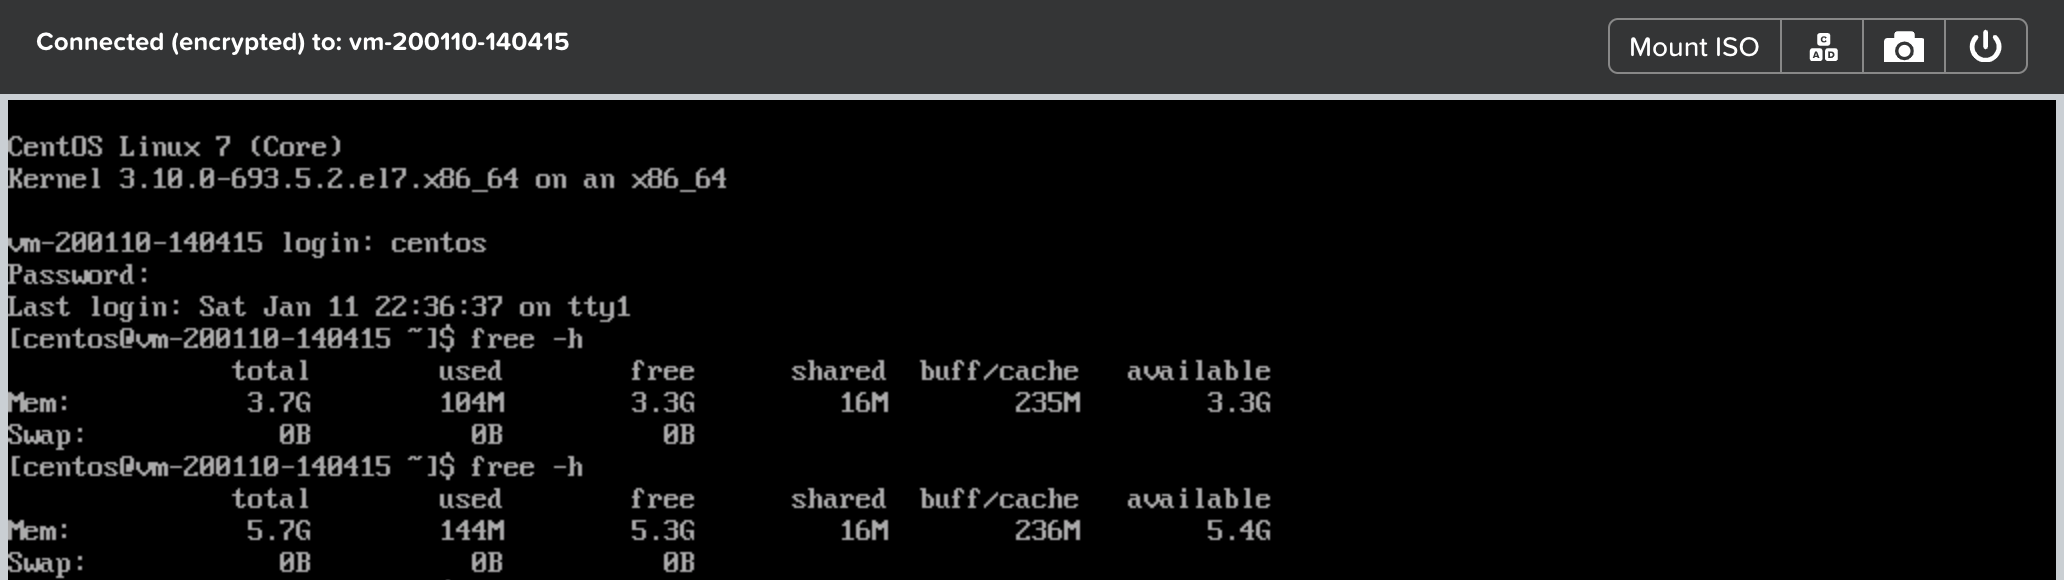
CentOS Memory - After Update
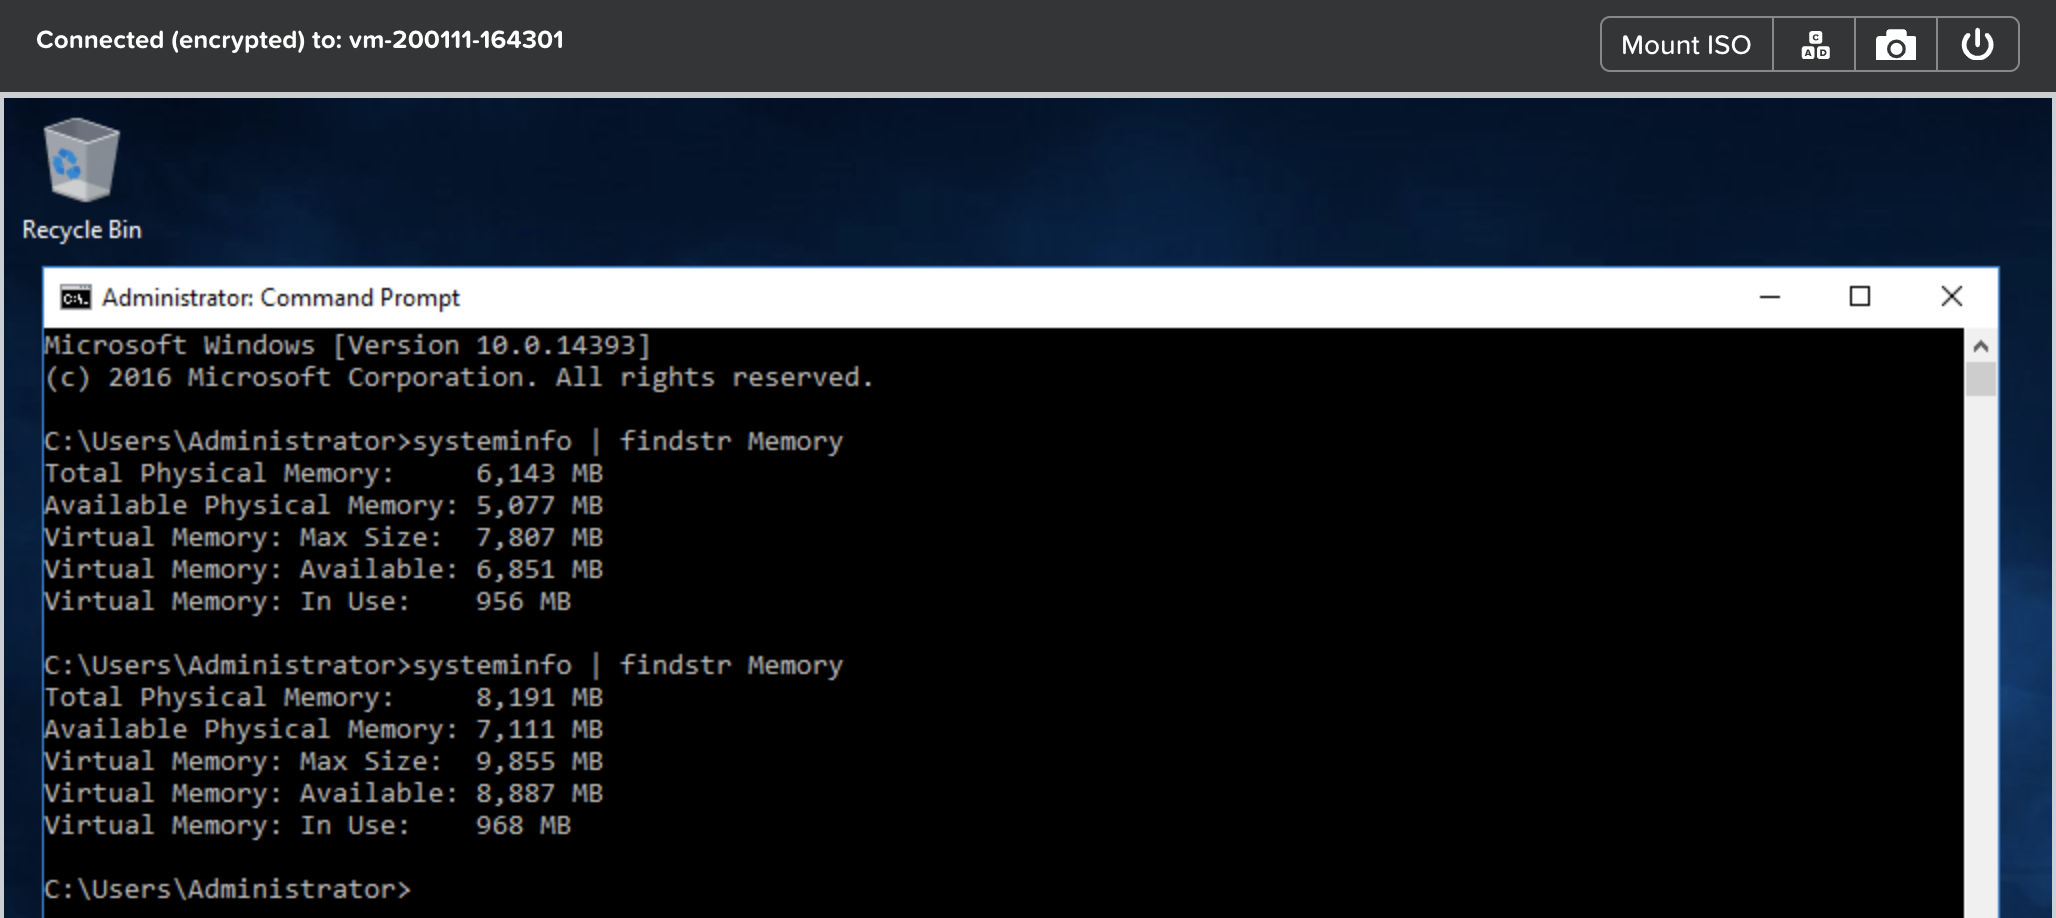
Windows Memory - After Update
If anything went wrong with the VM Update, navigate to the Recovery Points tab, click Restore on the before-update snapshot we took earlier, and click Confirm on the pop-up.
Takeaways
What are the key things you should know about Nutanix Calm and Single VM Blueprints?
Nutanix Calm provides application and infrastructure automation natively within Prism, turning complex, week long ticketing processes, into one-click self service provisioning.
While Multi VM blueprints enable the provisioning and lifecycle management of complex, multi-tiered applications, Single VM blueprints allows IT to provide Infrastructure-as-a-Service for their end users.
Common day 2 operations, like snapshotting, restoring, cloning, and updating the infrastructure can all be done by end users directly within Calm.