A Day in the Life
In this lab you will follow a day in the life of Carol O’Kay, a 10 year veteran of administrating virtual environments on 3-tier architecture, who has recently deployed her first Nutanix cluster. The Nutanix cluster is being used for a mix of production IT workloads, and supporting the engineering efforts for her company’s primary application, an inventory management solution called Fiesta, used to support the company’s retail storefronts.
Note
If there are multiple people utilizing the same Nutanix cluster to complete this lab, certain steps may have already been completed. If this occurs, just skip that particular step, and continue on with the lab after you’ve verified the step(s) was completed correctly.
Configuring Storage
In this brief exercise, you will experience how IT generalists can provision and monitor primary storage for their virtualized environment through Prism with just a few clicks - a stark contrast to planning and managing traditional SAN storage.
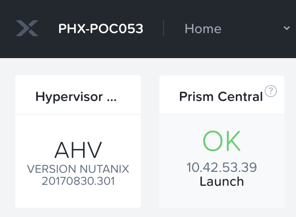
Using your Cluster Assignment Spreadsheet, identify your Prism Element cluster IP.
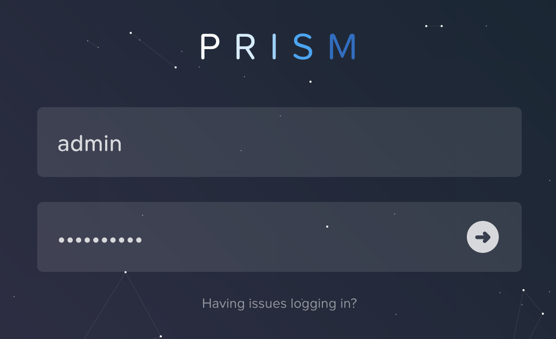
In a browser, open Prism Element and log in using the following local user credentials:
Username - admin
Password - HPOC Password
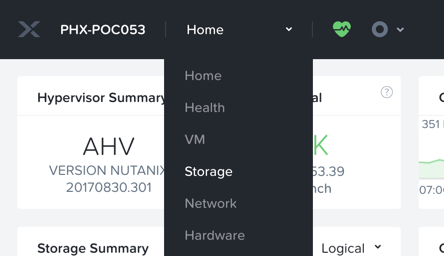
Select Storage from the drop down menu.
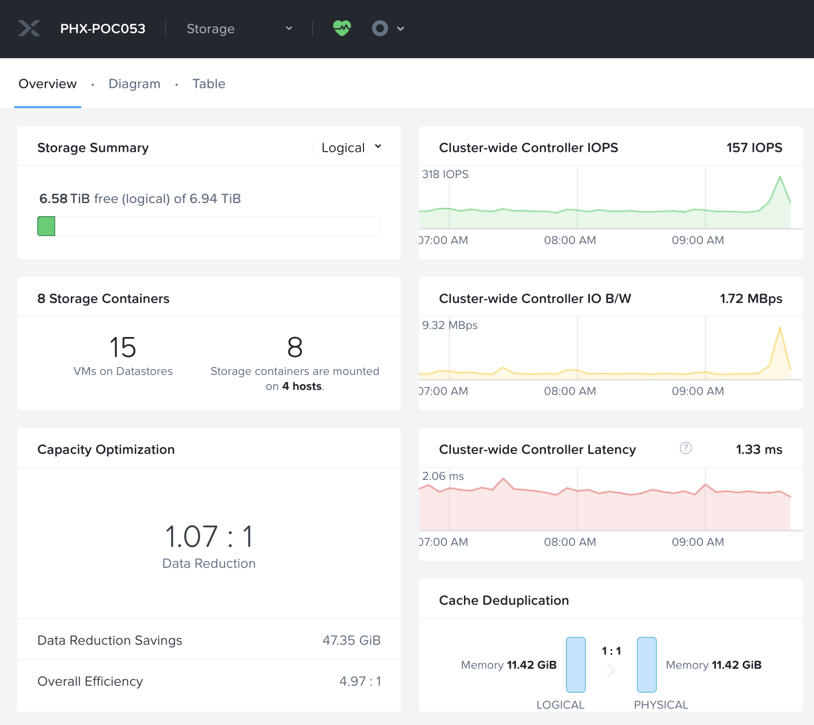
Mouse over the Storage Summary and Capacity Optimization widgets for explanations of what each is displaying.
It’s important to understand that Nutanix considers the Data Reduction ratio as savings ONLY from compression, deduplication, and erasure coding. The Overall Efficiency, comparable to what many other vendors consider “Data Reduction,” incorporates the aforementioned data efficiency features, as well as data avoidance features like thin provisioning, intelligent cloning, and zero suppression.
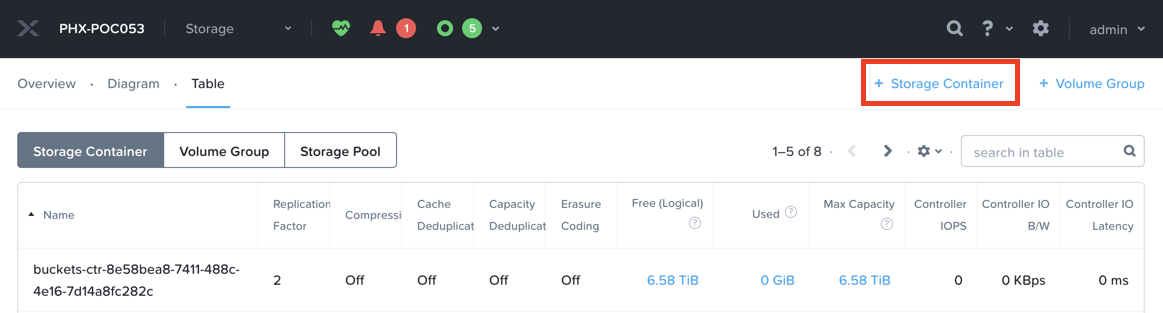
Select Table and click + Storage Container.
Storage Containers represent logical policies for storage, allowing you to create reservations, enable/disable data efficiency features like compression, deduplication, and erasure coding, and to configure Redundancy Factor (RF). Every Storage Container on a Nutanix cluster still leverages all physical disks within the cluster, referred to as the Storage Pool. A typical Nutanix cluster will have a small number of Storage Containers, typically corresponding to workloads that benefit from different data efficiency technologies.
Provide a unique Name (Initials-Storage-Container)for the Storage Container, and click Advanced Settings to explore additional configuration options.
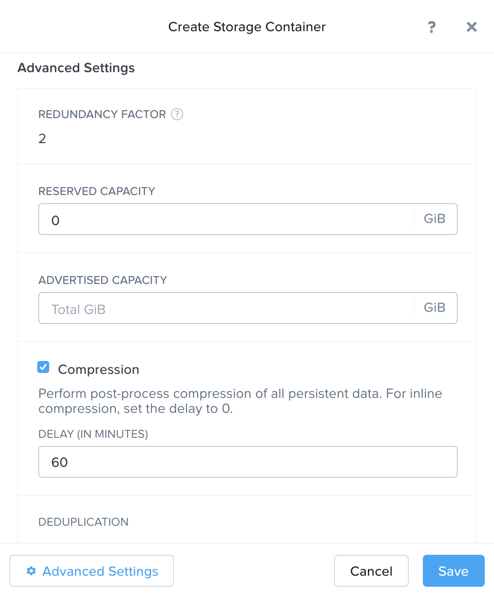
Nutanix provides different ways to optimize storage capacity that are intelligent and adaptive to workloads characteristics. Nutanix uses native data avoidance (thin provisioning, intelligent cloning and zero suppression) and data reduction (compression, deduplication, and erasure coding) techniques to handle data efficiently. All data reduction optimizations are performed at the container level, so different containers can use different settings.
Compression
Nutanix provides two choices - inline or post-process data compression. Irrespective of inline or post-process compression, write data coming into OpLog that is >4k and shows good compression, will be written compressed in OpLog. For inline compression (Delay=0), sequential streams of data or large size I/Os (>64K) will be compressed when writing to the Extent Store. For post-process (Delay > 0), data is compressed after it is drained from OpLog to the Extent Store, after compression delay is met.
Compression provides on-disk space savings for applications such as databases, and results in a lower number of writes being written to storage. Post-process compression is turned ON by default on all containers. Starting 5.18, inline compression will be turned ON by default on all containers. We recommend turning ON inline compression for almost all use cases. Workloads not ideal for compression are encrypted datasets or already compressed datasets.
Erasure Coding
To provide a balance between availability and the amount of storage required, Distributed Storage Fabric (DSF) provides the ability to encode data using erasure codes (EC). Like RAID (levels 4, 5, 6, etc.) where parity is calculated, EC encodes a strip of data blocks across different nodes and calculates parity. In the event of a host and/or disk failure, the parity data is used to calculate any missing data blocks (decoding). In the case of DSF, the data block must be on a different node and belong to a different vDisk. EC is a post-process operation and is done on write cold data (Data that hasn’t been overwritten in more than 7 days). The number of data and parity blocks in a strip is chosen by the system based on number of nodes and configured failures to tolerate.
Turn on EC-X for non-mission-critical workloads and workloads that have a significant amount of write cold data, since erasure coding works on write cold data and provides more usable storage. For more information refer to application specific best practice guides.
Deduplication
When enabled, Distributed Storage Fabric (DSF) does capacity-tier and performance-tier deduplication. Data is fingerprinted on ingest using a SHA-1 hash that is stored as metadata. When duplicate data is detected based on multiple copies with the same fingerprint, a background process removes the duplicates. When deduplicated data is read, it is placed in a unified cache, and any subsequent requests for data with the same fingerprint are satisfied directly from cache.
Deduplication is recommended for full clones, P2V migrations and Persistent Desktops.
Redundancy Factor
Redundancy Factor controls the number of data copies. Observe that the Redundancy Factor cannot be configured for this cluster, this is due to the minimum number of nodes required to support RF3 is 5.
Note
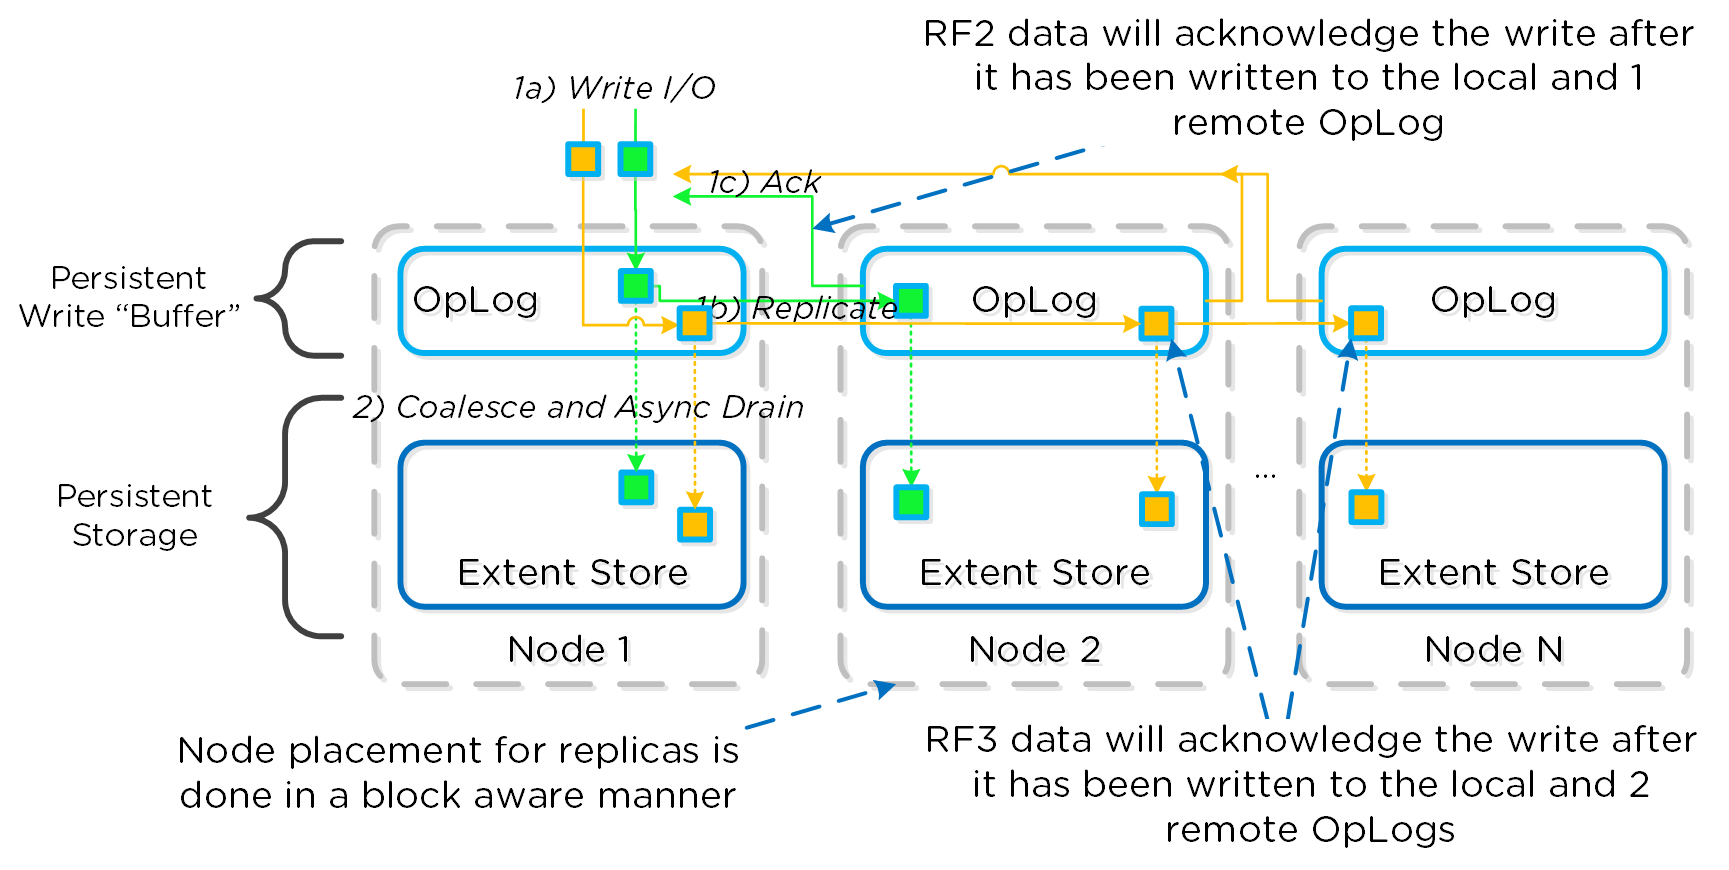
For more information on how Nutanix protects your data or implements data reduction, click the diagram below to review the relevant section of the Nutanix Bible.
Click Save to create the storage and mount it to all available hosts within the cluster.
In vSphere or Hyper-V environments, creating the Storage Container will also automate the process of mounting the storage to the hypervisor.
Select an existing Storage Container, and review the individual savings from different data reduction/avoidance features, as well as the Effective Capacity, which is a projection of available storage based on the overall efficiency. These values are found in the Storage Container Details table.
Unfortunately it is not possible to easily test data resiliency capabilities of the cluster in a shared environment, but the short video below will walk you through the experience from Prism when a node in the cluster is unexpectedly lost.
Provisioning a New Network
In this exercise Carol will use Prism to configure a new VM Network for the cluster.
AHV leverages Open vSwitch (OVS) for all VM networking. OVS is an open source software switch implemented in the Linux kernel and designed to work in a multiserver virtualization environment. Each AHV server maintains an OVS instance, and all OVS instances combine to form a single logical switch. Each node is typically uplinked to a physical switch port trunked/tagged to multiple VLANs, which will be exposed as virtual networks.
Select VM from the Prism Element drop down menu.
Select Network Config.

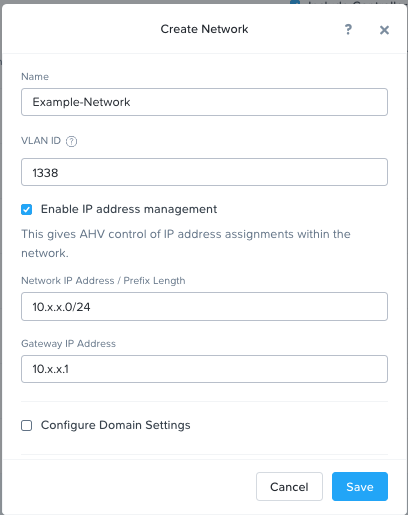
Click + Create Network and fill out the following fields, using the User specific network details in clusterassignments:
Name - Initials-Network_IPAM
VLAN ID - A value (< 4096) other than your Primary or Secondary network VLANs
Select Enable IP Address Management
Network IP Address / Prefix Length - 10.0.0.0/24
Gateway - 10.0.0.1
Do not select Configure Domain Settings
Select + Create Pool
Start Address - 10.0.0.100
End Address - 10.0.0.150
Click Submit
Note that AHV is capable of providing integrated DHCP services (IPAM), allowing virtualization administrators to allocate IPs to VMs from a configured pool, or easily specifying IPs as DHCP reservations when adding virtual NICs to VMs.
Click Save.
The configured virtual network will now be available across all nodes within the cluster. Virtual networks in AHV behave like Distributed Virtual Switches in ESXi, meaning you do not need to configure the same settings on each individual host within the cluster.
Close the Network Configuration window.
You’re done - simple stuff!
Responding to VM Creation Requests
Virtualization administrators are commonly tasked with deployment of new VMs. In this exercise, Carol walks through deployment of an AHV VM in Prism as a Nutanix administrator.
Return to the VM page in Prism Element from the drop down menu.
Click + Create VM.

Fill out the following fields to complete the user VM request:
Name - Initials-WinToolsVM
Description - Manually deployed Tools VM
vCPU(s) - 2
Number of Cores per vCPU - 1
Memory - 4 GiB
- Select + Add New Disk
Type - DISK
Operation - Clone from Image Service
Image - WinToolsVM.qcow2
Select Add
- Select Add New NIC
VLAN Name - Secondary
Select Add
Similar to public cloud providers, Nutanix AHV provides an Image Service feature allows you to build a store of imported files that you can use to mount a CD-ROM device from an ISO image or an operating system Disk from a disk image when creating a VM. The Image Service supports raw, vhd, vhdx, vmdk, vdi, iso, and qcow2 disk formats.
Note that the VM creation wizard also provides the ability to specify a Unattend.xml file for Windows Sysprep automation, or Cloud-Init file for Linux OS configuration.
Click Save to create the VM.
Note
Many VM operations, including VM creation can be scripted using the AHV CLI,
acli. Certain features, such as Secure Boot and vNUMA can currently only be enabled for a VM through the command line. The ACLI Reference Guide can be found here.You can SSH into any of your Nutanix CVMs and attempt creating an additional VM using
acli.Using the search field at the top of the table, filter for the requested VM. Select the VM and click Power On from the list of actions below the table.

Once the VM has completed booting, note the IP Address.

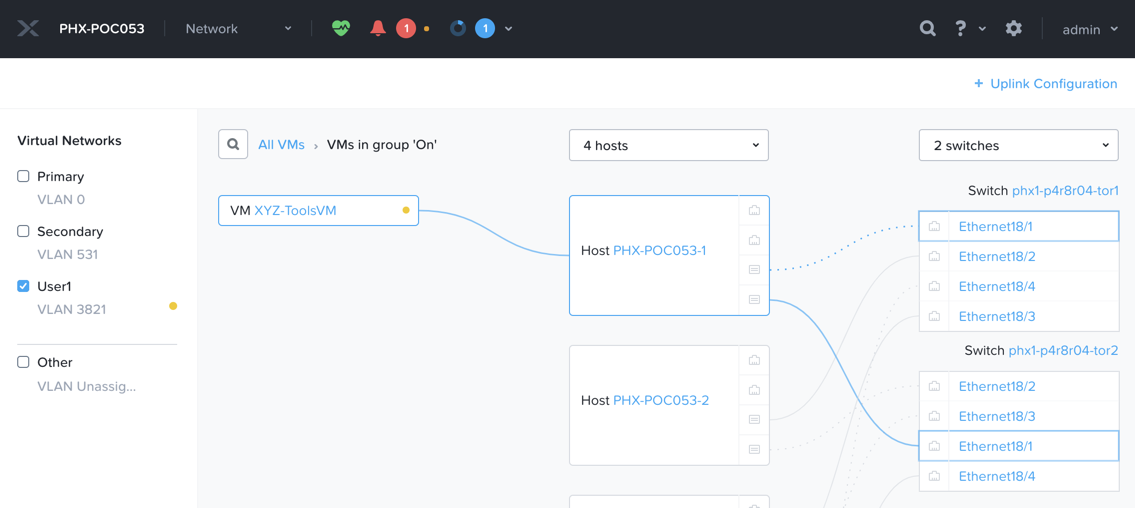
With previous infrastructure, Carol has had issues with newly created VM networks not working as expected, and has had to engage in lengthy troubleshooting sessions with her network admin counterpart to identify the source of the issue. With AHV, Carol is easily able to visualize the complete network path of the virtual machine she has provisioned.
Try it yourself by selecting the Network page from the Prism Element drop down menu and filtering by VLAN or VM name.
Enabling User Self Service
While Prism and acli provide simple workflows for creating VMs, Carol is regularly inundated with these requests and would love to focus more of her time on modernizing other parts of her organization’s aging infrastructure, and attending her son’s soccer games.
In the following exercises, Carol is going to up her Private Cloud game and bring IaaS self-service to her users leveraging native capabilities in Prism Central.
Return to the Home page of Prism Element.
Access Prism Central by clicking the Launch button and logging in with the following credentials:
User Name - admin
Password - HPOC Password
Exploring Categories
A Category is a key value pair. Categories are assigned to entities (such as VMs, Networks, or Images) based on some criteria (Location, Production-level, App Name, etc.). Policies can then be mapped to those entities that are assigned a specific category value.
For example, you might have a Department category that includes values such as Engineering, Finance, and HR. In this case you could create one backup policy that applies to Engineering and HR and a separate (more stringent) backup policy that applies to just Finance. Categories allow you to implement a variety of policies across entity groups, and Prism Central allows you to quickly view any established relationships.
In this exercise you’ll create a custom category for Carol to help align access to the proper resources for the Fiesta app team.
In Prism Central, select > Virtual Infrastructure > Categories.
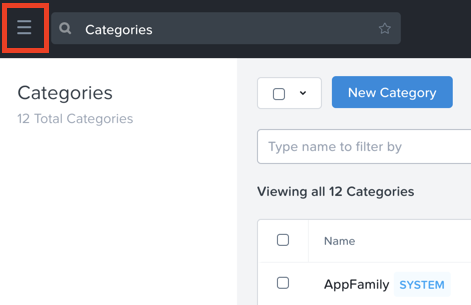
Click New Category and fill out the following fields:
Name - Initials-Team
Purpose - Allowing resource access based on Application Team
Values - Fiesta
Click Save.
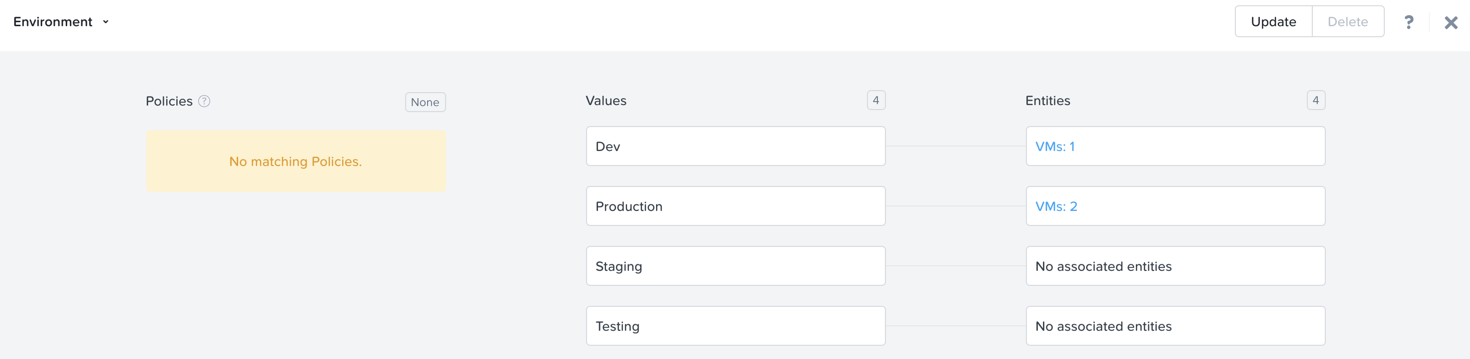
Click on the existing Environment category and note the available values. Environment is a SYSTEM category, and while you can add additional values, you cannot modify or delete the Category or any of its out of the box values.
Select > Virtual Infrastructure > VMs.
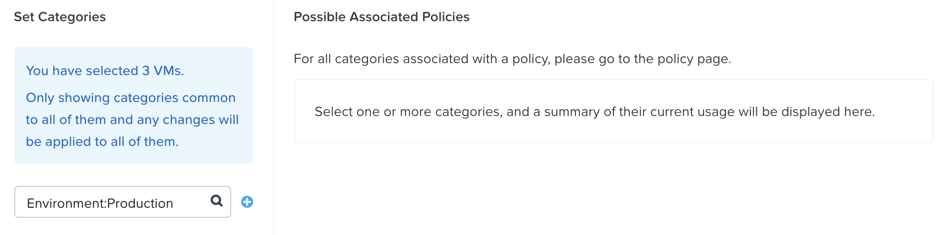
Using the checkboxes, select the AutoAD, and NTNX-BootcampFS-1 VMs and click Actions > Manage Categories.
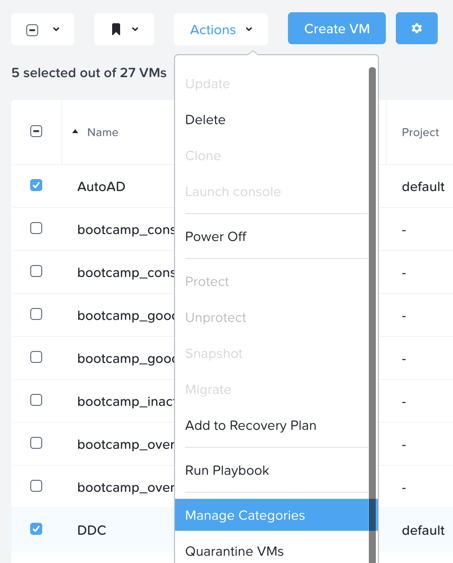
Note
Depending on the number of participants, some of the VMs you need to select could be on another page. You may either search for the VM in question, click to view additional pages and select the VM, or choose to show additional rows. Any of these techniques can be accomplished at the upper right hand portion of the interface.
In the search bar, begin typing Environment and select the Production value, then click on the plus sign.
Note
For categories tied to Security, Protection, or Recovery policies, related policies will appear in this window to show the impact of applying a Category to an entity.
Click Save.
Select the Initials-WinToolsVM provisioned by Carol in the previous exercise, and click Actions > Manage Categories. Assign the Initials-Team: Fiesta category, click the plus sign and then Save.
Exploring Roles
By default, Prism Central ships with several Roles that map to common user personas. Roles define what actions a user can perform, and are mapped to categories or other entities.
Carol needs to support two types of users working on the Fiesta team, developers who need to provision VMs for test environments, and operators who monitor multiple environments within the organization, but who have very limited capabilities to modify each environment.
In Prism Central, select > Administration > Roles.
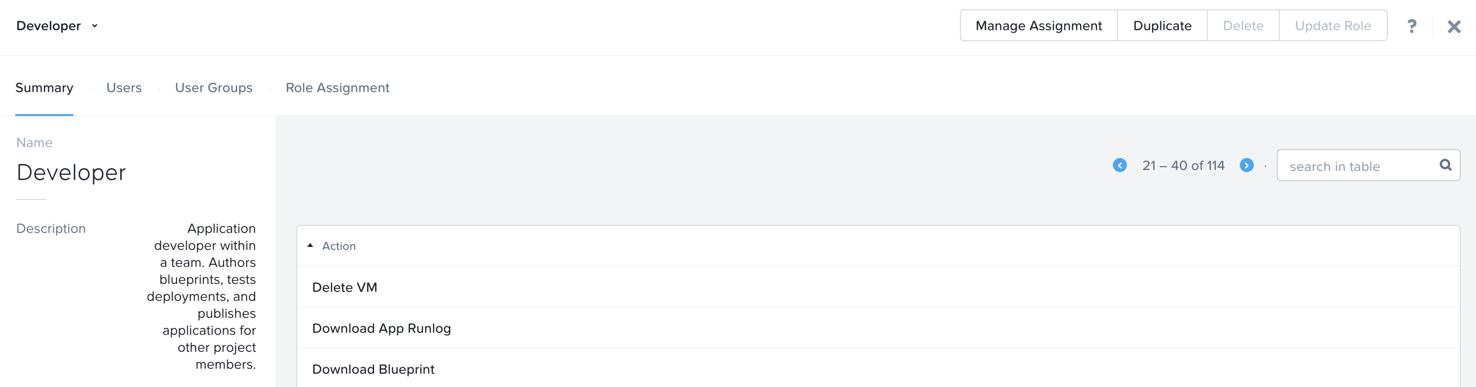
The built-in Developer role allows users to create and modify VMs, create, provision, and manage Calm Blueprints, and more.
Click on the built-in Developer role and optionally review the approved actions for the role. Click Manage Assignment.
Under Users and Groups, specify the SSP Developers User Group which should be automatically discovered from the NTNXLAB.local domain.
Under Entities, use the drop down menu to specify the following resources:
AHV Cluster - Your Assigned Cluster
AHV Subnet - Secondary
Category - Environment:Testing, Environment:Staging, Environment:Dev, Initials-Team:Fiesta
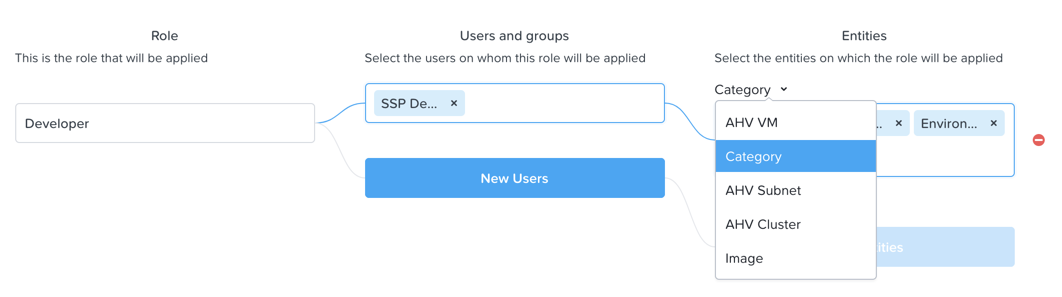
Click Save and then close this screen by clicking on the X at the top right.
The default Operator roll includes the ability to delete VMs and applications deployed from Blueprints, which isn’t desired in our environment. Rather than building a new role from scratch, we can clone to existing role and modify to suit our needs. The desired operator role should be able to view VM metrics, perform power operations, and update VM configurations such as vCPU or memory to address application performance issues.
Click the built-in Operator role and click Duplicate.
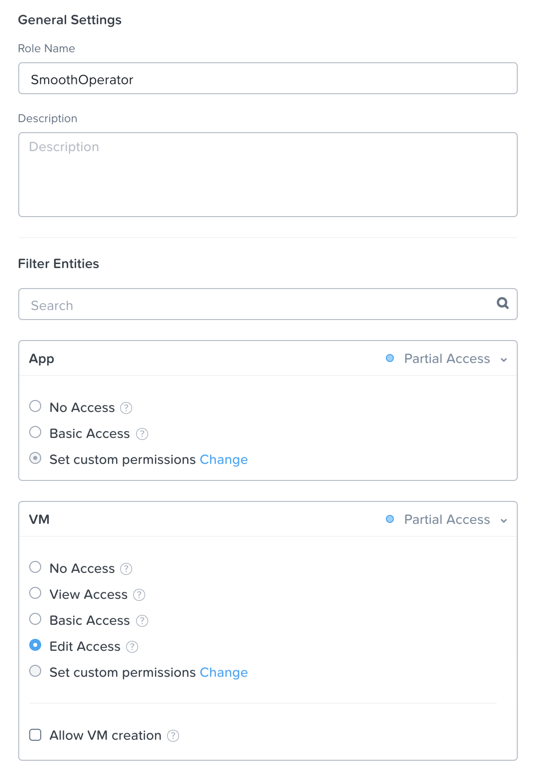
Fill out the following fields and click Save to create your custom role:
Role Name - Initials-SmoothOperator
Description - Limited operator accounts
App - No Access
VM - Edit Access
Do NOT select Allow VM Creation
Refresh Prism and click on your SmoothOperator role. Click Manage Assignment.
Create the following assignment:
Users and Groups - operator01
Entity Categories - Environment:Production, Environment:Testing, Environment:Staging, Environment:Dev
Operator01 is a user who has access to all VMs tagged with any of the Environment categories, but lacks generic access to specific clusters.
Click New Users to add an additional assignment to the same role:
Users and Groups - operator02
Entity Categories - Environment:Dev, Initials-Team:Fiesta
Operator02 is a user who sees all VMs tagged with either the Dev or Fiesta category values.
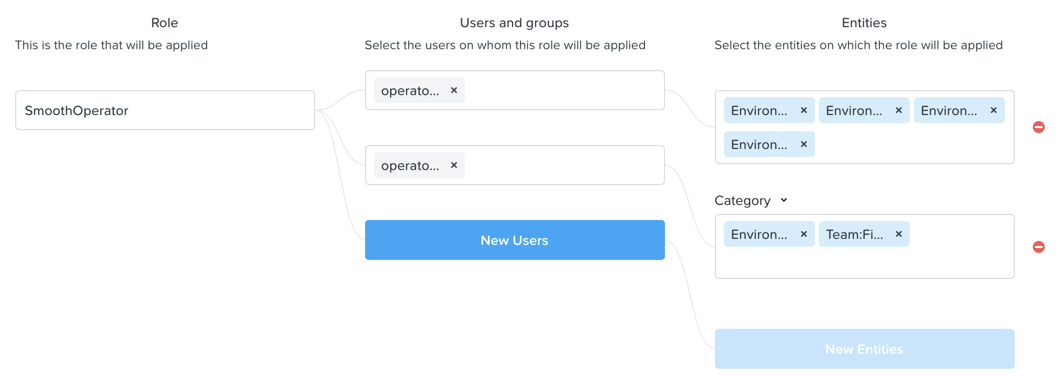
Click Save.
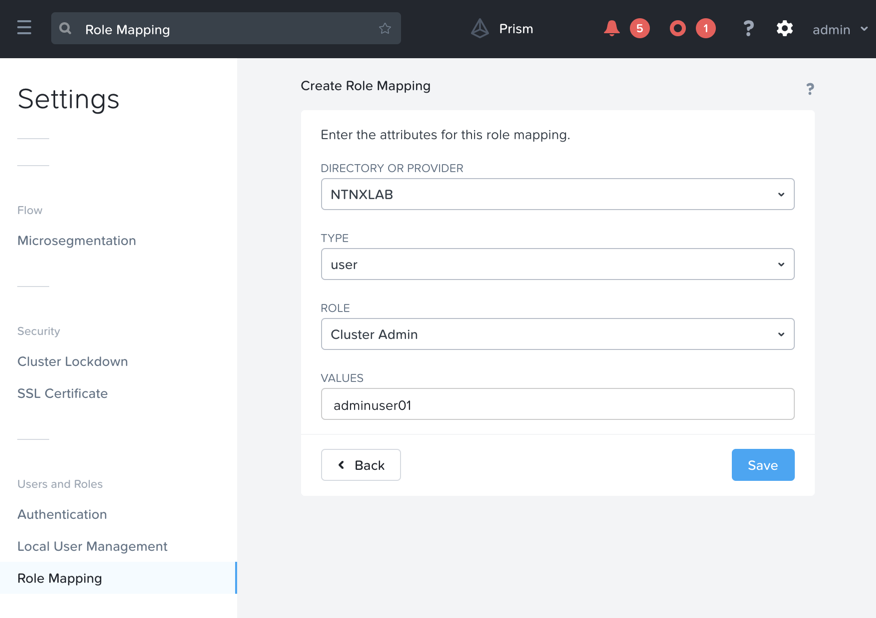
For infrastructure administrators such as Carol, you can map AD users to the Prism Admin or Super Admin roles through selecting > Prism Central Settings > Role Mapping and adding a new Cluster Admin or User Admin mapping to AD accounts.
Exploring Projects
The previous exercises are sufficient to provide basic VM creation self-service to Carol’s users, but much of their work involves applications that consist of multiple VMs. Manual deployment of multiple VMs for a single development, testing, or staging environment is slow and subject to inconsistency and user error. To provide a better experience for her users, Carol will introduce Nutanix Calm into the environment.
Nutanix Calm allows you to build, provision, and manage your applications across both private (AHV, ESXi) and public cloud (AWS, Azure, GCP) infrastructure.
In order for non-infrastructure administrators to access Calm, allowing them to create or manage applications, users or groups must first be assigned to a Project, which acts as a logical container to define user roles, infrastructure resources, and resource quotas. Projects define a set users with a common set of requirements or a common structure and function, such as a team of engineers collaborating on the Fiesta project.
In Prism Central, select > Services > Calm.
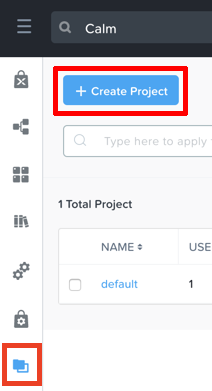
Select Projects from the lefthand menu and click + Create Project.
Fill out the following fields:
Note
Adding the User/Group mappings before adding the Infrastructure can cause adding the Infrastructure to fail. To avoid this, add the Infrastructure before the User/Group mappings.
Project Name - Initials-FiestaProject
Under Infrastructure, select Select Provider > Nutanix
Click Select Clusters & Subnets
Select Your Assigned Cluster
Under Subnets, select Primary, Secondary, and click Confirm
Mark Primary as the default network by clicking the
Under Users, Groups, and Roles, select + User
Name - SSP Developers
Role - Developer
Action - Save
Select + User
Name - Operator02
Role - Initials-SmoothOperator
Action - Save
Under Quotas, specify
vCPUs - 100
Storage - <Leave Blank>
Memory - 100
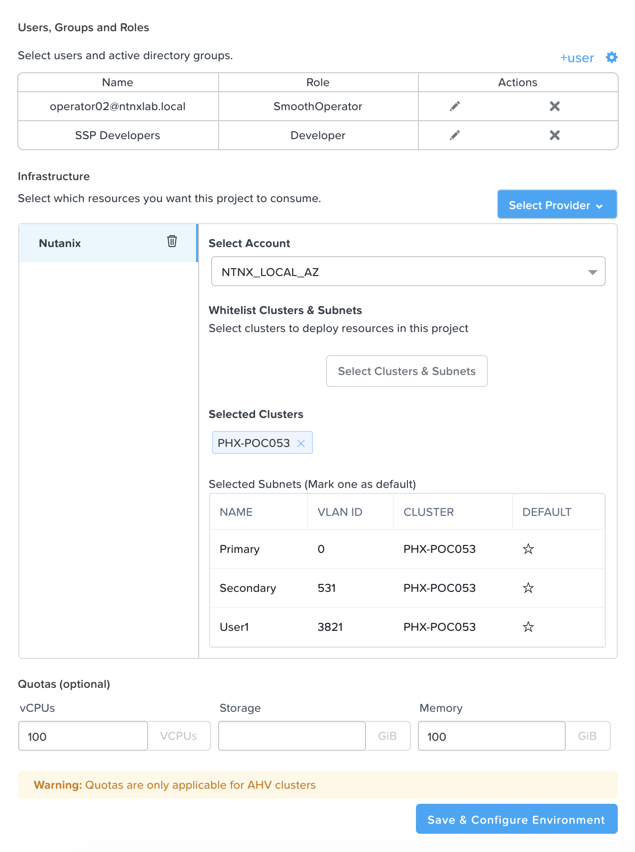
Click Save & Configure Environment.
This will redirect you to the Environments page, but there is nothing needed to configure here. Move onto the next step.
Note that only Operator02 was given access to the Calm project, rather than all Operator accounts.
Staging Blueprints
A Blueprint is the framework for every application that you model by using Nutanix Calm. Blueprints are templates that describe all the steps that are required to provision, configure, and execute tasks on the services and applications that are created. A Blueprint also defines the lifecycle of an application and its underlying infrastructure, starting from the creation of the application to the actions that are carried out on a application (updating software, scaling out, etc.) until the termination of the application.
You can use Blueprints to model applications of various complexities; from simply provisioning a single virtual machine to provisioning and managing a multi-node, multi-tier application.
While developer users will have the ability to create and publish their own Blueprints, Carol wants to provide a common Fiesta Blueprint used by the team.
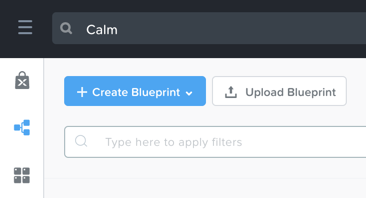
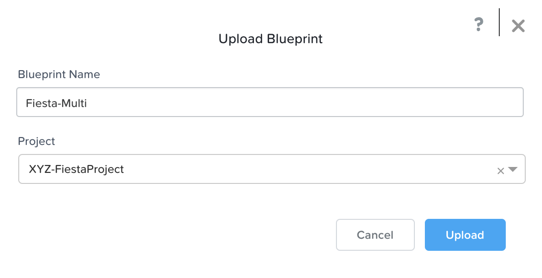
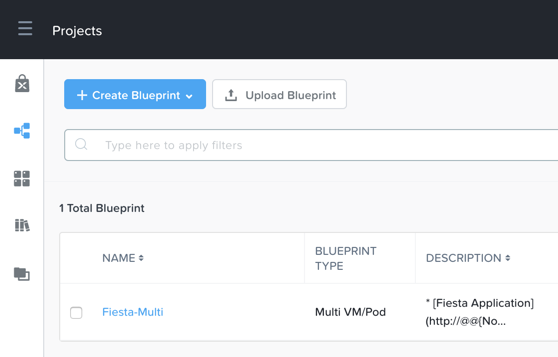
From Prism Central > Calm, select Blueprints from the lefthand menu and click Upload Blueprint.
Select Fiesta-Multi.json.
Update the Blueprint Name to include your initials. Even across different projects, Calm Blueprint names must be unique.
Select your Calm project and click Upload.
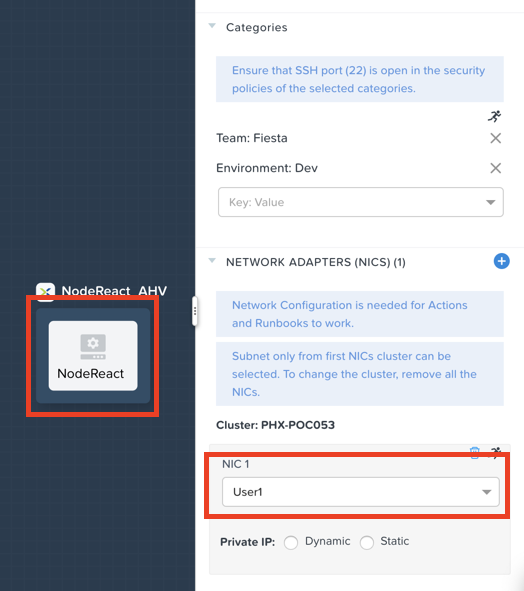
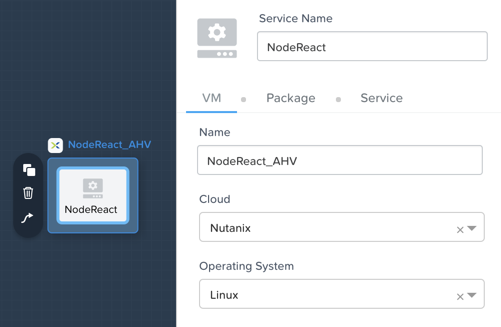
In order to launch the Blueprint you must first assign a network to the VM. Select the NodeReact Service, and in the VM Configuration menu on the right, select Primary as the NIC 1 network.
Specify the Initials-Team: Fiesta and Environment: Dev categories for the NodeReact Service.
Repeat the NIC 1 and Category assignment for the MySQL Service.
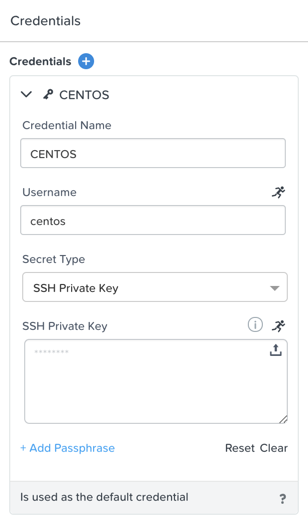
Click Credentials to define a private key used to authenticate to the CentOS VM that will be provisioned by the Blueprint.

Expand the CENTOS credential and use your preferred SSH key, or paste in the following value as the SSH Private Key:
-----BEGIN RSA PRIVATE KEY-----
MIIEowIBAAKCAQEAii7qFDhVadLx5lULAG/ooCUTA/ATSmXbArs+GdHxbUWd/bNG
ZCXnaQ2L1mSVVGDxfTbSaTJ3En3tVlMtD2RjZPdhqWESCaoj2kXLYSiNDS9qz3SK
6h822je/f9O9CzCTrw2XGhnDVwmNraUvO5wmQObCDthTXc72PcBOd6oa4ENsnuY9
HtiETg29TZXgCYPFXipLBHSZYkBmGgccAeY9dq5ywiywBJLuoSovXkkRJk3cd7Gy
hCRIwYzqfdgSmiAMYgJLrz/UuLxatPqXts2D8v1xqR9EPNZNzgd4QHK4of1lqsNR
uz2SxkwqLcXSw0mGcAL8mIwVpzhPzwmENC5OrwIBJQKCAQB++q2WCkCmbtByyrAp
6ktiukjTL6MGGGhjX/PgYA5IvINX1SvtU0NZnb7FAntiSz7GFrODQyFPQ0jL3bq0
MrwzRDA6x+cPzMb/7RvBEIGdadfFjbAVaMqfAsul5SpBokKFLxU6lDb2CMdhS67c
1K2Hv0qKLpHL0vAdEZQ2nFAMWETvVMzl0o1dQmyGzA0GTY8VYdCRsUbwNgvFMvBj
8T/svzjpASDifa7IXlGaLrXfCH584zt7y+qjJ05O1G0NFslQ9n2wi7F93N8rHxgl
JDE4OhfyaDyLL1UdBlBpjYPSUbX7D5NExLggWEVFEwx4JRaK6+aDdFDKbSBIidHf
h45NAoGBANjANRKLBtcxmW4foK5ILTuFkOaowqj+2AIgT1ezCVpErHDFg0bkuvDk
QVdsAJRX5//luSO30dI0OWWGjgmIUXD7iej0sjAPJjRAv8ai+MYyaLfkdqv1Oj5c
oDC3KjmSdXTuWSYNvarsW+Uf2v7zlZlWesTnpV6gkZH3tX86iuiZAoGBAKM0mKX0
EjFkJH65Ym7gIED2CUyuFqq4WsCUD2RakpYZyIBKZGr8MRni3I4z6Hqm+rxVW6Dj
uFGQe5GhgPvO23UG1Y6nm0VkYgZq81TraZc/oMzignSC95w7OsLaLn6qp32Fje1M
Ez2Yn0T3dDcu1twY8OoDuvWx5LFMJ3NoRJaHAoGBAJ4rZP+xj17DVElxBo0EPK7k
7TKygDYhwDjnJSRSN0HfFg0agmQqXucjGuzEbyAkeN1Um9vLU+xrTHqEyIN/Jqxk
hztKxzfTtBhK7M84p7M5iq+0jfMau8ykdOVHZAB/odHeXLrnbrr/gVQsAKw1NdDC
kPCNXP/c9JrzB+c4juEVAoGBAJGPxmp/vTL4c5OebIxnCAKWP6VBUnyWliFhdYME
rECvNkjoZ2ZWjKhijVw8Il+OAjlFNgwJXzP9Z0qJIAMuHa2QeUfhmFKlo4ku9LOF
2rdUbNJpKD5m+IRsLX1az4W6zLwPVRHp56WjzFJEfGiRjzMBfOxkMSBSjbLjDm3Z
iUf7AoGBALjvtjapDwlEa5/CFvzOVGFq4L/OJTBEBGx/SA4HUc3TFTtlY2hvTDPZ
dQr/JBzLBUjCOBVuUuH3uW7hGhW+DnlzrfbfJATaRR8Ht6VU651T+Gbrr8EqNpCP
gmznERCNf9Kaxl/hlyV5dZBe/2LIK+/jLGNu9EJLoraaCBFshJKF
-----END RSA PRIVATE KEY-----
Click Save and click Back once the Blueprint has completed saving.
Within minutes, Carol has laid the groundwork to provide virtual infrastructure and application self-service directly to her end users.
Developer Workflow
Meet Dan. Dan is a member of the Fiesta Engineering team. He’s behind on testing a new feature, as his request to IT to deploy the virtual infrastructure he requires to perform the testing are several days overdue.
Dan has resorted to deploying VMs outside of the corporate network on his favorite public cloud service, with no security oversight, and putting company IP at risk.
Carol to the rescue - she encourages Dan to follow the exercise below to allow him to easily deploy resources within the Fiesta project through Prism.
Log out of the local admin account and log back into Prism Central with Dan’s credentials:
User Name - devuser01@ntnxlab.local
Password - nutanix/4u
Note
If you experience a slow login, try logging in using an Incognito/Private browsing session.
Select the menu and note that you now have significantly restricted access to the environment.
On the VMs page, you should already see your Initials-WinToolsVM as available to be managed by Dan.
Click on the VM and note Dan can get basic metrics associated with his VM, as well as control the VM configuration, power operations, and even delete the VM.
There are two workflows that could be followed for self-service creation of VMs: Traditional VM creation wizard and Calm. One of Dan’s requirements is a Linux virtual machine that runs multiple tools required as part of his development workflow.
Click Create VM and fill out the following fields to provision a traditional virtual machine, similar to the manual VM deployment process Carol followed earlier in the lab:
Create VM from - Disk Images
Select Disk Images - Linux_ToolsVM.qcow2
Name - Initials -LinuxToolsVM
Target Project - Initials -FiestaProject
Network - Secondary
Categories - Envrionment:Dev
Select Manually configure CPU and Memory for this VM
CPU - 2
Cores Per CPU - 1
Memory - 4 GiB
Click Save and note the VM is immediately powered on following creation.
In addition to the tools VM, Dan also desires to deploy infrastructure that can be used to test new builds of the Fiesta application. Having end users deploy multi-tier applications through single-VM provisioning and manual integration is slow, inconsistent, and doesn’t result in high user satisfaction - luckily we can leverage the pre-created Blueprint for Fiesta staged to our project by Carol.
Select > Services > Calm.
Select Blueprints from the left hand menu and open the Fiesta-Multi Blueprint.
Note
If you’re unfamiliar with Calm Blueprints, take a moment to explore the following key components of the Fiesta-Multi Blueprint:
Select either the NodeReact or MySQL service and review the VM configuration in the configuration pane on the right hand of the screen.
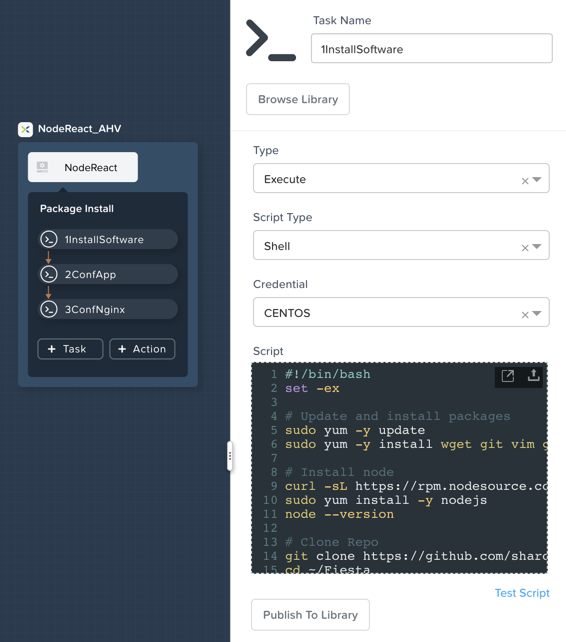
Select the Package tab and click Configure Install to view the installation tasks for the selected service. These are the scripts and actions associated with the configuration of each Service or VM.
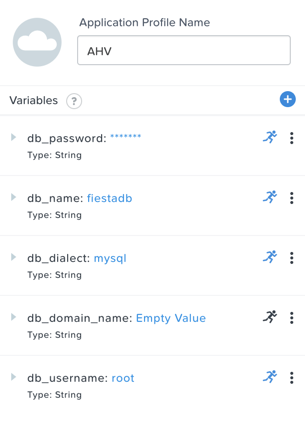
Under Application Profile, select AHV and view the variables defined for the Blueprint. Variables allow for runtime customization and can also be used on a per application profile basis to build a single application Blueprint that allows you to provision an application to multiple environments, including AHV, ESXi, AWS, GCP, and Azure.
Select the Create Action under Application Profile to visualize dependencies between services. Dependencies can be defined explicitly, but depending on assignment of variables Calm will also identify implicit dependencies. In this Blueprint, you see the web tier installation process will not begin until the MySQL database is running.
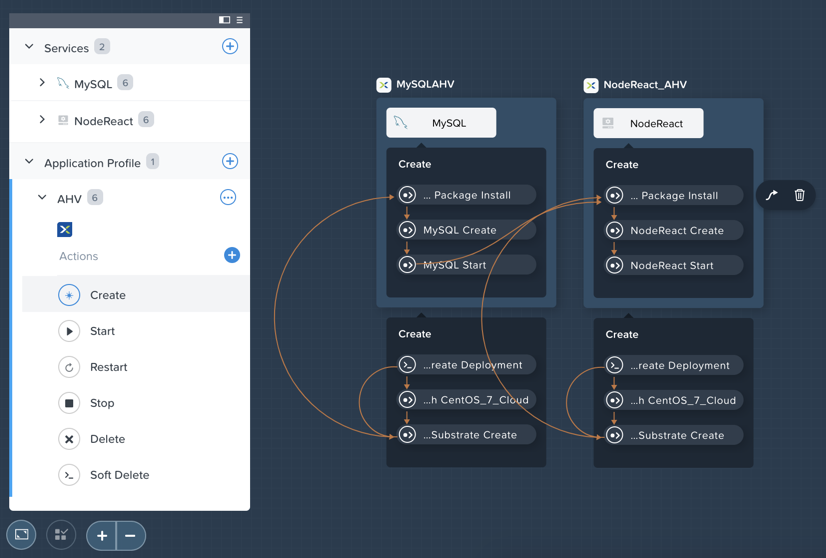
Click Credentials in the toolbar at the top of the Blueprint Editor and expand the existing CENTOS credential. Blueprints can contain multiple credentials which can be used to authenticate to VMs to execute scripts, or securely pass credentials directly into scripts.
Click Back.
Click Launch to provision an instance of the Blueprint.

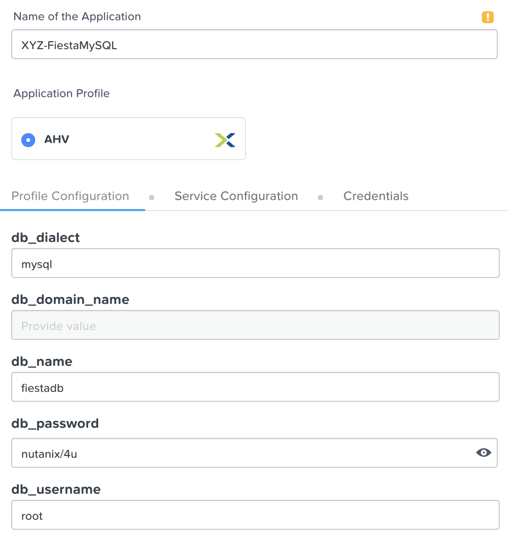
Fill out the following fields and click Create:
Name of of the Application - Initials -FiestaMySQL
db_password - nutanix/4u
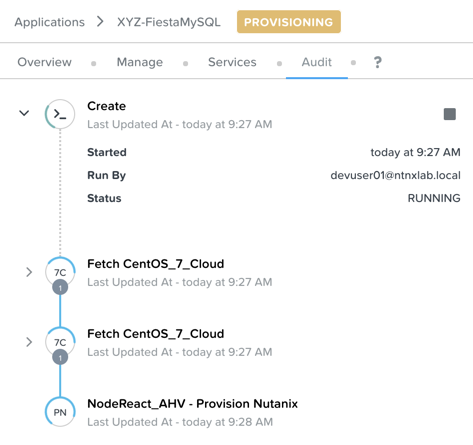
Select the Audit tab to monitor the deployment of the Fiesta development environment. Complete provisioning of the app should take approximately 5 minutes.
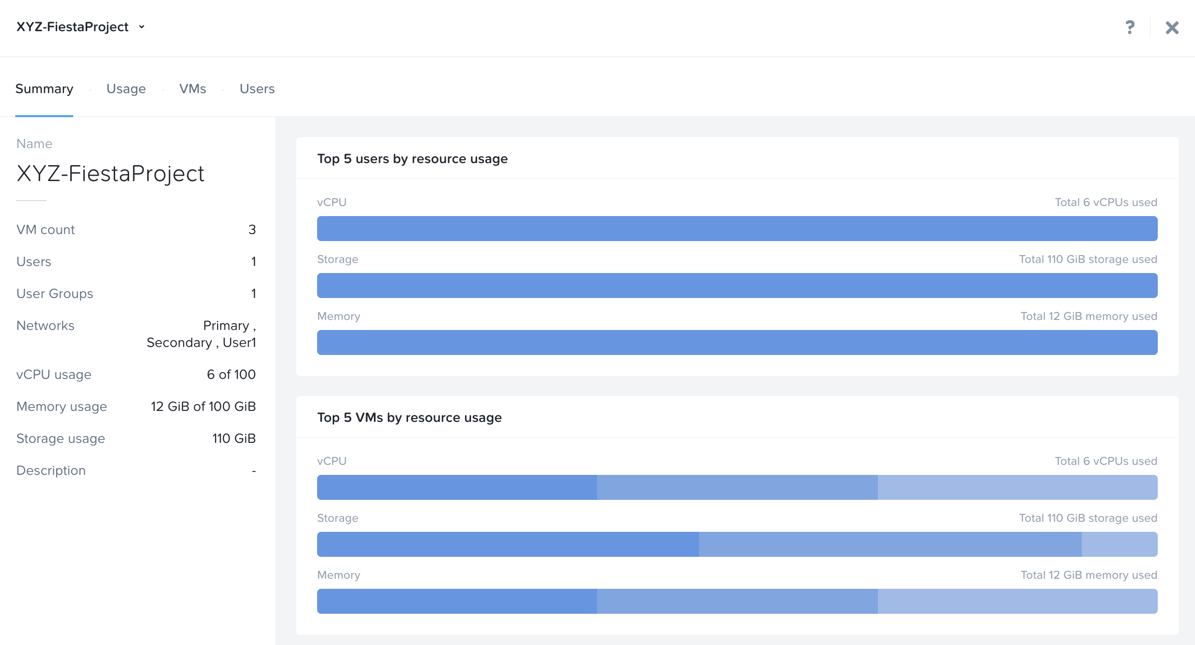
While the application is provisioning, open > Administration > Projects and select your project.
Review the Summary, Usage, VMs, and Users tabs to see what type of data is made available to users. These breakouts make it easy to understand on a per project, vm, or user level, what resources are being consumed.
Return to Calm > Applications > Initials-FiestaMySQL and wait for the application to move from Provisioning to Running. Select the Services tab and select the NodeReact Service to obtain the IP of the web tier.
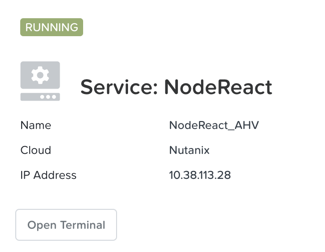
Open http://<NodeReact-VM-IP> in a new browser tab and validate the app is running.
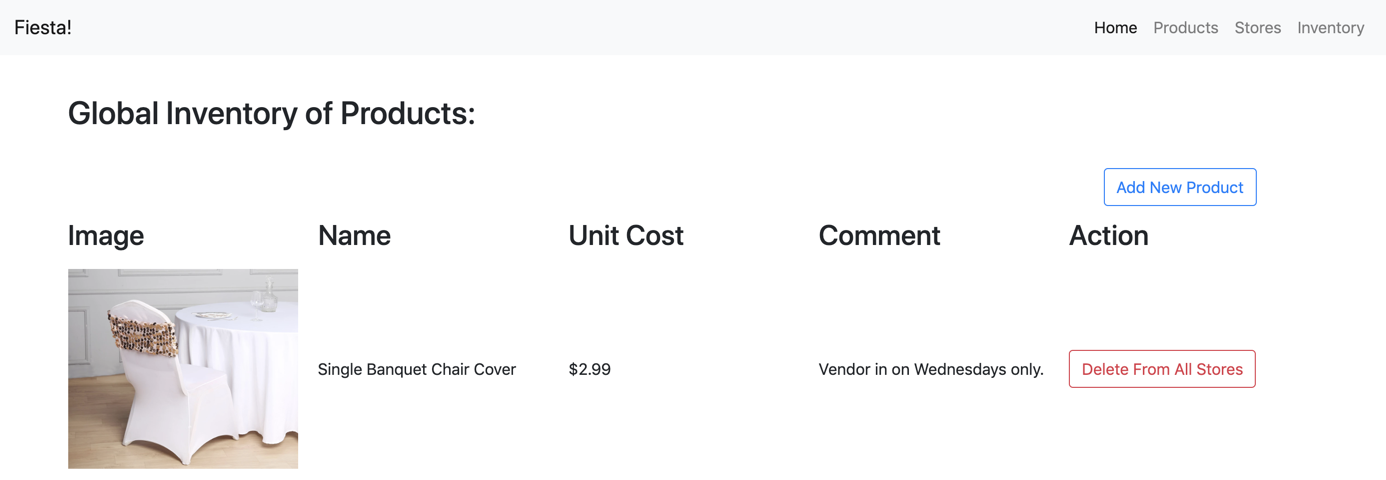
Instead of filing tickets and waiting days, Dan was able to get his test environment up and running before lunch. Instead of drowning his sorrows in Ben & Jerry’s tonight, Dan is going to go to the gym, and eat vegetables with his dinner. Go, Dan!
Operator Workflows
Meet Ronald and Elise. Ronald works as a Level 3 engineering with the corporate IT helpdesk, and Elise works as a QA intern on the Fiesta team. In the brief exercise below you will explore and contrast their levels of access based on the roles defined and categories assigned by Carol.
Log out of the devuser01 account and log back into Prism Central with Ronald’s credentials:
User Name - operator01@ntnxlab.local
Password - nutanix/4u
As expected, all VMs with Environment category values assigned are available. Note that you have no ability to Create or Delete VMs, but the abilities to power manage and change VM configurations are present.
What else can be accessed by this user? Is Calm available?
Log out of the operator01 account and log back into Prism Central with Elise’s credentials:
User Name - operator02@ntnxlab.local
Password - nutanix/4u
Note that only resources tagged with the Initials-Team: Fiesta category are available to be managed.
Elise receives an alert that memory utilization is high on the nodereact VM. Update the configuration to increase memory and power cycle the VM.
Using Entity Browser, Search, and Analysis
Now that Carol has freed up time to focus on replacing additional legacy infrastructure, it is important for her to understand how a large, diverse environment can all be managed and monitored via Prism Central. In the exercise below you will explore common workflows for working with entities across multiple clusters in a Nutanix environment.
Log out of the operator02 account and log back into Prism Central with Carol’s AD credentials:
User Name - adminuser01@ntnxlab.local
Password - nutanix/4u
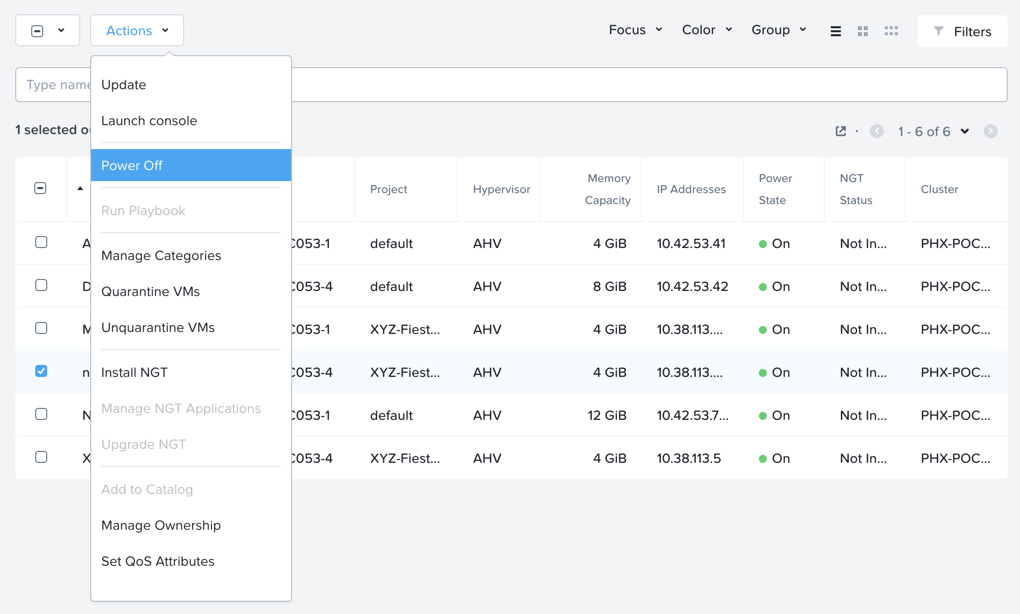
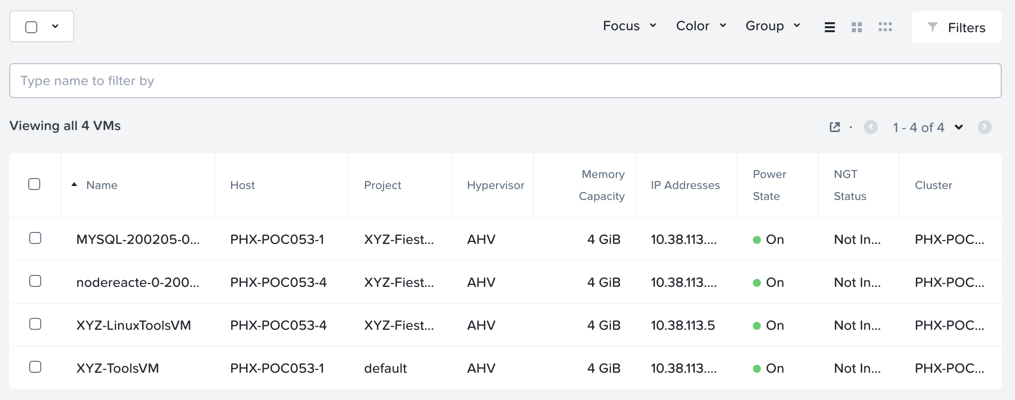
Open > Virtual Infrastructure > VMs. Prism Central’s Entity Browser provides a robust UI for sorting, searching, and viewing entities such as VMs, Images, Clusters, Hosts, Alerts, and more!
Select Filters and explore the available options. Specify the following example filters, and verify the corresponding box is checked:
Name - Contains Initials
Categories - Initials-Team: Fiesta
Hypervisor - AHV
Power State - On
Take notice of other helpful filters available such as VM efficiency, memory usage, and storage latency.
Select all of the filtered VMs and click the Label icon to apply a custom label to your group of filtered VMs (e.g. Initials AHV Fiesta VMs).
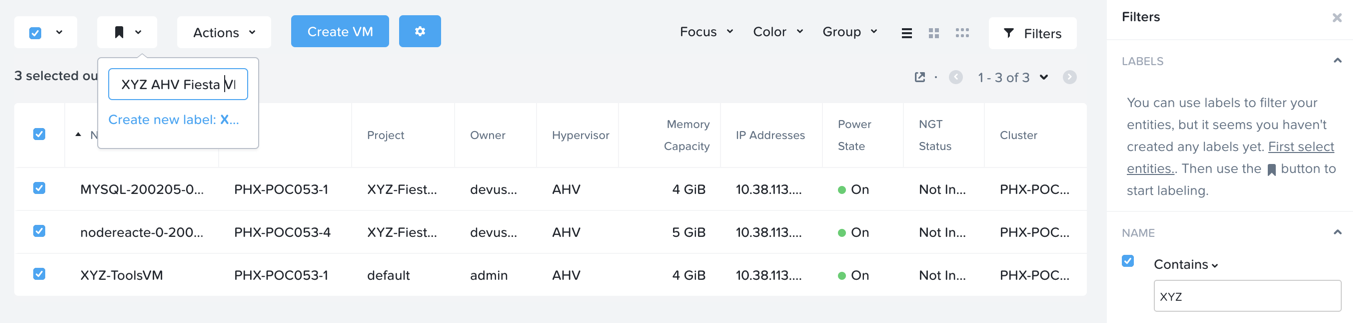
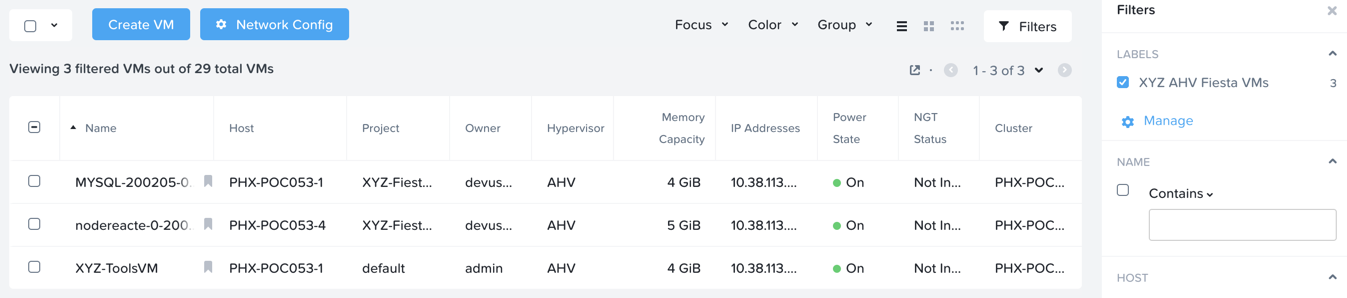
Clear all filters and select your new label to quickly return to your previously identified VMs. Labels provide an additional means of taxonomy for entities, without tying them to specific policies as is with categories.
Select the Focus dropdown to access different out of box views. Which view should be used to understand if your VMs are included as part of a DR plan?
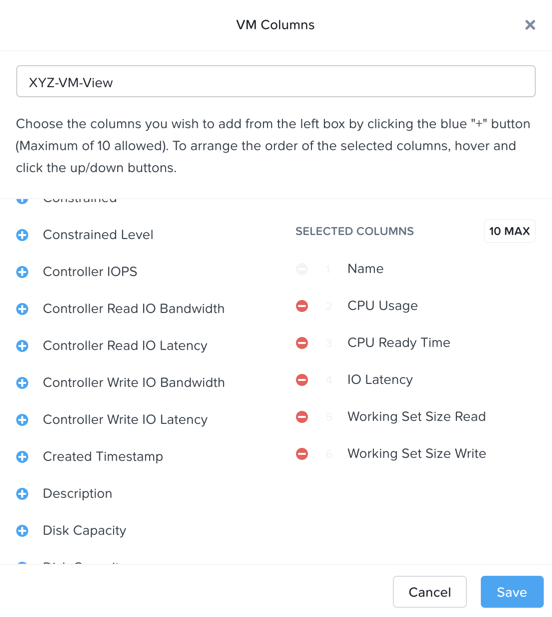
Click Focus > + Add Custom to create a VM view (e.g. XYZ-VM-View) that displays CPU Usage, CPU Ready Time, IO Latency, Working Set Size Read, and Working Set Size Write. Such a view could be used to helping to spot VM performance problems.
To fully appreciate the power of Prism Central for searching, sorting, and analyzing entities, view the following brief video:
Improved Life Cycle Management
While not a daily activity, Carol previously dedicated as much as 40% of her time planning and executing software and firmware updates to legacy infrastructure, leaving little time for innovation. In her Nutanix environments, Carol is leveraging the rules engine and rich automation in Lifecycle Manager (LCM) to take the hassle out of planning and applying her infrastructure software updates.
Unfortunately in a shared cluster environment, you’re not able to test LCM directly. To become more familiar with LCM’s capabilities and ease of use, click through each of the interactive demos available below.
5.11 Prism Element LCM Interactive Demo

5.11 Prism Central LCM Interactive Demo

Next Steps
In under 2 hours, we’ve shown you how Prism delivers a frictionless experience for virtual infrastructure administrators when it comes to deploying storage, networks, and workloads, monitoring the environment, and updating software. You’ve seen how native Prism Central capabilities, combined with Active Directory, can be used to control access and enable self-service for non-administrator personas. Additionally you enabled rich application automation capabilities for your Private Cloud through Nutanix Calm.
Private Clouds aren’t built on IaaS, self-service, and application automation alone, however. In the upcoming labs, you will see how Nutanix has built on its foundation to provide advanced monitoring and operations capabilities through its additional Prism Pro features, consolidate storage technologies with Files, native microsegmentation with Flow, and more!