Cost Governance with Xi Beam
Xi Beam is a cost governance and security compliance service that works with both public clouds and Nutanix Private Cloud. This lab introduces Beam’s cost governance capabilities specifically for Nutanix.
What is Cost Governance? It is a set of rules by which you measure your cloud consumption and implement cost control policies. Specifically for the Nutanix Private Cloud, Beam provides the following cost governance capabilities:
Granular Cloud Metering: know how much it really costs to run VMs in your Nutanix Private Cloud
Cost Center Reporting: tag-based automated reports to know how much a cost center is spending
Chargeback & Budgeting: drive accountability by allocating any untagged costs to appropriate cost centers and implement budget alerts
In this lab you will mimic a customer use case of identifying the true cost of running workloads on Nutanix Private Cloud across various users. By the end of the lab, you will learn:
How to use a TCO model to calculate the cost of Nutanix clusters and VMs
How to use Prism categories to allocate those costs to a cost center for VM spend reporting
How to implement Chargeback to ensure costs are allocated to appropriate cost centers
How to set up alerts to be notified before costs exceed a certain budget
Logging In
Beam is a SaaS service and does not require any on-premises installation for cost governance. To begin the lab, you will log into the Beam portal using pre-created credentials.
In your browser, open https://beam.nutanix.com/ and click Sign in with My Nutanix.
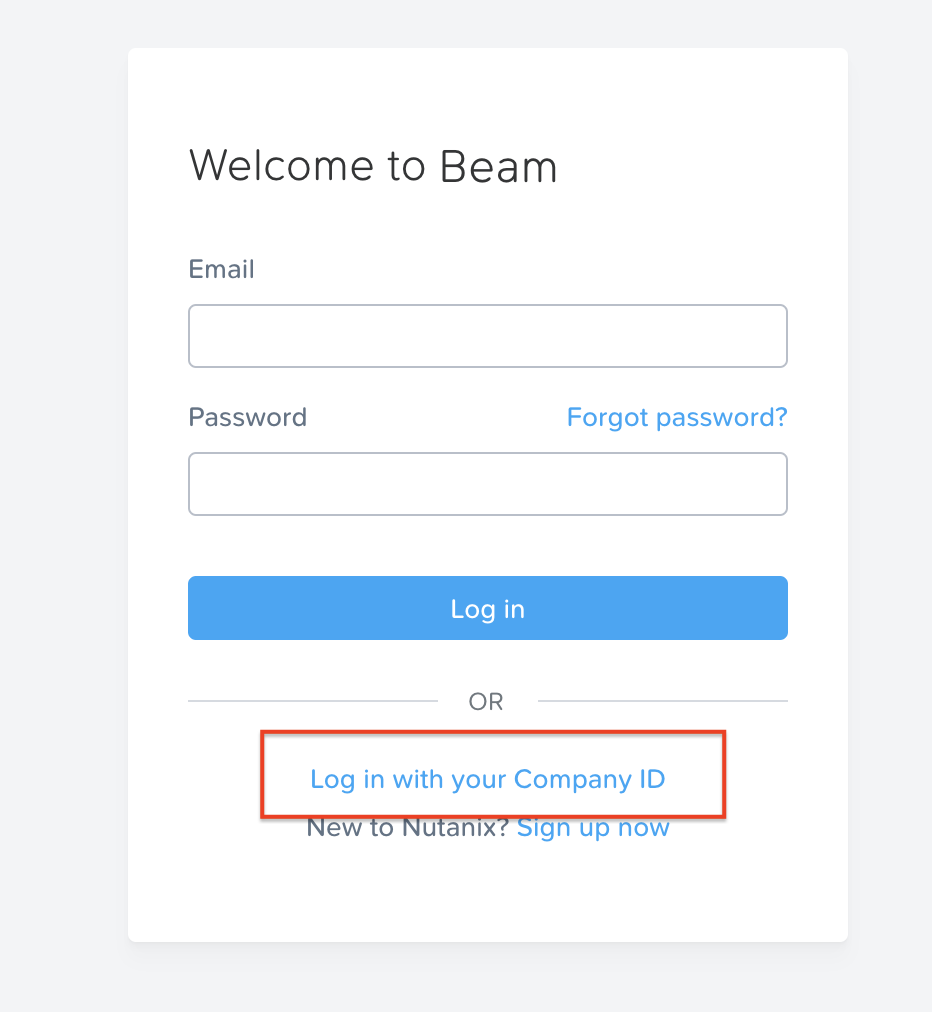
Click Login with your Company ID to login with a custom Identity Provider.
Enter beam-lab@nutanix.com as your Company email address and click Continue.
Enter nutanix6-ad as your Unique ID and click Continue.
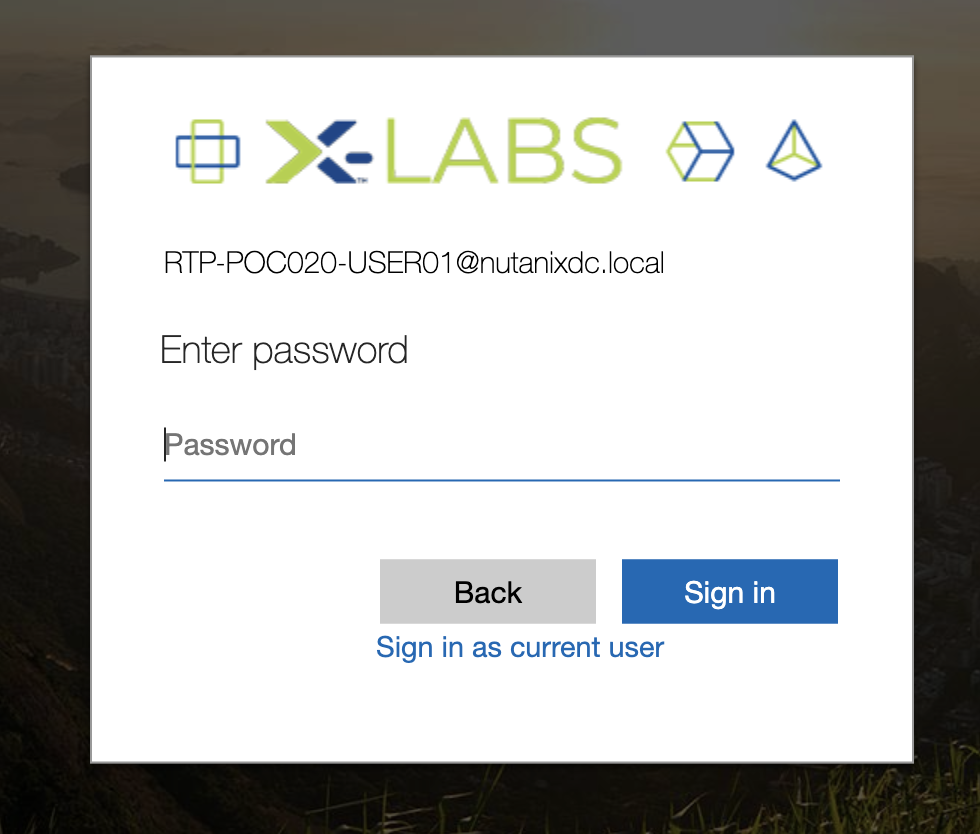
Log in using the following credentials:
Username - Your Lab VPN Username in clusterassignments
Password - techX2020!
Note
Additional pre-requisites already configured for this lab include:
The Nutanix cluster being used must already be licensed in the Nutanix Salesforce database.
Pulse must be enabled within Prism for your cluster, allowing Beam to receive configuration and utilization details of VMs running on the cluster.
If this is your first time accessing the Beam lab, you may see two popup messages explaining how Beam calculates the cost data for Nutanix products. Review and dismiss the messages to proceed to the Beam Cost Governance portal.

Private Cloud Cost Metering
Nutanix Account Configuration
In order to start using Beam, you will need to configure a customer’s Nutanix account with Beam by entering a license key associated with their purchase.
Note
For the lab environment, the license key has already been entered.
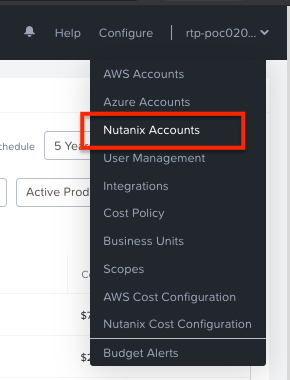
From the toolbar at the top of the portal, select Configure > Nutanix Account.
Observe the configured license key.

Product Costs
The next step is to ensure Beam has accurate license cost data for all Nutanix products.
From the toolbar at the top of the portal, select Configure > Nutanix Cost Configuration.
Once you’ve entered the license key, Beam populates the customer’s entire Nutanix purchase history from their Salesforce account. Beam automatically populates product costs based on assumed market price for all Nutanix products - hardware and software. The actual cost paid by customers may vary slightly depending on the final pricing from Nutanix resellers, which is unavailable to Beam.
Select Configure Cost to view how a customer can customize their exact costs for each purchase.
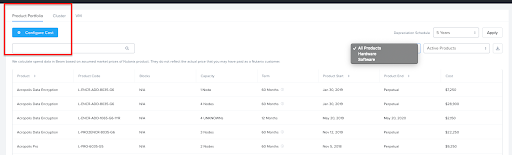
Click X to close Cost Configurations.
TCO Configuration
Beam uses a built-in total cost of ownership (TCO) model for Nutanix that provides out-of-the-box visibility into the true cost of running the Nutanix private cloud. These costs are eventually used to calculate granular VM level costs. It is important to configure the TCO model accurately so that you have more accurate VM costs.
The TCO model includes several cost heads that are automatically populated depending on the number of Nutanix nodes and some industry standards that are built into the model. The out-of-the-box TCO calculations provide a good faith level of accuracy and can be further fine-tuned to customer specifics. Learn how to configure the TCO model:
In Configure > Nutanix Cost Configuration, select the Cluster tab, and search for cluster ID ending in 4d3b.
Click on Edit TCO next to that cluster.
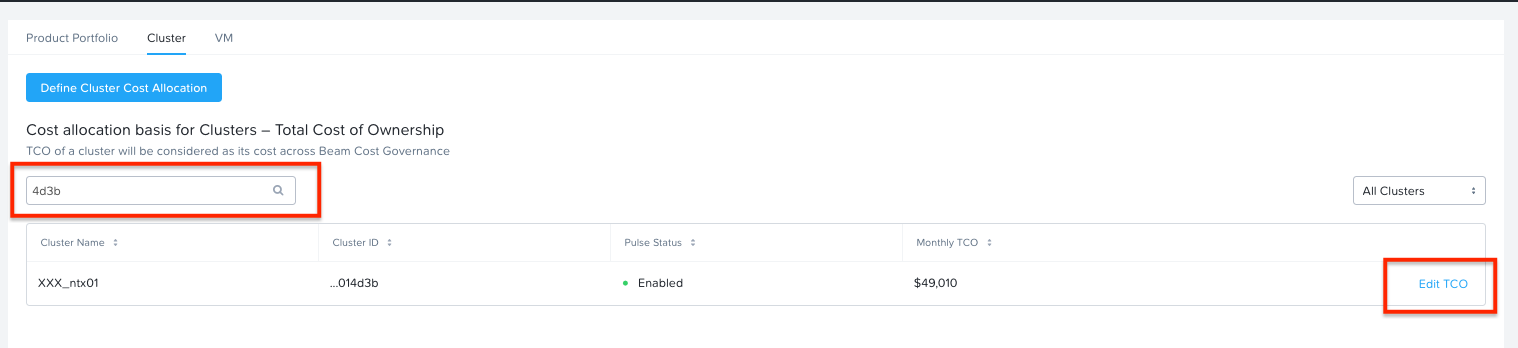
Note
If you do not see the Edit TCO option, click on Define Cluster Cost Allocation and ensure that Total Cost of Ownership is selected as the cost model.
Navigate through the various cost heads to familiarize yourself with them:
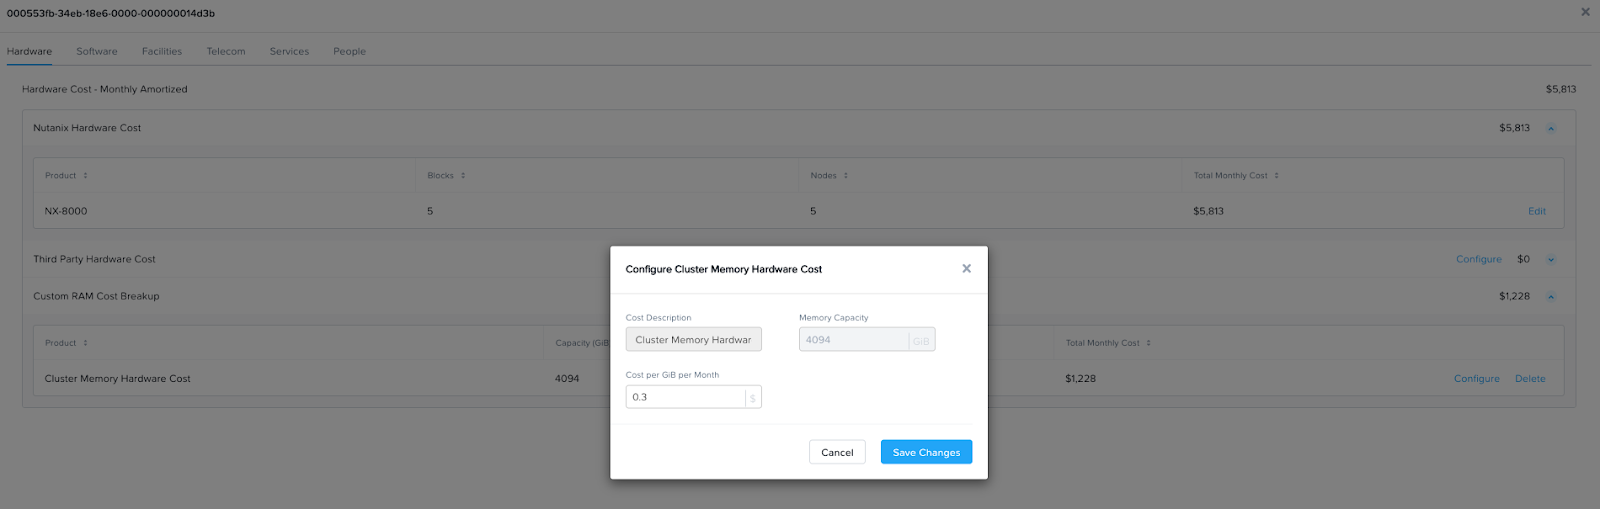
Hardware
Includes all Nutanix appliance costs which are automatically pulled from customer’s purchase history in salesforce. These costs are amortized on a monthly basis assuming a hardware life of 60 months.
Any third-party hardware costs are added automatically as well. Average cost per third-party appliance is assumed to be $12,000. Memory costs for the whole cluster can be added manually if you know the monthly cost per GB of RAM.
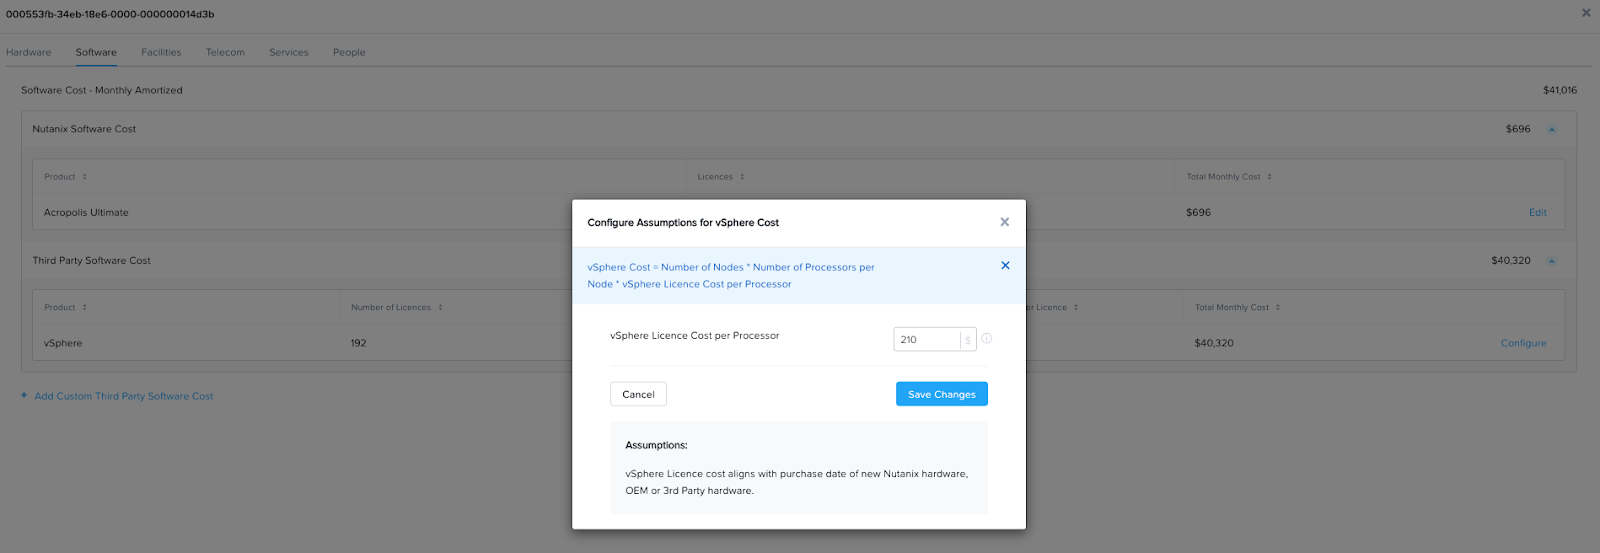
Software
Includes all Nutanix software license costs which are automatically pulled from customer’s purchase history in salesforce. Costs associated with any Nutanix nodes running vSphere are also automatically calculated assuming a vSphere license cost of $210/processor and 2 processors per node.
Any additional software costs, such as a third-party application performance monitoring software cost can be added manually. All software costs are amortized on a monthly basis.
Facilities
Includes power and cooling costs, and datacenter space costs for the datacenter used to run the Nutanix Private Cloud.
The power and cooling costs are automatically calculated depending only on the number of Nutanix nodes. Amount of power consumed per node and a power usage effectiveness (PUE) ratio are built into the model. The TCO model assumes cost of power to be $0.1/kWh based on US standard. This cost can be configured depending on customer geography. Monthly power and cooling costs = Number of nodes * power consumed per node in kWh * cost per kWh * (number of hours in a month)*PUE.

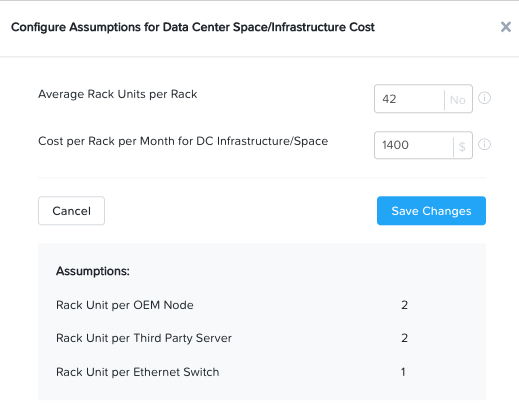
The datacenter space costs are also automatically calculated depending only on the number of Nutanix nodes. It is assumed that each node needs 2 rack units, there are 42 rack units per rack, and the average cost per rack is $1,400/month. Monthly datacenter space cost = {(Number of nodes * 2 rack units)/42 rack units per rack}*($1,400)
Telecom
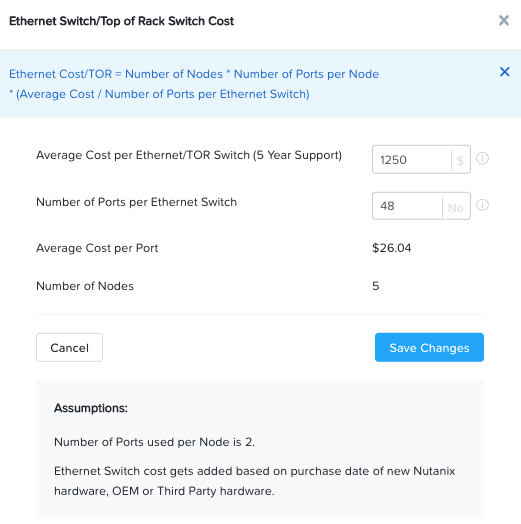
Includes Ethernet/top-of-rack switch costs that are automatically calculated depending only on number of nodes. The TCO model assumes each node uses 2 ports on a switch, there are 48 ports per TOR switch, and the cost of each TOR switch is $1,250 amortized on a per-month basis. Monthly telecom costs = {(Number of nodes*2 ports)/48 ports per switch}*($1,250)
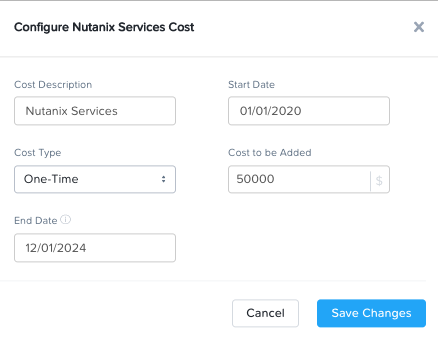
Services
This cost head includes any Nutanix or third-party services that you may have paid for. These costs are entered manually by the user and amortized to a monthly basis by TCO model.
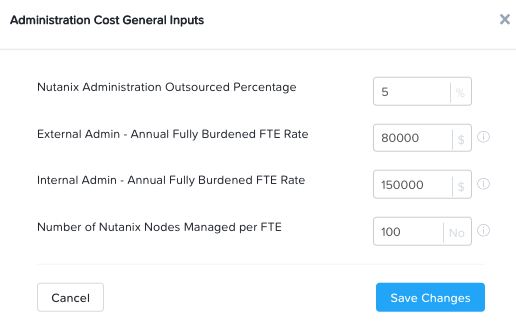
People
This cost head includes the cost incurred on IT Admin salaries for the administrative staff employed to maintain your Nutanix Private Cloud. The TCO model assumes a salary of $150,000 for internal admins and $80,000 for external admins based on US standards. You can specify what % of your Nutanix nodes are outsourced to external admins and what is maintained by internal admins. Salary amounts can be configured too.
The power of the TCO model lies in being able to centralize all costs associated with a private cloud into one unified view and providing a good approximation of a customer’s private cloud costs without any configuration. At the same time, the TCO model is highly customizable and can also be configured separately for each cluster.
Close the TCO view.
Cluster and VM Costing
The next step is to allocate the cluster level costs to individual VMs running on the cluster. It is mandatory to have Prism Pulse enabled so that Beam has the data on VM state and resources allocated to each VM on that cluster.
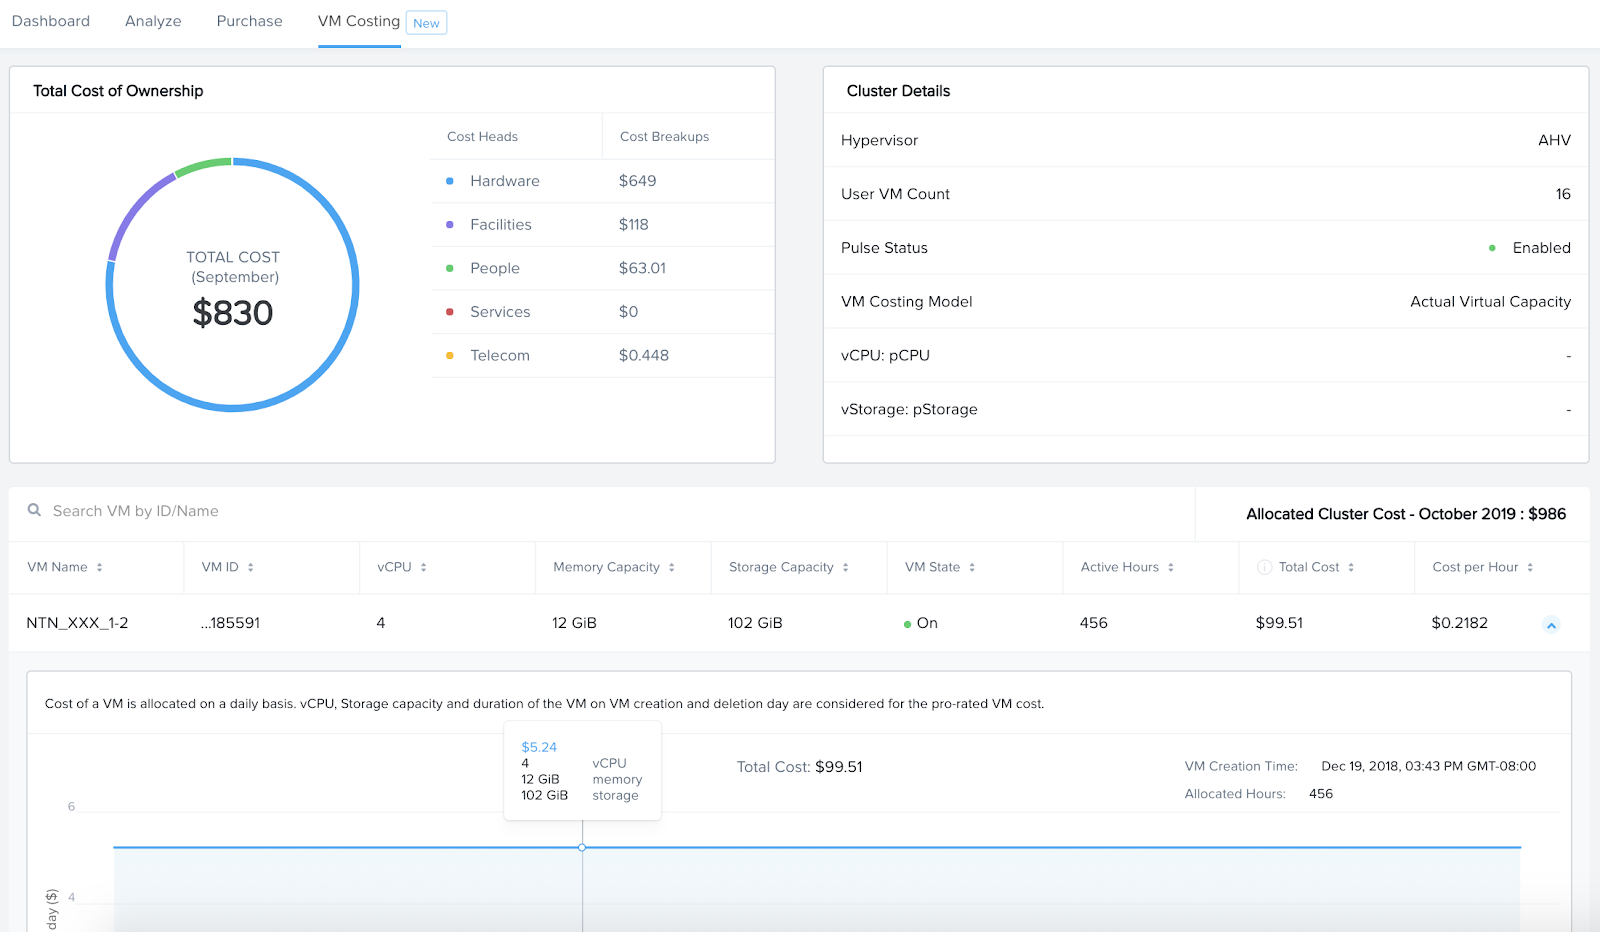
The total cluster level costs (calculated using the TCO model) are allocated to each VM depending on the number of hours that the VM is up and running and the capacity allocated to that VM relative to the overall capacity on the cluster. The CBL model is used to calculate cost per vCPU, cost per GB of storage and cost per GB of RAM. Those per unit costs are multiplied by the number of vCPUs, storage and memory allocated to each VM to get total VM costs. These costs are calculated out-of-the-box without needing any customer configuration.
Click Go Back to access the Beam Dashboard.
Select Analyze > VM Costing and search for Cluster ID ending in 4d3b.

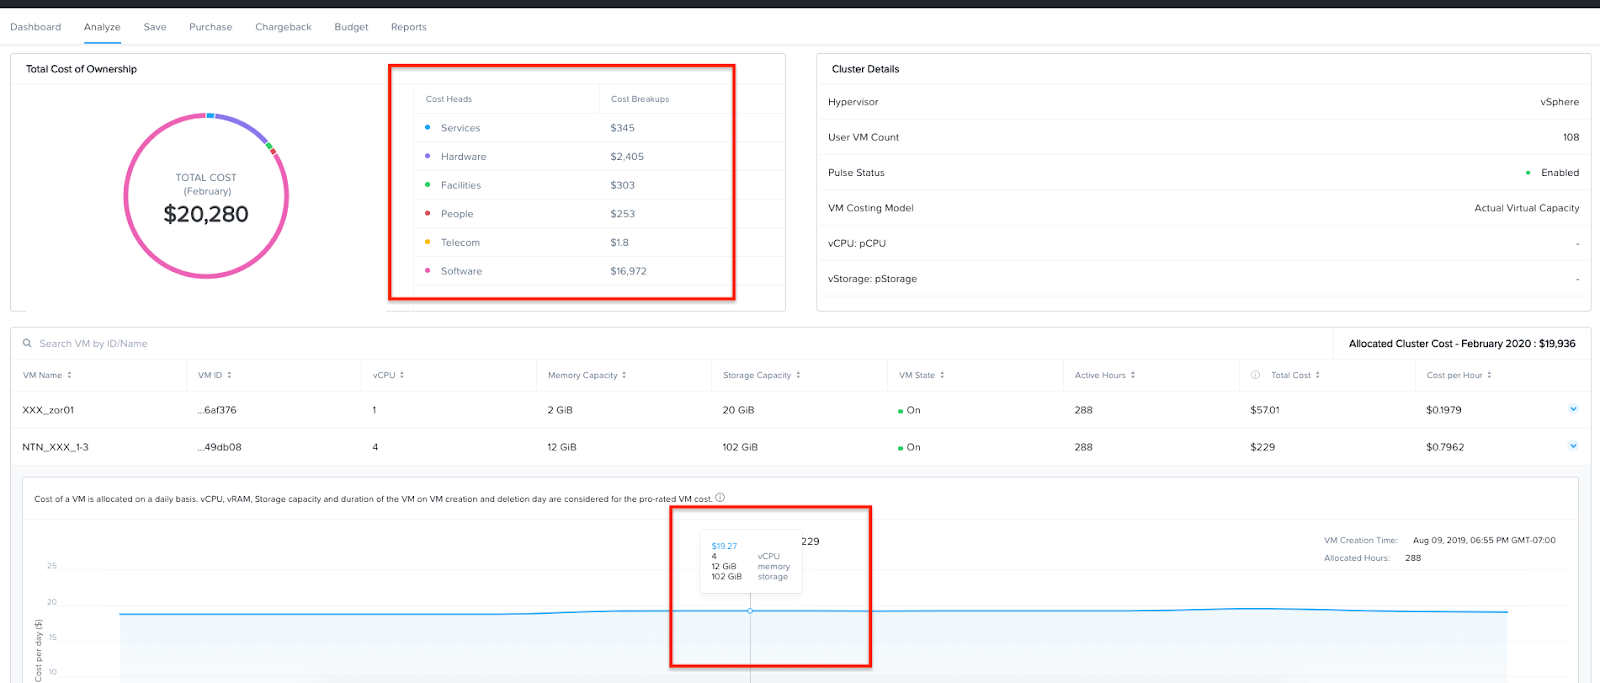
Click View Details to see the detailed TCO based cost breakdown for this cluster.
Note that the cost of each individual VM running in this cluster has been automatically calculated. If the TCO model has been accurately configured, these costs represent the true cost of running that VM in the Nutanix Private Cloud.
This concludes the walkthrough of Beam’s cost metering capabilities for Nutanix Private Cloud.
Note
It takes a few hours for VM costing data to show up after a Nutanix account is configured in Beam. The TCO model is baked into the product and VM costs will be calculated out-of-the-box using the default values of the TCO model. The model can be fine-tuned depending on customer need.
Cost Center Reporting
Now that we know what individual VMs cost to run on Nutanix, we can create cost views that aggregate consumption across various VMs and clusters. This is done by leveraging Prism’s Categories as tags. Depending upon how Prism Categories are defined, these cost centers can help to track spending across various users, teams, applications, geographies, etc.
Creating a Cost Center
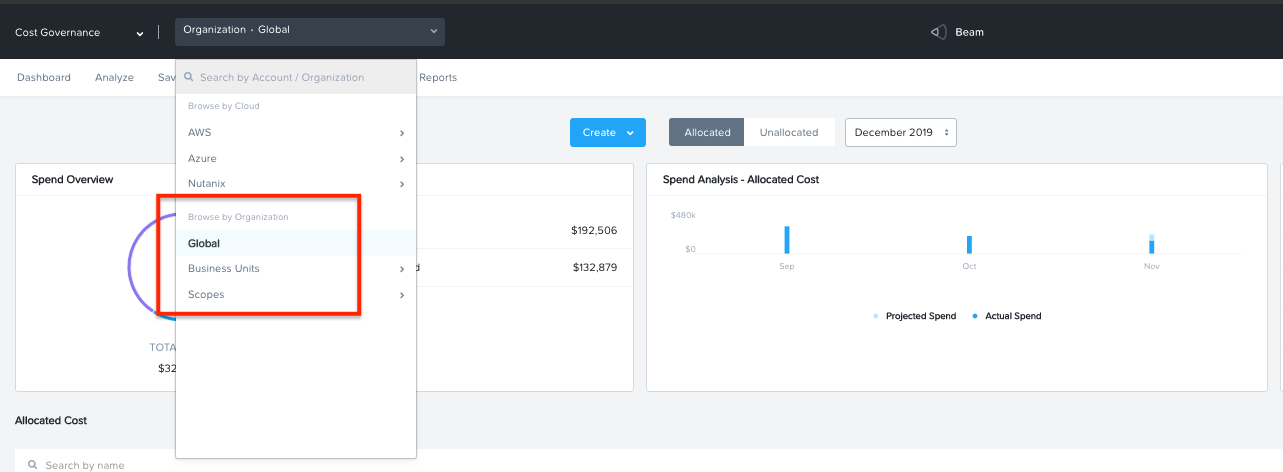
Navigate to the Global Organization view from the main menu and go to the Chargeback tab. You may notice some cost centers previously created by other users.
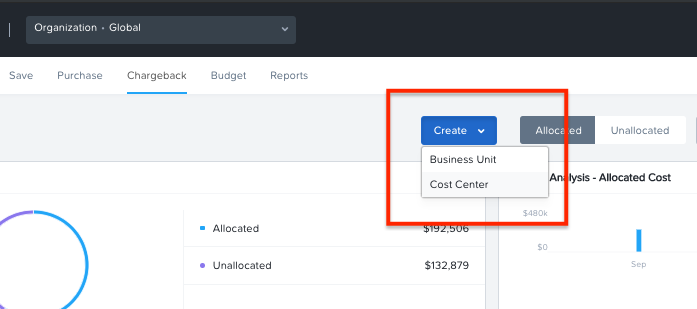
Select Create then Cost Center.
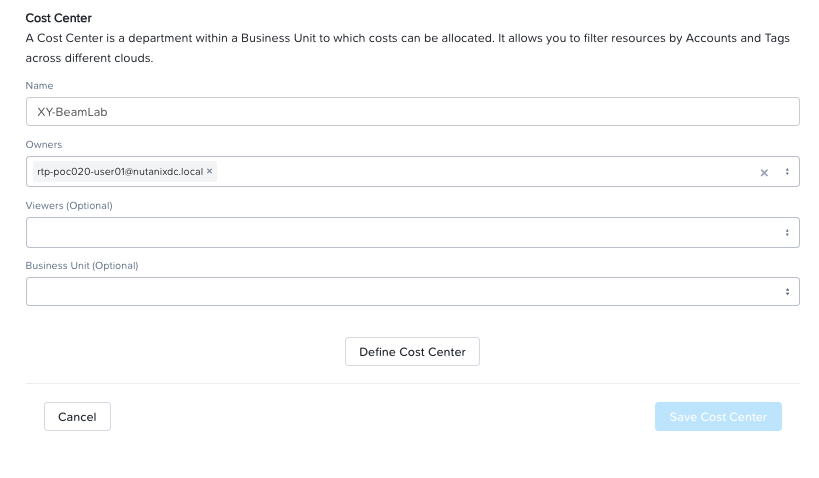
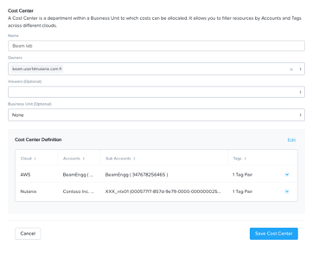
Provide a name for the cost center and click on Define Cost Center.
Note
In order to avoid conflicting work with another user, please start the name of your Cost Center with your initials. Example: XY-BeamLab
Fill out the following fields:
Cloud - Nutanix
Parent Account - Nutanix Cost Demo Account
Sub Accounts - Search for the Cluster ID ending in 4d3b
Key Set - nx:App
Value Set - Select any available VDI### value
Note
The ### will be a three-digit number. You may select any number between 001 to 080. This is being done to provide a unique key-value pair for each lab attendee because each key-value pair can only be in a unique cost center to avoid double counting of VM costs in different cost centers.
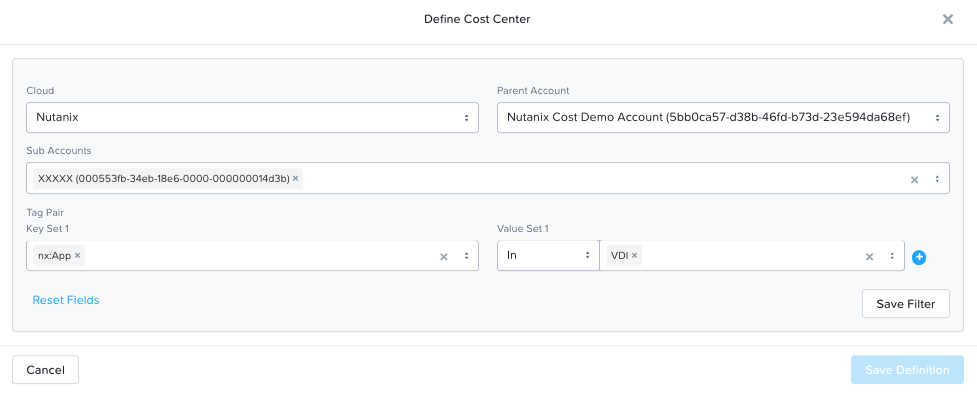
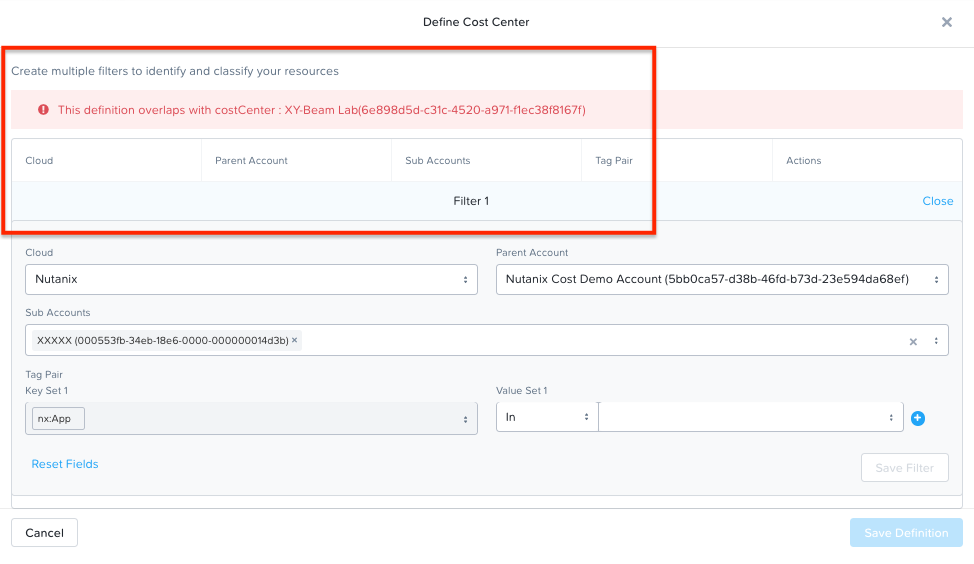
Select Save Filter to save the key-value pair used as a filter. You can add multiple key-value pairs to a cost center definition.
Note
Each Key-Value pair can only be added to a unique Cost Center. If you get an error message when you define your Key-Value pair, it is likely because another user already added that Key-Value pair to their Cost Center. Please select a different Key-Value pair.
Select Save Definition to save the definition of the cost center, and Save Cost Center to exit the view and go back to the Chargeback screen.
You have now created a cost center which will aggregate costs from all Nutanix VMs carrying the tag key App and tag value VDI###. You may add further Prism Categories as filters to the cost center definition. For example you could add a Region Category as tag key and Europe or Asia as tag values as long as those are defined in Prism. This would allow you to create Cost Centers to track VM spending across different regions.
(Optional) The cost center definition can be made to be truly multi-cloud. If your customer wants to extend their cost center definition to also include public cloud resource costs, that can be done in the same way by adding public cloud accounts and tag-key pairs to the same cost center definition. This is a very powerful capability of Beam immensely helping customers that use both public and private clouds by providing a unified view of all cloud resource costs in the same cost center.
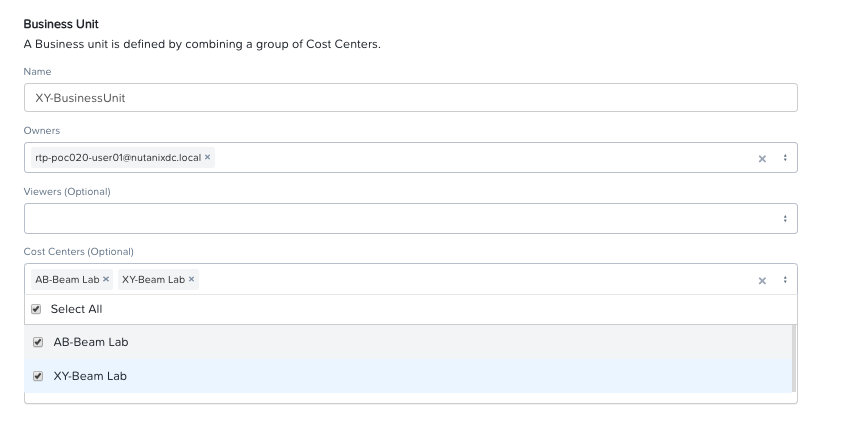
Some customers may want to have several cost centers reporting to a common parent entity. For example, you may want to track the costs separately for different dev and prod teams all reporting to the same Engineering department. You can do this in Beam by defining a Business Unit which is nothing but a combination of multiple cost centers. Each Cost Center can only belong to one Business Unit.
Chargeback & Budgeting
Chargeback Unallocated Spend
Not all VMs may be tagged with Category values that you specify in cost centers. Often times you will find that there will be spending that did not fit a cost center definition. These costs can be captured through Chargeback.
Navigate to the Chargeback > Unallocated spend view.
Search for the cluster ID ending in 4d3b.
Click on View Details to see the details of spend on this cluster that did not get allocated to any cost center.
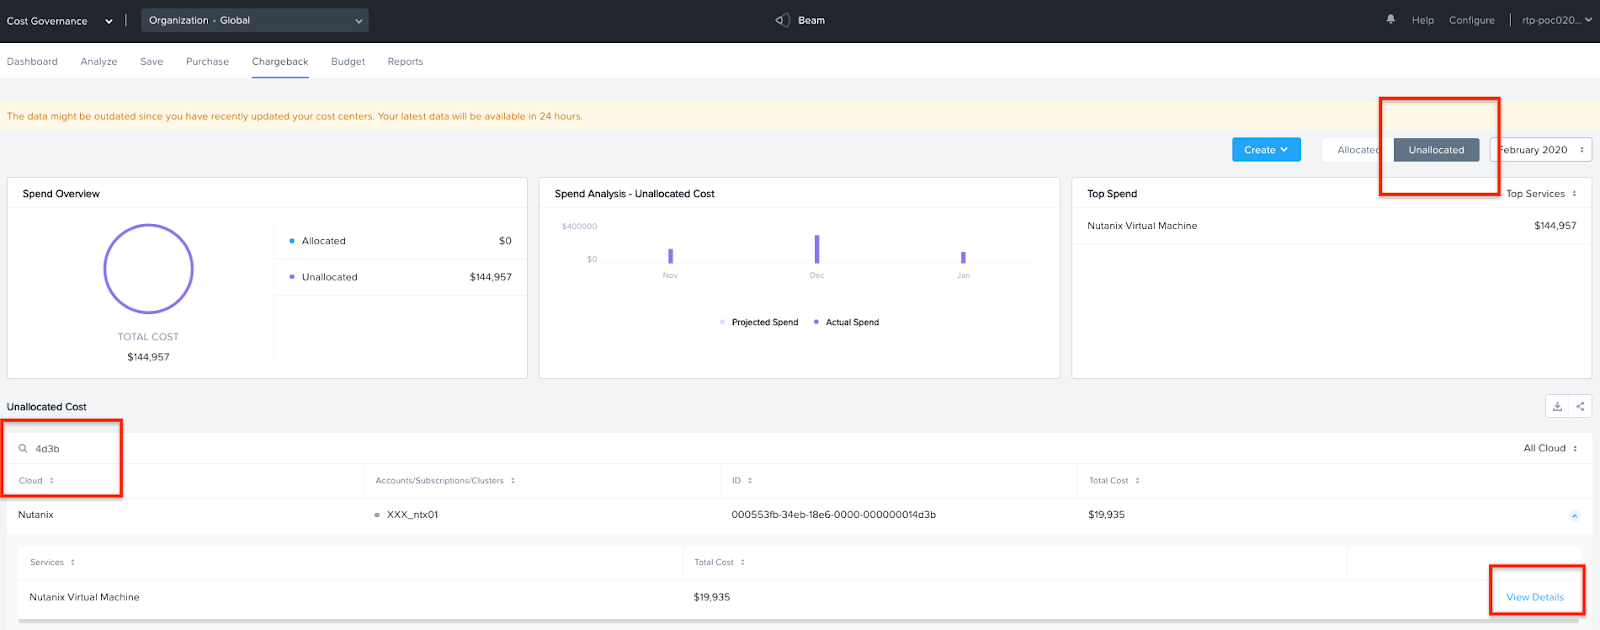
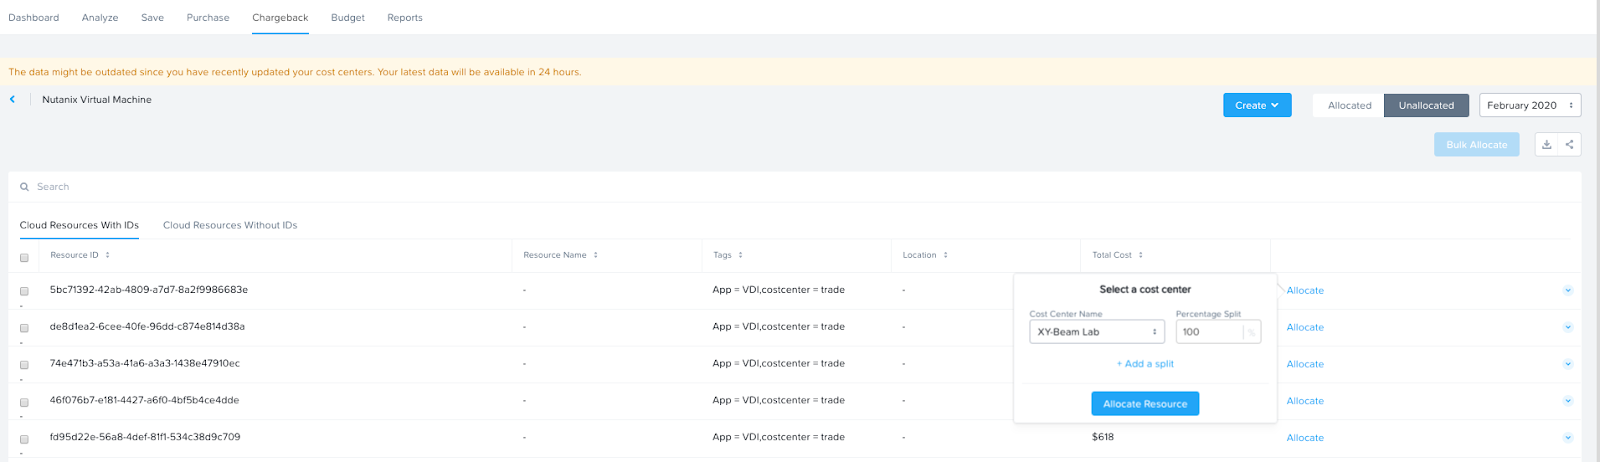
If you find any unallocated spend from some VMs, you can select Allocate and choose the cost center(s) that you want to allocate that spend to.
You can also split the spend across multiple cost centers. Select the cost center you had created, XY-BeamLab, and allocate 100% of the spend of this VM to that cost center. You only need to do this once. Any future spending by the same VM will be automatically allocated to that cost center.
This feature is extremely helpful to identify shadow spending outside of a customer’s cost center and business unit structure, and allows a financial admin to more accurately map cloud consumption to appropriate owners so that customers can be aware of who is responsible for spending in their cloud.
Budget Alerts
In this exercise you will define a budget for a cost center and set up a related alert.
Navigate to the Budget tab and click on Create a Budget.
Select Business Unit/Cost Center based Budget and click Next.
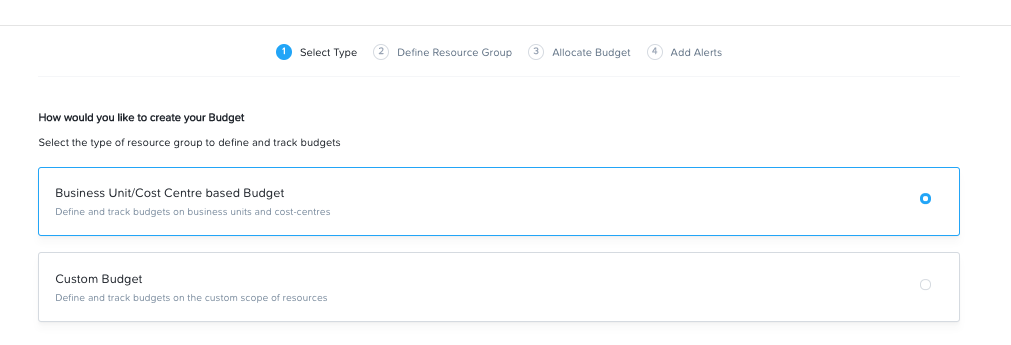
Alternatively, Beam also allows you to create a custom resource group using a combination of accounts, services, and tags, and then set up budget alerts on the custom resource group.
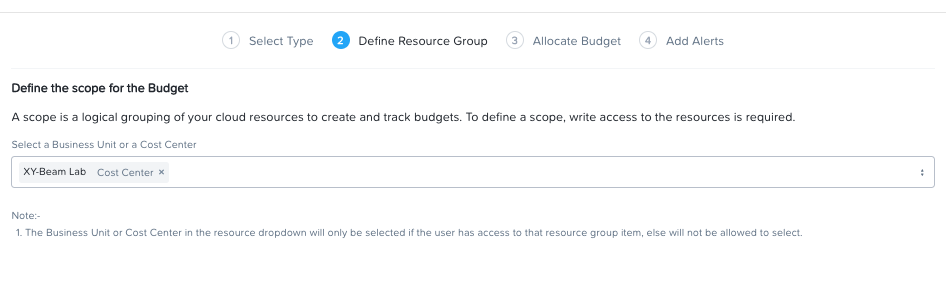
Select the Cost Center you created in the previous exercise.
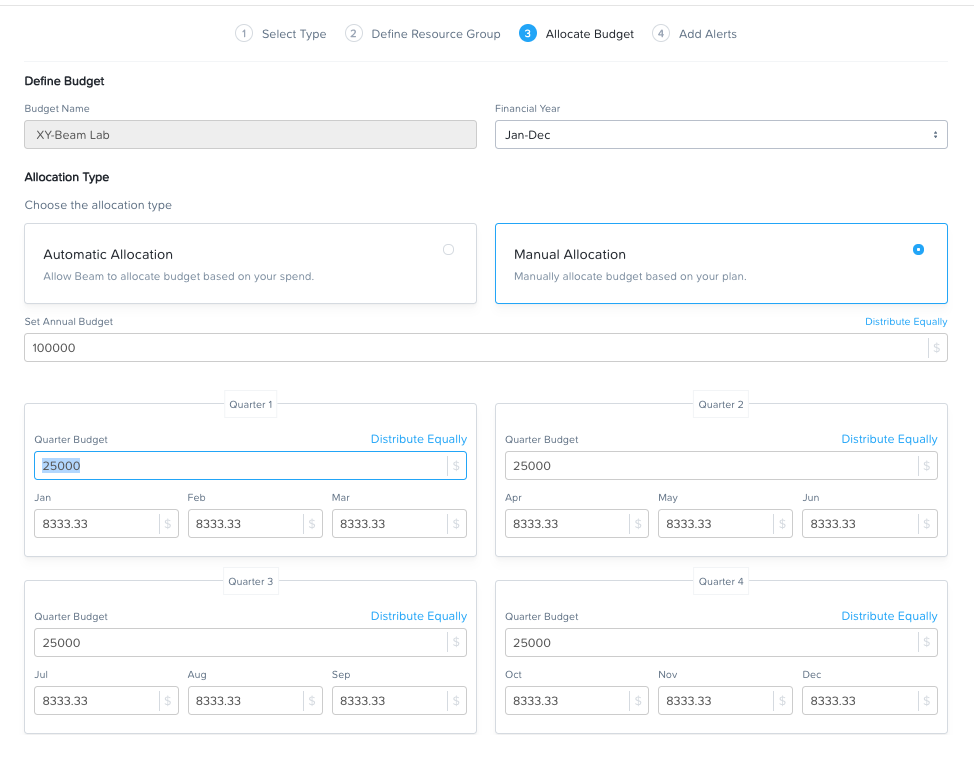
Select Manual Allocation.
This will allow you to customize values for the budget at an yearly, quarterly or monthly level.
Enter the annual budget to be $100,000. It will be allocated equally to each month.
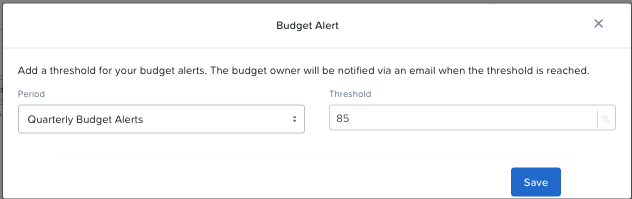
Finally, beside Quarterly Budget Alerts, click Create.
Set a Threshold value of 85% and click Save.
Add your email address under Alert Notifications and click Save.
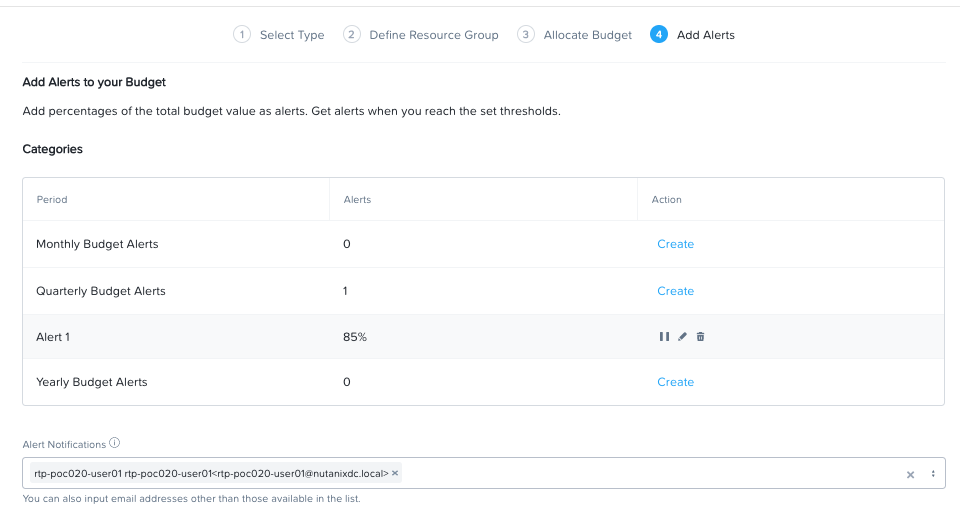
You have now created a budget alert to be notified when spending in your cost center goes above a certain threshold relative to your configured quarterly budget.
This completes the Private Cloud Cost Governance lab. You may log out of your Beam account.
Takeaways
Beam’s cost governance module helps you identify cost of VMs running on Nutanix, allocate them to cost centers, setup chargeback reports & budget alerts.
You can create multi-cloud cost centers using public cloud tags and Prism categories to track spending across both private and public clouds
Nutanix costs can be configured using a highly customizable TCO model that helps you identify your true cost of running your private cloud
Beam helps you keep your cloud spending in control and drives financial governance in a multi-cloud environment