Files: Create NFS Export
Overview
In this exercise you will create and test a NFSv4 export, used to support clustered applications, store application data such as logging, or storing other unstructured file data commonly accessed by Linux clients.
Using NFS Exports
Enabling NFS Protocol
Note
Enabling NFS protocol only needs to be performed once per Files server, and may have already been completed in your environment. If NFS is already enabled, proceed to Creating the Export.
In Prism Element > File Server, select your file server and click Protocol Management > Directory Services.
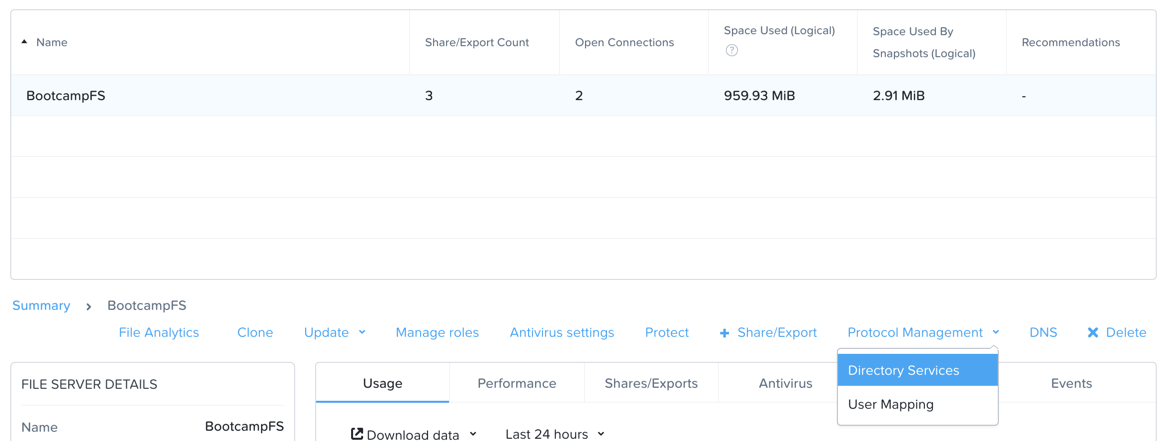
Select Use NFS Protocol with Unmanaged User Management and Authentication, and click Update.

Creating the Export
In Prism > File Server, click + Share/Export.
Fill out the following fields:
Name - logs
Description (Optional) - File share for system logs
File Server - BootcampFS
Share Path (Optional) - Leave blank
Max Size (Optional) - Leave blank
Select Protocol - NFS
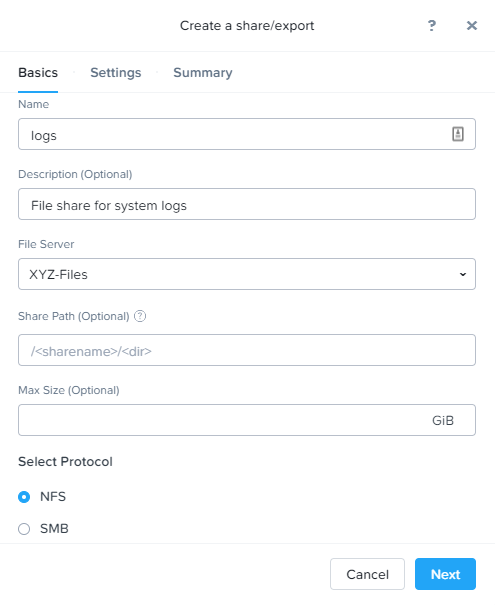
Click Next.
Fill out the following fields:
- Select Enable Self Service Restore
These snapshots appear as a .snapshot directory for NFS clients.
Authentication - System
Default Access (For All Clients) - No Access
Select + Add exceptions
Clients with Read-Write Access - The first 3 octets of your cluster network.* (e.g. 10.38.1.*)
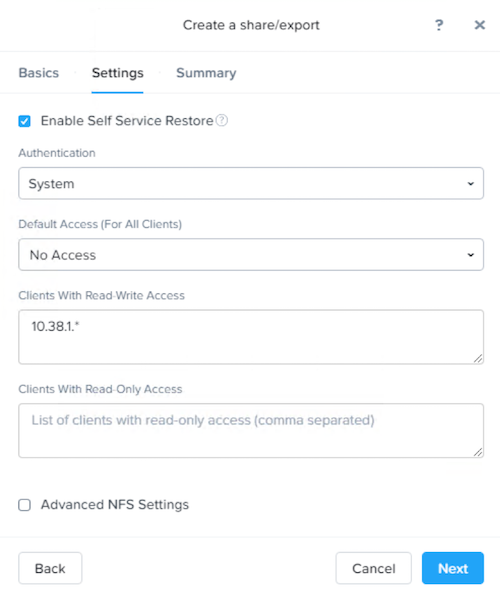
By default an NFS export will allow read/write access to any host that mounts the export, but this can be restricted to specific IPs or IP ranges.
Click Next.
Review the Summary and click Create.
Testing the Export
You will first provision a CentOS VM to use as a client for your Files export.
Note
If you have already deployed the Linux Tools VM as part of another lab, you may use this VM as your NFS client instead.
In Prism > VM > Table, click + Create VM.
Fill out the following fields:
Name - Initials-NFS-Client
Description - CentOS VM for testing Files NFS export
vCPU(s) - 2
Number of Cores per vCPU - 1
Memory - 2 GiB
- Select + Add New Disk
Operation - Clone from Image Service
Image - CentOS
Select Add
- Select Add New NIC
VLAN Name - Secondary
Select Add
Click Save.
Select the Initials-NFS-Client VM and click Power on.
Note the IP address of the VM in Prism, and connect via SSH using the following credentials:
Username - root
Password - nutanix/4u
Execute the following:
[root@CentOS ~]# yum install -y nfs-utils #This installs the NFSv4 client
[root@CentOS ~]# mkdir /filesmnt
[root@CentOS ~]# mount.nfs4 BootcampFS.ntnxlab.local:/ /filesmnt/
[root@CentOS ~]# df -kh
Filesystem                      Size  Used Avail Use% Mounted on
/dev/mapper/centos_centos-root  8.5G  1.7G  6.8G  20% /
devtmpfs                        1.9G     0  1.9G   0% /dev
tmpfs                           1.9G     0  1.9G   0% /dev/shm
tmpfs                           1.9G   17M  1.9G   1% /run
tmpfs                           1.9G     0  1.9G   0% /sys/fs/cgroup
/dev/sda1                       494M  141M  353M  29% /boot
tmpfs                           377M     0  377M   0% /run/user/0
BootcampFS.ntnxlab.local:/             1.0T  7.0M  1.0T   1% /afsmnt
[root@CentOS ~]# ls -l /filesmnt/
total 1
drwxrwxrwx. 2 root root 2 Mar  9 18:53 logs
Observe that the logs directory is mounted in
/filesmnt/logs.Reboot the VM and observe the export is no longer mounted. To persist the mount, add it to
/etc/fstabby executing the following:echo 'BootcampFS.ntnxlab.local:/ /filesmnt nfs4' >> /etc/fstab
The following command will add 100 2MB files filled with random data to
/filesmnt/logs:mkdir /filesmnt/logs/host1 for i in {1..100}; do dd if=/dev/urandom bs=8k count=256 of=/filesmnt/logs/host1/file$i; done
Return to Prism > File Server > Share > logs to monitor performance and usage.
Note that the utilization data is updated every 10 minutes.