Networking Configuration Lab
Overview
Learn how to set up a network in the cluster using Prism. The networks you create in the steps below provide VMs with connectivity by assigning the appropriate networks for the VMs’ respective NICs.
AHV Networking Background
AHV leverages Open vSwitch (OVS) for all VM networking. OVS is an open source software switch implemented in the Linux kernel and designed to work in a multiserver virtualization environment. Each AHV server maintains an OVS instance, and all OVS instances combine to form a single logical switch.
Each node is typically uplinked to a physical switch port trunked/tagged to multiple VLANs, which will be exposed as virtual networks.
VM networking is configured through Prism (or optionally CLI/REST), making network management in AHV very simple. In the following exercise you will walk through virtual network creation in AHV.
With AHV, you can also setup a DHCP server to automatically provide IP addresses for VMs using the IP address management (IPAM) service. Meaning you don’t have to setup a separate DHCP server for the network. Which makes network management easier.
Additional details about AHV networking can be found here.
Virtual Networks
Similar to a VMware “distributed portgroup”
Each virtual NIC belongs to exactly one virtual network
Each virtual network is a common point of configuration for a group of virtual NICs
Physical switch port must be configured to trunk VLAN
Virtual NICs of VMs
Each vNIC of a VM belongs to exactly one virtual network
For IPAM-enabled networks, vNICs get life-long static IP assignments
User may configure pools to automatically allocate IPs, or specify the IP manually
IP Address Management (IPAM)
Integrated DHCP Server
AHV intercepts DHCP requests from guests on IPAM networks, and injects responses
Virtualization admin manages a range of IP addresses
Supports arbitrary DHCP options, with UI support for DNS and TFTP configuration
Configure Network
Note
In the following exercise you will create networks using invalid VLANs, meaning no VM traffic will be transmitted outside of an individual host. This is expected as the exercise is for demonstration/education purposes only.
Setup User VM Network
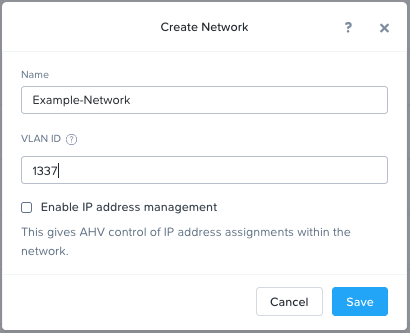
Connect to Prism Element and create a network for user VM interfaces. Use any VLAN other than 0, and do not enable IP address management.
In Prism Element > VM, click VMs, then click Network Config.
Select VM Networks, then click + Create Network.
Fill out the following fields and click Save:
Name - Initials-Network
VLAN ID - A value (< 4096) other than your Primary or Secondary network VLANs
Do not select Enable IP Address Management
The final result should look like the image below.

The configured virtual network will now be available across all nodes within the cluster. Virtual networks in AHV behave like Distributed Virtual Switches in ESXi, meaning you do not need to configure the same settings on each individual host within the cluster. When creating VMs in IPAM managed networks, the IP can optionally be manually specified during vNIC creation.
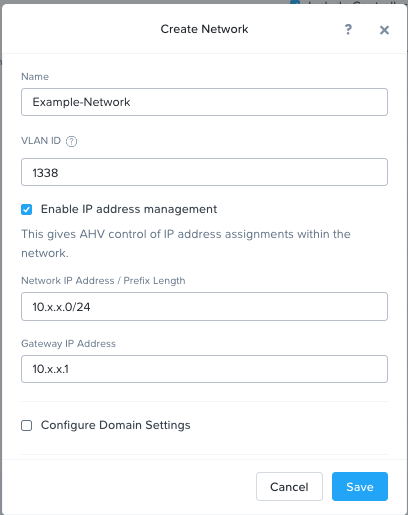
Setup User VM Network with IPAM
Create another network, but this time enable IPAM.
Fill out the following fields and click Save:
Name - Initials-Network_IPAM
VLAN ID - A value (< 4096) other than your Primary or Secondary network VLANs
Select Enable IP Address Management
Network IP Address / Prefix Length - 10.0.0.0/24
Gateway - 10.0.0.1
Do not select Configure Domain Settings
Create Pool - 10.0.0.100-10.0.0.150
Do not select Override DHCP Server
Note
It is possible to create multiple pool ranges for a network.
The configured virtual network will now be available across all nodes within the cluster. VMs with vNICs on this network will receive a DHCP address from the range specified. This IP assignment lasts for the life of the VM, avoiding the need to depend on DHCP reservations or static IPs for many workloads.
Takeaways
It’s very easy to setup a network in the cluster in order to establish VM connectivity.
IPAM is very simple to setup within a network and it can greatly simplify IP management within the cluster.